Showing posts with label Tutorial-Photoshop and PSE. Show all posts

Friday, May 5

CoffeeShop "Underwater Luxe 2" Fine Art Photoshop/PSE Action!


Happy Friday! One of my most downloaded Photoshop/PSE actions is the Underwater Luxe. I love that action but after using it for some time I wanted to write an updated version that I believe is better. Today you can download this update called Underwater Luxe 2. Yes, a very original name. Hee hee!

This action reduces haze, adds beautiful dark contrast, and allows you to remove blue casts off and smooth skin in underwater images. But it isn't only for portraits!

I have a step-by-step tutorial posted below (I overdid the effect somewhat so it was easier to see a difference on a small screen). Download the free action near the bottom of this post.

CoffeeShop "Underwater Luxe 2" Tutorial: 


Run "Underwater Luxe 2". A Color Range pop-up will appear, this step is for skin smoothing and is optional. If you are using this on a portrait, simply click on the skin area that you wish to smooth to select it and adjust the Fuzziness to taste. Just leave "as-is" if you don't need skin smoothing.

 
Adjust the Radius and Threshold setting until you are satisfied with the skin smoothing (or do nothing if you don't need this layer). You will be able to dial it down after the action finishes so if anything, overdo it a little.

 
This is what the image looks like after "Underwater Luxe 2" has finished. Lovely, right?


Click to select the Luxe's layer mask and use your favorite selection method to select the person (or animal/fish) where you want to remove some of the dark contrast. Then go to Edit<Fill and fill the layer mask with 50% gray. Or just start painting over the image with a low opacity black brush.

 
If you want to remove more Luxe off the skin, use a soft black brush at low opacity where needed.

 
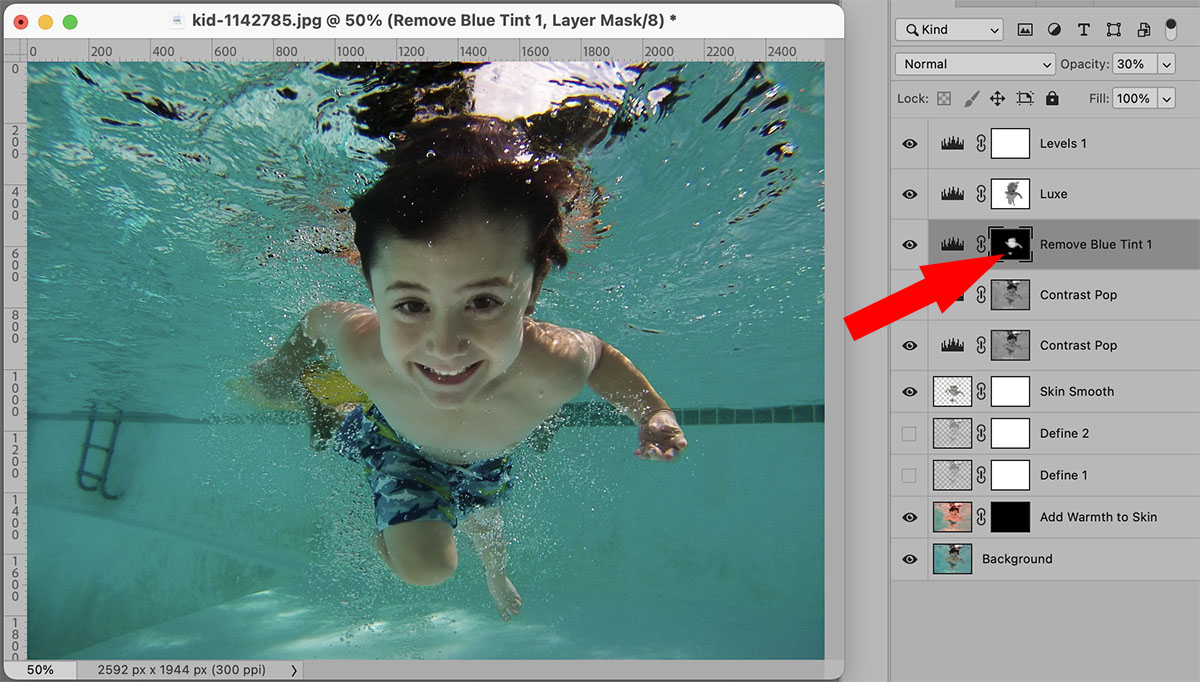
Click to select the Remove Blue Tint 1 layer's mask and use a soft white brush to remove any blue tint off of skin/eyes/teeth.


Keep both Contrast Pop layers on and adjust each opacity to taste. Turn off the Skin Smooth layer if you don't need it or adjust its opacity. Adjust the Define 1 and Define 2's opacity to taste. Then click on the Add Warmth to Skin's layer mask and use a low opacity white brush to gently add back some additional warmth to skin if needed.
 
As a final step, open up the top Levels 1 layer and adjust the sliders to taste. Now it is finished and I think it looks great! Note: I did overdo the edit slightly so that you can see the changes on a small screen.
 
Here is one more, you don't just use this action on people!

Download the CoffeeShop "Underwater Luxe 2" Fine Art Photoshop/PSE Action!

Do you want to download thousands of professional CoffeeShop PSE/Photoshop actions (including exclusive ones not found anywhere for free), textures/overlays, scrapbooking papers, clip art/design elements, photo storyboards and frames, and Lightroom presets from this site in one convenient zipped file AND help support this one-woman blog?

Just click here for my CoffeeShop Mega Download Pack!

Friday, April 21

CoffeeShop "Linnaeus" Fine Art Texture Set!

I am BACK!  I have had a few people check on me on my Facebook page and I really appreciate their concern. Luke and I have been working full-time at my husband's business, filling in until we hired some new staff. That put a damper on the time and energy I needed to post here on my blog, but now we have a full staff and I am back to working part-time for Paul (when needed). I really missed creating.

So a few things. First, my CoffeeShop MegaPack is on sale this month, so please check it out! And if you have purchased it already within two years, email me if you want my newest version for free. I just updated it today if you want my newest version!

Second, I am updating all of my download links. Many of the older ones are broken or blocked by some browsers because the "HTTP" is not "HTTPS". When I uploaded my older freebies there was no "S" to be had, so I am painstakingly going back and adding that blasted "S". If you are having issues downloading, simply copy the download link to Notepad or Word and change the "HTTP" to "HTTPS" and the link will work. If your browser allows you to click on the old link it will be directed to the secure site automatically. And if you find any broken links or issues, just leave a comment on that post and I will fix it.

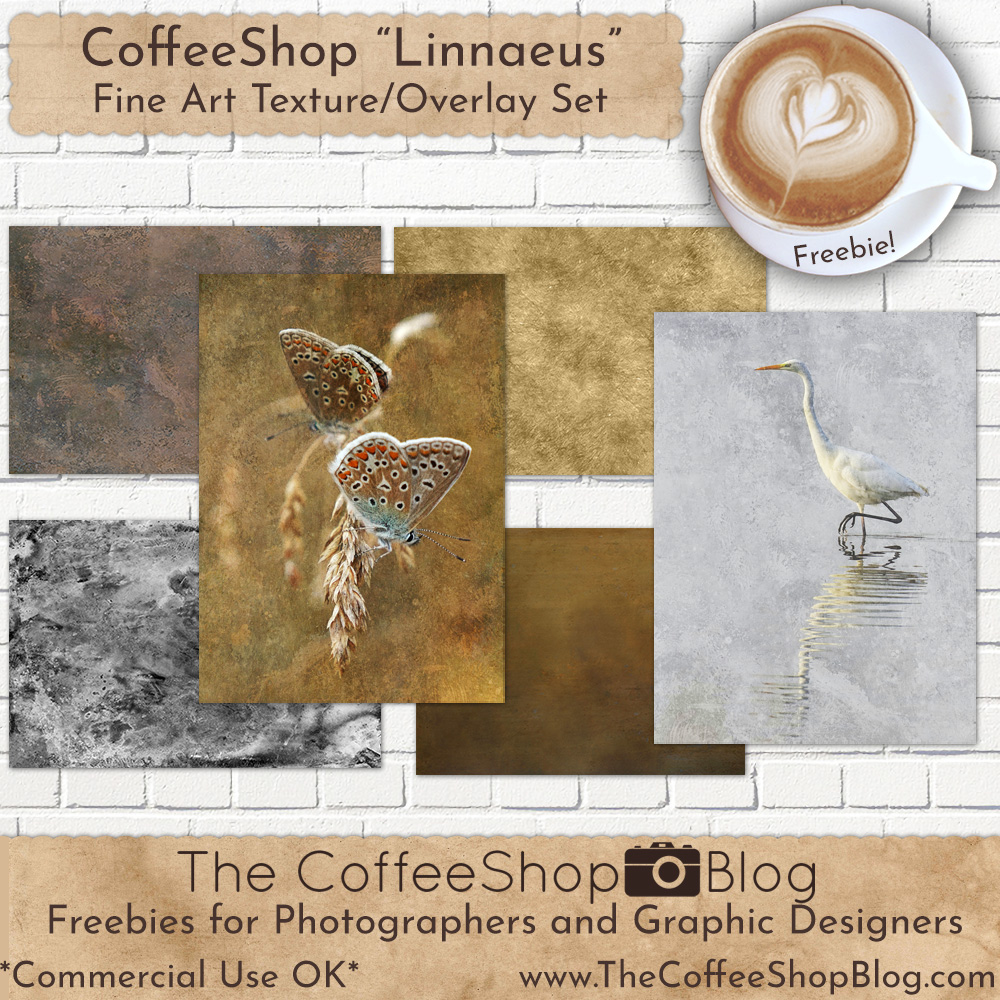
Third, I am posting a new fine art texture set called "Linnaeus". These look gorgeous overlaid on images or used alone as papers. I have posted two of my editing recipes below using this set. You can download the textures for free using the link toward the bottom of this post.


  Download the CoffeeShop "Linnaeus" Fine Art Texture Set!

Do you want to download thousands of professional CoffeeShop PSE/Photoshop actions (including exclusive ones not found anywhere for free), textures/overlays, scrapbooking papers, clip art/design elements, photo storyboards and frames, and Lightroom presets from this site in one convenient zipped file AND help support this one-woman blog?

Just click here for my CoffeeShop Mega Download Pack!

Wednesday, September 21

CoffeeShop "Dashwood" Fine Art Texture/Overlay/Paper Set!


Today is the last day of summer and I am so ready for fall. I even purchased a pretty fall tablecloth for my dining room table and I usually don't theme decorate for any holiday other than Christmas. We are all ready for sweater weather, but this week our heat indexes are over 100. Gotta love Texas. 

If you have been following my blog you know I have a passion for textures. Today I put together a new distress vintage set of papers. I love this set so much! Use them layered over images (see my tutorial below) or alone as papers in your own designs. These come with free commercial terms-of-use. The free download is toward the bottom of this post.

Check out all of my other textures/papers/overlays!

CoffeeShop "Dashwood" Texture Tutorial:


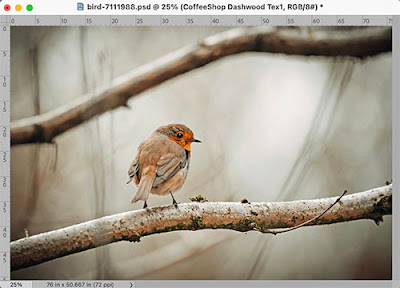
Place the CoffeeShop Dashwood Tex1 on top of the image and put it in Overlay blending mode.

Duplicate the texture layer (Ctrl-T) and desaturate it (Ctrl-D). Then add a layer mask and paint that layer off the robin.

Add a Color Lookup Layer (only in Photoshop) in Soft Warming Look. Or run one of my many warm-tinted actions on the image. Then admire your really pretty edit and print it on a card or hang it on your wall!

Download the CoffeeShop "Dashwood" Fine Art Texture/Overlay/Paper Set!

 Do you want to download thousands of professional CoffeeShop PSE/Photoshop actions (including exclusive ones not found anywhere for free), textures/overlays, scrapbooking papers, clip art/design elements, photo storyboards and frames, and Lightroom presets from this site in one convenient zipped file AND help support this one-woman blog?

Just click here for my CoffeeShop Mega Download Pack!

Tuesday, September 13

CoffeeShop Photoshop/PSE Tutorial" "Autumn Pumpkin Card"!


It has been ages since I posted a design Photoshop/PSE tutorial. I write tutorials for the Graphics Fairy but haven't taken the time to add more tutorials here. Well, today I was inspired to post a fall-inspired card design tutorial!

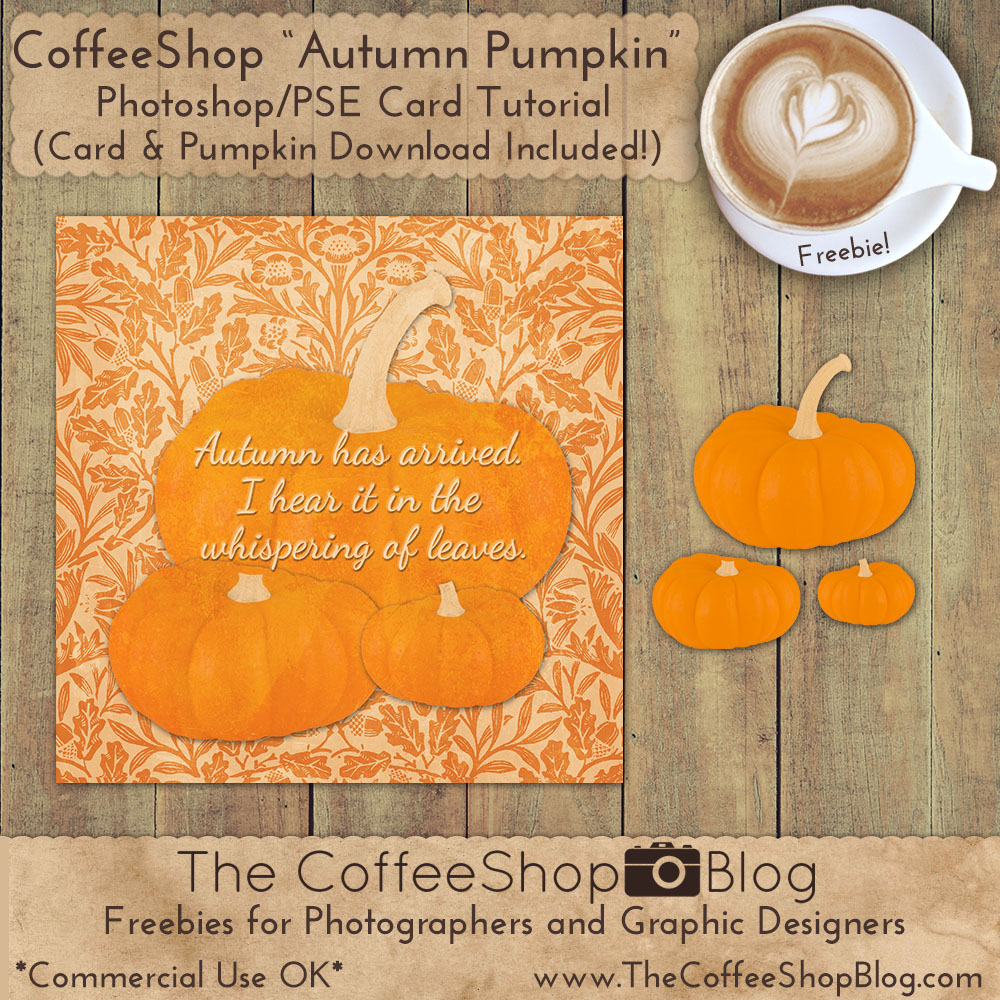
In this tutorial I show you how I made the painted pumpkins (included in the download below) and then use them along with one of my Orange Morris textures and a daguerreotype texture to create a pretty 5 by 5 greeting card. 

If you want to get all my newest freebie posts sent to your email, I just added a subscribe via email link on the top of my right sidebar!

Create a Autumn Pumpkin Card in Photoshop/PSE:

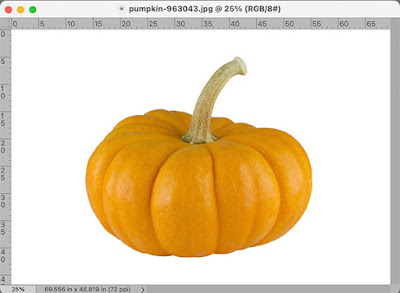
1. Download this free pumpkin image.

Use your favorite method to remove it off of the white background. 


2. "Hand Paint" Pumpkin: I wanted to use pumpkins that looked painted, so I wanted to show you a quick way to get that effect using a public domain photo.

Add a Solid Color bright orange layer (I just grabbed the darker orange from the Morris paper) and clip it to the pumpkin. Turn the opacity down to 75% or so, until the pumpkin looks painted but you can still see some of the details. 

Use a black hard brush on the layer mask to remove the orange from the stem.


3. Clip a lighter orange (from the paper) Solid Color layer on top around 75% opacity and fill the layer mask with black. 

Use a hard white brush to add the color to the stem.

Now we have a lovely painted pumpkin that has some nice detail.


4. Make a new document 5 inches by 5 inches, 300 pixels/inch and center the Morris Fall 2 texture on top. 


5. Place the daguerreotype #2 texture on top in Soft Light blending mode, 55% opacity. This really adds a gorgeous worn effect.


6. Add the big pumpkin in the center under the daguerreotype texture and add a drop-shadow effect.

Note: The other two pumpkins are made from this big pumpkin. I just reduced their sizes, tilted or flipped them, and used a layer mask to remove part of the stem.


7. Add the other two pumpkins.


8. Select all three pumpkin layers and center them in the middle of the card.


9. Add your quote or greeting (I used Dancing Script OT) and add a drop-shadow and/or embossing if you want.

Isn't this cute! You can download this version, a version without the quote, and the three pumpkins down below.


 Do you want to download almost everything on this blog in one download AND support a small woman-owned business?

Just click here for my CoffeeShop Mega Download Pack!

Wednesday, August 31

CoffeeShop Photoshop/PSE Tutorial: From Vintage Scrap to Seamless Patterned Paper!


Yesterday I posted a beautiful set of 1880's fabric papers I created from an Old Pacific Print Works sample book. I have had several requests to put together a tutorial on how I do this, so here it is!

CoffeeShop Photography Photoshop/PSE Tutorial: From Vintage Scrap to Seamless Patterned Paper:


I found this page in this fabric sample set

I love the rose with gray background fabric sample so I selected it using the Marquee tool and then cropped it out (Image<Crop).


This is the selection.


I pressed Ctrl-T to free-transform the fabric scrap and pulled out the selection on all corners to remove most of the rough edges.


Then I used both the spot healing and clone brush to fix the white edges.


To make this into a seamless pattern I applied the Offset filter (Filter<Other<Offset).


Click Wrap Around and then adjust the Horizontal and Vertical sliders until you can see seams that were originally the edges of the image.


I have circled both the horizontal and vertical seams above. These will have to be blended in so they won't be obvious in this pattern.


I used the spot healing and clone brush to fix the pattern. 

There was some reddish stain on part of the background so I cloned a clean gray background over it. I also remove some extra little flowers and added back leaves that had been cut off. 

These isn't really any tricks to making a nice pattern in this case other than knowing how to clone and heal. It can take some time, but worth it to get a perfect seamless pattern.


After you finish, then run another Offset filter with new settings on it to make sure you don't see any seams. If you see anything that looks off, clone or heal it.

If you are using Photoshop Elements, make a pattern of this scrap (Edit<Define Pattern) and apply this pattern on a new blank paper (I made mine 12 by 12 inches). If you see any blank or weird looking areas, just clone some flowers or other design elements over the original pattern and save this new version and check it again. Continue to do this until you are satisfied with your pattern.

If you have Photoshop Elements you are done! If you have Photoshop then read on to learn a nifty trick to simplify pattern making.


Photoshop only: If you have a newer version of Photoshop, now they have this amazing feature called Pattern Preview (View<Pattern Preview). If you check this and zoom out you can see how your pattern will look once applied to a larger area. 

The original pattern will have a blue box around it. You can spot heal or clone anywhere on the pattern and see live what is happening. Just make sure your changes are on a new layer on top so you can edit them.


I made a new layer and cloned a rose in the middle.


I free-transformed the rose to flip it and then used the erasure tool to remove any extra that was covering my original pattern.


Here is the finished seamless pattern paper. It looks great, you would never know I started with a dirty little fabric scrap.

If you have any questions please  leave a comment below! And if you have any photo-editing or graphic designs tutorial suggestions, please let me know. 

Do you want to download thousands of professional CoffeeShop PSE/Photoshop actions (including exclusive ones not found anywhere for free), textures/overlays, scrapbooking papers, clip art/design elements, photo storyboards and frames, and Lightroom presets from this site in one convenient zipped file AND help support this one-woman blog? 

 Just click here for my CoffeeShop Mega Download Pack!

Thursday, March 17

CoffeeShop "Heirloom Browns" Fine Art Texture/Overlay Set!


Happy St. Patrick's Day! I have to pull out my green shirt before the boys remember and start pinching me.


Today I wanted to share two really lovely distressed brown textures. These look gorgeous on images. Don't hesitate to desaturate them or change their colors for your own images (as seen in the image above), you aren't stuck with the brown. 


I wanted to show you this simple edit.


I ran the CoffeeShop "Cabernet  Afternoon" action on this image, adjusted the layers, and then added the Fremont texture from this pack in Overlay blending mode under the Cabernet layer.

I hope you enjoy playing with this new texture set!


Do you want to download all of my favorite professional CoffeeShop PSE/Photoshop actions (including exclusive ones not found anywhere for free), textures, papers, clip art/design elements, storyboards, and Lightroom presets in one convenient zipped file AND help support this blog? Just click here for my CoffeeShop Mega Download Pack!

Tuesday, February 22

CoffeeShop "Daguerreotypes" Fine Art Texture/Overlays


Today I wanted to share a beautiful set of damaged daguerreotypes that I edited from original public domain images found here.  These look so gorgeous on images, just play around with blending modes and fill colors.

I also like to use these types of textures overlayed on digital papers and other designs. It gives you an instant worn/vintage look.


CoffeeShop Tutorial: Using Daguerreotypes Textures in Photoshop/PSE


There are so many ways to use these these textures. In this edit I added the Daguerreotype 2 texture in Soft Light blending mode.


Then I added a golden Solid Color adjustment layer and put that in Soft  Light Blending mode to add some warmth to the image.


Do you want to download all of my favorite professional CoffeeShop PSE/Photoshop actions (including exclusive ones not found anywhere for free), textures, papers, clip art/design elements, storyboards, and Lightroom presets in one convenient zipped file AND help support this blog? Just click here for my CoffeeShop Mega Download Pack!