Showing posts with label Photo Editing Tutorial. Show all posts

Monday, April 24

CoffeeShop "Creamy Luxe" Photoshop/PSE Action Revisited!

I am going to start revisiting some of my older Photoshop/PSE actions every week. I have over 400 actions on this site and I love rediscovering old classics. It is spring, so why not play around with a perfect spring edit!

Today I wanted to edit with my "Creamy Luxe" action. I wrote this one back in 2015. I had an 11 and an 8 year old boy in the house back then, and I have no idea how I got anything done on my blog. This is a simple little action but is stunning applied on floral images and outdoor portraits.

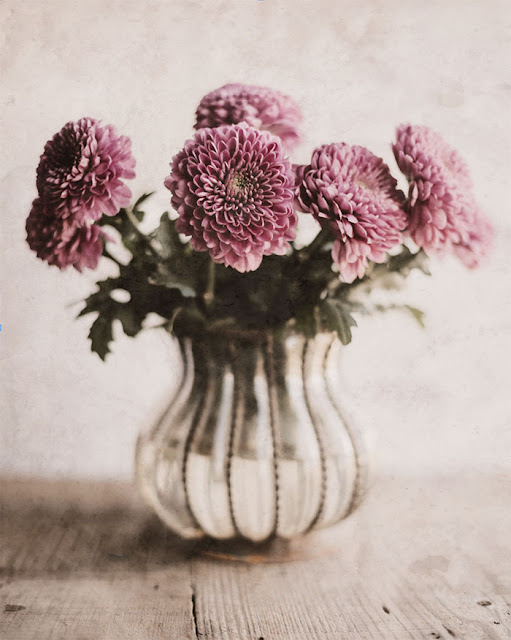
Here is an example photo edit using "Creamy Luxe". Download the original image here.

This is what the image looks like after running the action without any adjustments. This is pretty but I want to soften it even more.
I turned off the Define layer and brought up the Creamy layer from 50% to 90%. I love this edit so much!
Finally, I added one of my fine art textures. I used the Catlin 2b texture from this post. I desaturated the texture and applied it twice on top in Soft Light blending mode at 100% and then 50%.

 Download the print I made by clicking on the image or on this link.


  Visit the CoffeeShop "Creamy Luxe" Photoshop/PSE post to download the action!

Do you want to download thousands of professional CoffeeShop PSE/Photoshop actions (including exclusive ones not found anywhere for free), textures/overlays, scrapbooking papers, clip art/design elements, photo storyboards and frames, and Lightroom presets from this site in one convenient zipped file AND help support this one-woman blog?

Just click here for my CoffeeShop Mega Download Pack!

Monday, January 16

CoffeeShop "Just the Texture" Fine Art Kit


Today I wanted to share a new fine art texture kit. This set has four unique textures that include cracks, paint, and vintage-aged effects on a transparent background. They can be combined with any of my other textures or even used alone for a really nice effect. 


I love using textures on my images, but sometimes I want to add a textured effect to one of my already made texture or overlay. I created this new overlay set by editing different textures and removing everything from the background other than the specific texture I wanted to highlight. 


For example, the painted texture in this kit has a painterly texture on a transparent background. Add each of these textures to your image in Multiply, Screen, Soft Light or Overlay blending mode to get different effects along with another texture of your choice. I also love to invert the textures (making them white). You can also clip a Color Fill adjustment layer to them to change the colors. 

You can use these textures alone on your images, but I really think they shine used with another texture.

Here is the original image.

I added one of my Catlin textures on top in Overlay blending mode.

I added the TexK1b texture in this set to the image in Overlay. 

You could clip a Color Fill layer to the texture to change the distressing color.

Then I inverted the texture (made the texture white). This give a completely different effect. I erased the texture off the flower.

This is texture TexK1d inverted so it is white and put in Soft Light blending mode.

I hope you have fun playing with this kit and adding additional texture to your images!

Download the CoffeeShop "Just the Texture" Fine Art Kit!

Do you want to download thousands of professional CoffeeShop PSE/Photoshop actions (including exclusive ones not found anywhere for free), textures/overlays, scrapbooking papers, clip art/design elements, photo storyboards and frames, and Lightroom presets from this site in one convenient zipped file AND help support this one-woman blog?

Just click here for my CoffeeShop Mega Download Pack!

Wednesday, September 21

CoffeeShop "Dashwood" Fine Art Texture/Overlay/Paper Set!


Today is the last day of summer and I am so ready for fall. I even purchased a pretty fall tablecloth for my dining room table and I usually don't theme decorate for any holiday other than Christmas. We are all ready for sweater weather, but this week our heat indexes are over 100. Gotta love Texas. 

If you have been following my blog you know I have a passion for textures. Today I put together a new distress vintage set of papers. I love this set so much! Use them layered over images (see my tutorial below) or alone as papers in your own designs. These come with free commercial terms-of-use. The free download is toward the bottom of this post.

Check out all of my other textures/papers/overlays!

CoffeeShop "Dashwood" Texture Tutorial:


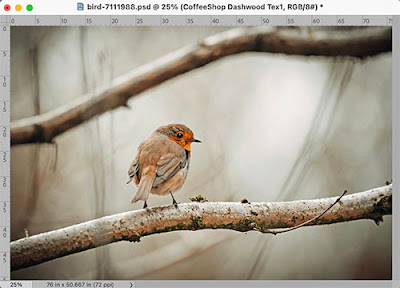
Place the CoffeeShop Dashwood Tex1 on top of the image and put it in Overlay blending mode.

Duplicate the texture layer (Ctrl-T) and desaturate it (Ctrl-D). Then add a layer mask and paint that layer off the robin.

Add a Color Lookup Layer (only in Photoshop) in Soft Warming Look. Or run one of my many warm-tinted actions on the image. Then admire your really pretty edit and print it on a card or hang it on your wall!

Download the CoffeeShop "Dashwood" Fine Art Texture/Overlay/Paper Set!

 Do you want to download thousands of professional CoffeeShop PSE/Photoshop actions (including exclusive ones not found anywhere for free), textures/overlays, scrapbooking papers, clip art/design elements, photo storyboards and frames, and Lightroom presets from this site in one convenient zipped file AND help support this one-woman blog?

Just click here for my CoffeeShop Mega Download Pack!

Thursday, March 17

CoffeeShop "Heirloom Browns" Fine Art Texture/Overlay Set!


Happy St. Patrick's Day! I have to pull out my green shirt before the boys remember and start pinching me.


Today I wanted to share two really lovely distressed brown textures. These look gorgeous on images. Don't hesitate to desaturate them or change their colors for your own images (as seen in the image above), you aren't stuck with the brown. 


I wanted to show you this simple edit.


I ran the CoffeeShop "Cabernet  Afternoon" action on this image, adjusted the layers, and then added the Fremont texture from this pack in Overlay blending mode under the Cabernet layer.

I hope you enjoy playing with this new texture set!


Do you want to download all of my favorite professional CoffeeShop PSE/Photoshop actions (including exclusive ones not found anywhere for free), textures, papers, clip art/design elements, storyboards, and Lightroom presets in one convenient zipped file AND help support this blog? Just click here for my CoffeeShop Mega Download Pack!

Tuesday, February 22

CoffeeShop "Daguerreotypes" Fine Art Texture/Overlays


Today I wanted to share a beautiful set of damaged daguerreotypes that I edited from original public domain images found here.  These look so gorgeous on images, just play around with blending modes and fill colors.

I also like to use these types of textures overlayed on digital papers and other designs. It gives you an instant worn/vintage look.


CoffeeShop Tutorial: Using Daguerreotypes Textures in Photoshop/PSE


There are so many ways to use these these textures. In this edit I added the Daguerreotype 2 texture in Soft Light blending mode.


Then I added a golden Solid Color adjustment layer and put that in Soft  Light Blending mode to add some warmth to the image.


Do you want to download all of my favorite professional CoffeeShop PSE/Photoshop actions (including exclusive ones not found anywhere for free), textures, papers, clip art/design elements, storyboards, and Lightroom presets in one convenient zipped file AND help support this blog? Just click here for my CoffeeShop Mega Download Pack!

Thursday, November 18

CoffeeShop Photoshop/PSE Tutorial: Create Heavenly Light Using Gradients!


Today I wanted to show you an easy technique to add gorgeous heavenly light to any image. This effect looks stunning on most outdoor images, but I really love using it on fall and winter scenes.

In this tutorial I will be using my CoffeeShop "Buttercream Beauty" Photoshop/PSE action and adding a  Gradient adjustment layer for the light effect.

Buttercream Beauty is one of my favorite actions but I posted it years ago and many of you have probably never seen it. It looks great on so many different images including portraits, still life, and landscapes. So I am excited to be using it in my newest tutorial.

CoffeeShop "Heavenly Light" Photoshop/PSE Tutorial:


Run the Buttercream Beauty action and adjust the layers to taste.


Click to select the Soft Buttercream 2 layer and add a Gradient adjustment layer.


Set the Gradient to Black to Transparent, Linear, Scale of 1%. I use these settings so I can easily adjust where I want the light breaking through. 

Adjust the Angle where you wish to see the light, in this case mainly from the upper right corner.


Double-Click on the Black to Transparent Gradient to open up the Gradient Editor and then click on the left color box as seen above and set it to Hex#f2dab4.


Do the same to the right box and then press OK.


Adjust the Scale to taste to soften the light effect. Then adjust the opacity of this new Gradient layer or try different blending modes.


Screen blending mode


Hard Light blending mode


Overlay blending mode


I wanted to show you one more example using a different color for the Gradient.

Run the Buttercream Beauty action.


This time add a burnt orange color to the left side of the Gradient and keep the right side the same as I used in the previous image. Then adjust the Scale to taste.

I hope you can use this method of editing on some of your images! Please leave any questions in the comments below.

Do you want to download all of my favorite professional CoffeeShop PSE/Photoshop actions (including exclusive ones not found anywhere for free), textures, papers, clip art/design elements, storyboards, and Lightroom presets in one convenient zipped file AND help support this blog? Just click here for my CoffeeShop Mega Download Pack!

Friday, August 6

CoffeeShop Photoshop/PSE Tutorial: Painterly Texture Effect!


I wanted to show you how I edited this owl image using the free "Munch" textures I posted earlier this week. This type of design would make gorgeous greeting card, stickers or prints for your wall. And it is such an easy edit!


Download the "Munch" textures and "Lady Echlin" letters to follow along with this tutorial. You can even save your final edit as a layered .psd file and add different images to make a set of prints or cards. I will show you how I do this in my tutorial below.

Note: You can download both of the 5x7 prints I made in this tutorial here.

CoffeeShop "Painterly Texture Effect" Photoshop/PSE Tutorial:


Open your image. You can download this owl one here.


Duplicate the image by pressing Ctrl(Cmd in Mac)-J.


Go to the top menubar and click Filter<Filter Gallery and use the Dry Brush Filter on the top image. 

I used Brush Size (3), Brush Detail (9), and Texture (1). If the effect is too much you can turn down the opacity of that layer.


Add the Munch 1 texture in Overlay blending mode.


I want to remove the blue tint from the owls but leave it on the rest of the image. To do this I clipped a Hue/Saturation layer to the Munch texture and set the Master Saturation to -50.


Fill the Hue/Saturation Mask with black and use a hard white brush at 100% opacity and paint over the owls. 

Note: To see where you are painting, click the "\" key to make the masked area red. Click "\" again to remove the red tint.


As you can see, only the background and stump have the blue tint from the texture.


Add the Munch 4 texture in Soft Light on top. This slightly warms up the entire image while adding a small amount of  additional texture.


Add the Lady Echlin 3a letter on top. Then invert it by clicking Ctrl(Cmd in Mac)-I.


Put the Echlin letter texture in Soft Light blending mode and use a hard black brush on the layer mask to remove it from the owls.


As a final step I like to soften the contrast of the original owl photo. To do this I added a Levels adjustment layer over the image and then increased the shadows and black Output slider until the image looked a little "hazy".


I am really happy with how this turned out! I think I would like to make a set of these for greeting cards.


The beauty of editing in Photoshop is that you can save your finished image with the layers and go back and add a different image to make a matching set of prints. 

To create this bird edit I simply deleted the owl images and dragged in the bird image. I followed the same steps (and repainted the layer masks) and added one additional layer.

To change the texture color, clip another Hue/Saturation layer to the blue Munch 1 texture. Then adjust the Master sliders to taste. I set Hue (-23), Saturation (+10), and Lightness (-7).

I hope you enjoyed this little tutorial and would love to see your own edits on my Facebook page!

Download the high resolution 5x7 prints I made in this tutorial on this page.

Do you want to download my favorite CoffeeShop PSE/Photoshop Actions and Lightroom Presets or Design Elements in one convenient zipped file AND help support this blog? Just click here for my action pack or here for all the actions/presets and professional design elements, storyboards, and textures.