Tuesday, September 27
CoffeeShop Frames 19!
Sorry I haven't posted much in the last days, but I have had two sick little boys. No big deal, just a virus; but they feel bad and they get grouchy when they are sick and can't play outside. Then I get grouchy and tired and don't feel like working on my computer or answering emails... Hopefully we will get back to normal by the end of the week.
But luckily I found these fun little clipping mask frames in my WIP's (works-in-progress) file that add a cool distressed edge effect to photos. You can use my Group-It action if you want to add the images to the clipping mask.
Download the free CoffeeShop Frames 19 set. If that download link does not work, you can download it from MediaFire.
And please check out the Pretty Presets giveaway on Laura's website! It is amazing!!! Just click on the image below to go there and read all about it.
Want all of my favorite CoffeeShop Actions or Design Elements in one simple download AND help support this blog? Just click here for my action pack or here for a download of some of my most popular design elements, storyboards, and textures.
Saturday, September 24
CoffeeShop Vintage Paper Set 1!
Happy day! Lori Peterson found some more amazing vintage papers and frames in her attic and she scanned them in and sent them my way to share with you! I put together two of the vintage papers for this download. I especially love the one with the old tape. They are really beautiful and can be used in so many ways, such as textures, cards, frames, blog design, etc. Thank you so much for sharing your personal vintage papers Lori!
Download the free CoffeeShop Vintage Digital Paper 1 Pack. You can also download it on MediaFire.
Want all of my favorite CoffeeShop Actions or Design Elements in one simple download AND help support this blog? Just click here for my action pack or here for a download of some of my most popular design elements, storyboards, and textures.
Tuesday, September 20
Dirty Hands and a Home School Tip
Imp is looking at some fresh-picked lavender in his hands. I only hope he doesn't try to eat any of it. Oh, those filthy hands...
So I discovered a great little tip to use when homeschooling a rambunctious 1st grader (Duke). Every fifteen minutes or so we both do a few minutes of exercise; usually involving jumping jacks, bottom kicks, virtual jump rope and boxing. Duke has trouble staying still while doing schoolwork and I found yelling at him to stop squirming and chewing on his pencils was not working. But the exercise really helps him focus and allows me to work out some of my frustration. ;-)
Monday, September 19
CoffeeShop Blogging UnWrapped Tutorial: Before/After Blog Photo MouseOver Tutorial!
We are finally getting some rain in Texas and the threat of wildfires in our area has been drastically reduced. Oh, I can't tell you how much we loved watching that rain pour down... We are still in a horrible drought, but thankfully the hot dry summer is almost over and we might start getting more rain.
I have been wanting to post before/after images using the mouse-over technique on my blog (dangle your mouse over the image below and it will "magically" change to the after image), however I had not found an easy way to do it. Finally I figured out a simple method that I wanted to share with you. This effect should work in all computer browsers and is incredibly easy.
I used the CoffeeShop ButterScotch Vintage action on this image, no adjustments necessary. I think this is my favorite tinted action.

Copy this code and paste it in NotePad or Text Edit. If you paste it in Word or Open Office, make sure there is no weird editing going on (extra spaces, tabs, etc.).
Replace the "URL where you want people to go if they click on your image" with any website, blog or page address you want people directed to if they actually click rather than dangle over your image. I linked this image to my blog.
Upload two images that are the same size to your favorite hosting site (I love using Picasa) and grab the direct link URL's. This is the web address that goes directly to each image.
Replace 'First Image URL' in both places in the code with the URL of your first image. Replace 'Second Image URL' with the URL of your second image. Don't forget the '' around each URL and don't add extra spaces. You have to link the first image twice, the second only once.
Your code might look something like this:
Once you have added the four URL links, just paste the code in the Edit HTML in your blog post. Now when readers hold their mouse over your "before" image, they should see it magically change to the "after".
Easy, right?
Want all of my favorite CoffeeShop Actions or Design Elements in one simple download AND help support this blog? Just click here for my action pack or here for a download of some of my most popular design elements, storyboards, and textures.
I have been wanting to post before/after images using the mouse-over technique on my blog (dangle your mouse over the image below and it will "magically" change to the after image), however I had not found an easy way to do it. Finally I figured out a simple method that I wanted to share with you. This effect should work in all computer browsers and is incredibly easy.
I used the CoffeeShop ButterScotch Vintage action on this image, no adjustments necessary. I think this is my favorite tinted action.

Copy this code and paste it in NotePad or Text Edit. If you paste it in Word or Open Office, make sure there is no weird editing going on (extra spaces, tabs, etc.).
<a href="URL where you want people to go if they click on your image"><img src="First Image URL" onmouseover="this.src='Second Image URL'" onmouseout="this.src='First Image URL'" /></a>
Replace the "URL where you want people to go if they click on your image" with any website, blog or page address you want people directed to if they actually click rather than dangle over your image. I linked this image to my blog.
Upload two images that are the same size to your favorite hosting site (I love using Picasa) and grab the direct link URL's. This is the web address that goes directly to each image.
Replace 'First Image URL' in both places in the code with the URL of your first image. Replace 'Second Image URL' with the URL of your second image. Don't forget the '' around each URL and don't add extra spaces. You have to link the first image twice, the second only once.
Your code might look something like this:
<a href="http://www.thecoffeeshopblog.com/"><img onmouseout="this.src='https://lh5.googleusercontent.com/before.jpg'" onmouseover="this.src='https://lh5.googleusercontent.com/after.jpg'" src="https://lh5.googleusercontent.com/before.jpg" /></a>
Once you have added the four URL links, just paste the code in the Edit HTML in your blog post. Now when readers hold their mouse over your "before" image, they should see it magically change to the "after".
Easy, right?
Want all of my favorite CoffeeShop Actions or Design Elements in one simple download AND help support this blog? Just click here for my action pack or here for a download of some of my most popular design elements, storyboards, and textures.
Saturday, September 17
CoffeeShop Back to School Digital Design Set!
Sorry I have been a bit lax about posting this week. We are still trying to get into our homeschooling groove (1st grade!) and by the end of the day I am so exhausted I don't have the energy to blog. Not to mention the constant state of low-grade anxiety we are all experiencing due to the extreme weather here. Most of the major wildfires have been contained, but with hot, dry, rainless days, every day is ripe for a wildfire. Hopefully we will get some rain soon that will provide some much needed relief.
I ran across this excellent tutorial on creating your own staples on Pugly Pixels and had to take a few minutes to make one for myself. I had so much fun making my staple (how nerdy does that sound...) that I had to create some notebook paper to go with it. So I put them both together for download today and called them the CoffeeShop Back to School Set. And please go visit Pugly Pixel and read her tutorial to create your own colored staples (the one in my download is boring gray). Plus she has tons of great tutorials and freebies on her blog and an affordable paid membership which allows you extra goodies and exercise work files.
I am always excited to find tutorials on making my own design elements because most freebies and paid design elements posted for download can't be used in commercial work. I enjoy making my own from scratch and then posting them for free download here. Every design element posted for download on my blog can be used personally or commercially in your own work and you don't have to worry about linking my blog when you use them.
You don't have to be a scrap-booker to enjoy using design elements either. Any photographers can find all types of fun ways to use staples and notebook paper to display their photos on the web.
I hope you enjoy my newest digital design set! These are image files, not actions. Download the free CoffeeShop Back to School Set. If that link does not work, you can download it on Mediafire.
Do you want to download my favorite CoffeeShop PSE/Photoshop Actions and Lightroom Presets or Design Elements in one convenient zipped file AND help support this blog? Just click here for my action pack or here for a download of some of my most popular design elements, storyboards, and textures.
For complete info on installing all of my actions, click here.
Tuesday, September 13
CoffeeShop 2 Minute Miracle Action and Tutorial!
I am so excited to release my newest free retouching action, CoffeeShop 2 Minute Miracle. This does not replace any of my old retouching actions, like Perfect Portrait 3
Sunday, September 11
CoffeeShop Texture and Two Minute Miracle Action Tutorial: Part 1
This tutorial is in two parts, with today's demonstrating how I applied the texture to this portrait of Imp. The second part
Saturday, September 10
Testing Mouse-Over Code and Preview of New Tutorial and Action Coming Out
I am testing this mouse-over code and need your help. If you could take a minute and mouse over the top image below to see if it changes and leave a comment if it worked and what browser you used, I would really appreciate it. If this code works I will write a tutorial on how to use it on your own blog. I can see it on Safari and FireFox on my iMac so keeping my fingers crossed it works on Chrome and IE9. UPDATE: This seems to work in all browsers!!!
BTW, this is an example of my newest tutorial/action coming out this weekend. I will show you how I added the texture and how I finished off the photo with the new CoffeeShop Two Minute Miracle retouching action (free of course!). The eyes and skin are a bit surreal for display purposed only. You can adjust this action to get a very realistic and beautiful eyes and skin-tones.
Friday, September 9
{Friday Photo Bliss}
I am always incredibly moved by the resiliency and faith of children. We are still threatened by the unrelenting wildfires blazing here in Texas and last night my husband and I went outside with the boys to see the gorgeous sunset due to the high amount of smoke and ash in the air.
As we stepped outside we noticed it was "snowing" ash. Some pieces were tiny, others were entire small leaves that dissolved with a simple touch of our hand. As we stared up at the sky in disbelief and anxiety, the boys ran out in the field catching ash in their hands as they would snowflakes. Their eyes shone with excitement as they would bring me a beautiful leaf on their palm which would magically dissolve with a tiny touch.
Watching those two little boys of mine, just living in the moment and enjoying nature's spectacular if deadly show, helps me keep things in perspective. I know many families are without their homes today in Texas (over 1500 at last count) and many more forced to evacuate, hoping to hear something about the safety of their home. I know many people in Texas are in a constant state of anxiety, even if they don't live by the fires because our entire state is so dry. Please be safe and hold your family and friends close. We will get through this.
Tuesday, September 6
CoffeeShop Frames 18
So far we have been able to avoid the horrible wildfires in Texas. Yesterday we were driving around and noticed that it sky over our house appeared filled with smoke. We frantically drove home and found that the raging fires were still quite far away, but the plumes of smoke were terrifying.
Today it smells of smoke outside and there is a haze. We live on some acres and are surrounded by fields of dry grass since we were not able to cut any for hay this summer. We are saying our prayers for the safety of all of our family and all other people living in Texas in danger of the fires. We are also praying for rain.
I found this frame in my WIPs (Works in progress) file and thought it was decent enough to post. I hope you enjoy using it! It is a layered .psd file (not an action), and you add your images using a clipping mask. The frame color is adjustable. Make it really easy on yourself and use my Group-It action to quickly add your own images to this storyboard.
I am going to post my newest retouching action, The CoffeeShop Two Minute Miracle, in the next day or two, so please check back soon!!!
Download the free CoffeeShop Frames 18. If that link does not work, you can download the frame at MediaFire.
Want all of my favorite CoffeeShop Actions or Design Elements in one simple download AND help support this blog? Just click here for my action pack or here for a download of some of my most popular design elements, storyboards, and textures.
Sunday, September 4
CoffeeShop Storyboards 4!
I hope everyone in the US is enjoying their Labor Day long weekend! I wanted to post this new layered psd storyboard with clipping masks. It has "painted" edges and can be used for print or the web. This is not an action, so open it like any other image. Make it really easy on yourself and use my Group-It action to quickly add your own images to this storyboard.
You can change the background color by clicking on the bottom color fill adjustment layer.
Download the free CoffeeShop Storyboards 4! If that link does not work, you can download it here.
Want all of my favorite CoffeeShop Actions or Design Elements in one simple download AND help support this blog? Just click here for my action pack or here for a download of some of my most popular design elements, storyboards, and textures.
Friday, September 2
{Friday Photo Bliss}
Inspired by the SouleMama blog's {this moment}, I am posting one image every Friday, taken that week, that really makes me happy. If you end up doing the same I would love to see your photo linked in my comments!
Imp made this mask completely on his own without consulting me at all. I love the google eyes and teeth of his monster mask.
Want all of my favorite CoffeeShop Actions or Design Elements in one simple download AND help support this blog? Just click here for my action pack or here for a download of some of my most popular design elements, storyboards, and textures.
Thursday, September 1
Action FlashBack: CoffeeShop Eye Bright!

If you are new to my blog, welcome!!! The CoffeeShop Blog is a one-woman-owned business (by me, Rita!) and I create all of the tutorials and freebies posted here. If you want to grab hundreds of my Photoshop/PSE actions (including exclusive sets not found here on my blog), Lightroom Presets, and professional digital designs (including all of my favorite holiday sets) in a single download AND help support my site please check out my CoffeeShop Download Pack. Thanks to you The CoffeeShop Blog is possible.
You must understand how to use layer masks to use this action, so please go read my Layer Mask tutorial and if you have PSE8 or below you might want to download my free layer mask action. You don't need to add your own layer masks to use this action (they are built in), but once you start using layer masks you won't want to stop.
Remember, this is the way I usually edit using this action, but you might find a way that you think works better!
1. Open your image and run CoffeeShop Eye Bright. You will have four layers but your image will be unchanged. I have so many people email me and ask why there is no change on their image after they run this action. This action needs user input to get stunning and realistic results.
The Eye Define layer mask is already selected. Black masks "mask" any change.
2. Zoom in the eyes.
3. Click "B" to select your brush, then "D" for default black foreground and white background, and then "X" to make your foreground color white. Your brush has to be white to edit all of these layers! Make your brush soft, make sure it is in normal mode, and put the opacity at 100% for this step.
4. I like to make it easy to see where I am editing, so I click Alt-Shift while clicking on my black layer mask in the Eye Define layer. Now my entire image is red, which allows me to see where I am painting in the image. You can also click on the backslash \ key to get the same effect.
5. Now I take my brush which I adjusted in Step 3 and paint over the iris in each eye. Wherever I paint on the image I remove the red, which means I am defining that part of the eye. If you go over the whites, just click "X" to make your brush black and repaint over the part you want to remove.
6. Then I usually bring the opacity down to 50% or so and paint over the eyelashes and eyebrows. Make sure you don't paint on the edges of the bottom of the eye just above the bottom eye lashes. This can make the eyes look really odd. And remember, as long as you are holding your mouse down when you paint, the opacity will continue to be 50% even if you repaint over an area.
7. Shift-Alt to remove the red mask and then click on the White Whites' black layer mask. Click Shift-Alt to turn on the red mask again. Then make sure your brush is white and set to around 50% and paint over the whites of the eye. Be careful to not paint on the black part of the iris or the skin around the eye. You can see below I painted over the bottom part of the iris, so I changed to a black brush and painted the iris out.
Shift-Alt to remove the red mask when you are done.
8. Click on the Bright Eyes layer. Use a white brush at 100% opacity to paint over the color parts of the eye. Make sure to avoid any areas that are black.
9. Now, this is probably the most important part of the eye editing process. We have all seen retouching gone wild in photography, where children or adults look like plastic space aliens... So be sure to zoom out and examine your eyes and make sure they look normal. In this case, I think we need to do some final adjustments.
10. I usually don't do anything to the Eye Define layer, but I always bring down the opacity of the Bright Eyes and White Whites layers. You can see my final setting below.
11. I still think the eyes are a bit overdone, but I could go back and play with the settings again. This simple little action can really enhance the eyes in your portraits.
If you want to do a complete retouching job with these Eye Bright and auto skin smoothing, etc., please go download my free CoffeeShop Perfect Portrait 3 action. I have so many other retouching actions, and you can find them all on this page (go down a bit) or download my most popular ones in one simple download and help support this blog here.
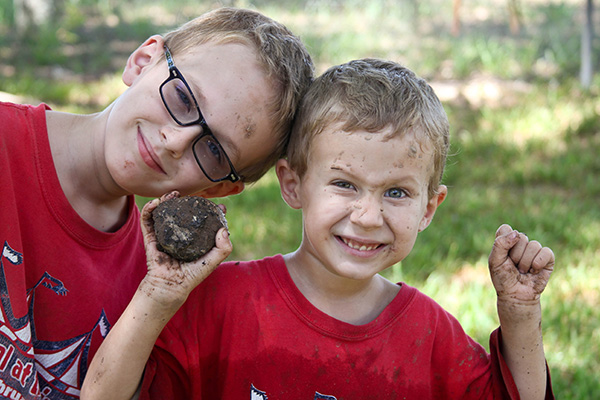
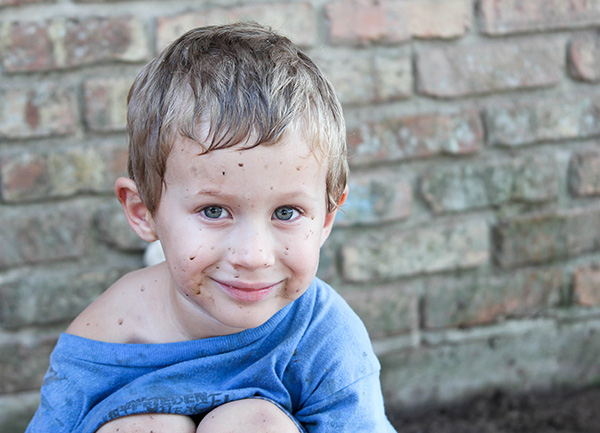
I also have a new action coming out that has Eye Bright and the auto skin smoothing from Perfect Portrait 3. Once I figure out a name I will post it here. I posted a sample before/after below, and that edit took maybe 2 minutes. This action is perfect to use on an already edited portrait that just needs some simple retouching.
Do you want to download my favorite CoffeeShop Actions or Design Elements in one convenient zipped file AND help support this blog? Just click here for my action pack or here for a download of some of my most popular design elements, storyboards, and textures.
For complete info on installing all of my actions, click here.
Subscribe to:
Posts (Atom)


