

Monday, November 30
Wednesday, November 25
CoffeeShop Baby PowderRoom FREE PS/PSE Action!


CoffeeShop Baby PowderRoom 2 has been released and has auto-skin smoothing! It does not replace this action, but you should have them both in your toolbox. :-)
I want to wish all of you a Happy Thanksgiving! Thanksgiving is my favorite holiday. Anyone can celebrate it. There is no gift buying involved. You get to eat tons of great food and visit with loved ones. Your family from out-of-town comes to visit. The wine and coffee flows freely (in our house at least). And you stop and think about everything you should be thankful for in your life. Including your blog readers!
Now, on to the main attraction!!!
Yes, it is finally here, CoffeeShop Baby PowderRoom PS/PSE Action! And this action isn't only for babies. It works great on any portrait. :-). And its price is FREE! (Should I confess I watch TMZ???)
I know many of you use and love CoffeeShop PowderRoom 2 and/or CoffeeShop Perfect Portrait and/or CoffeeShop Glamour Glow retouching actions. I am amazed how many successful professional photographers write and tell me they use my free retouching actions on images they sell. :-)
But what to do if you are working on a lovely portrait where the skin is not perfect? Most people will use the clone or heal tool in Photoshop or Photoshop Elements on a duplicate of the background and fix the skin before using the CoffeeShop retouching actions. This works fine, but it is very time-consuming, especially if the skin is especially troubled as it is often in small babies or teenagers. And have you ever tried cloning/healing a blemish right by an eyebrow or lip? It can be very frustrating.
I did a lot of reading and found a method that works better and faster than cloning in many cases, and I slightly modified it to make it even better. This action, like my other retouching actions, takes some work with brushes on layer masks. However, the benefit of retouching this way rather than buying an expensive "automatic" retouching program is that your final results can look more realistic (read "less plastic").
This action not only allows you to remove blemishes and other skin issues, it also has layers to smooth, lighten, and even add a dewy glow to skin. I also included the Eye Define and Bright Eyes from the actions mentioned above and also found in CoffeeShop Eye Bright action.
Once you download the free action, be sure to bookmark this post because I have the full step-by-step instructions on using CoffeeShop Baby PowderRoom Action below. And if you have any questions, please post them at the CoffeeShop Facebook, we love to help. :-)
I am also putting together a special "Senior" retouching action. It will have all of the steps of Baby PowderRoom, but I will add the teeth whitening from PowderRoom 2 and the Urban Grit from Perfect Portrait. It will be the perfect action to process those senior shots, or really any portrait that needs some retouching and oomph. :-)

Baby PowderRoom Action Tutorial (this action runs in all versions of Photoshop CS and PSE5-PSE8):
I will post the step-by-step Baby PowderRoom Unwrapped (where I take the action apart so you can do the enhancements on your own) in a future post. These directions are for using the action. :-)
Note: Your image will look unchanged after running this action! You will paint in the effects "by hand". All opacity ranges are just suggestions. You have two ways to control the amount of enhancement that is applied on each layer. First, you adjust your brush opacity, and second you can tweak the layer opacity. And I can't stress enough, moderation is the key in retouching. Most people don't like plastic-looking barbie skin. :-) Also, this action should be run on a portrait that is already color/contrast corrected. This should be the final step in your editing (other than sharpening).
1. Red Skin Repair: This layer is where you remove or lighten skin imperfections like blemishes, redness, wrinkles, etc. Click on the blank Red Skin Repair layer (not its layer mask). Select "I" for the eye dropper tool and click on a clean area of skin to select the color. Then select "B" for brush. Select a soft brush, Normal Mode, 25-50% opacity. Paint over the problem areas of skin adjusting your brush size using the [ or ] keys.
It is better to start with a lower opacity brush and brush over these areas a few times. You want your original skin texture to show through. Note: If you continue to hold down your mouse button while painting an area of skin using the brush tool at 25% and go back over the same area there won't be any additional changes. You must remove your finger from your mouse and re-click and repaint the area to see additional changes.
After the skin looks clean, go to the Red Skin Repair layer and adjust its opacity to taste. You don't want plastic looking skin! If you make a mistake either use the erasure tool (E) on the painted layer or a black brush on the layer mask.
2. Smooth Skin: Click on the black layer mask. Click "B" for brush Normal mode, white, and low opacity (20-30%). Paint over the skin (don't go over dark shadow areas or important features like eyes, nostrils, and lips). Then adjust the Smooth Skin layer's opacity to taste. Again, moderation is the key to realistic retouching techniques. I usually find an opacity setting I think is perfect and then dial it down a bit more to be safe.
3. Lighten Skin: If you want to slightly lighten the skin (as if lightly powdered), click "B" for brush and set your brush to Normal Mode, white, and low opacity (10-20%). Click on the black layer mask and paint over the skin. Adjust the Lighten Skin layer's opacity to taste.
4. Skin Glow: This layer adds a soft subtle dewy glow to the skin. Cick "B" for brush and set your brush to Normal Mode, white, and low opacity (20-30%). Click on the black layer mask and then paint over the skin. Adjust the Skin Glow layer's opacity to taste.
5. Eye Define: This layer enhances eyes and eyelashes. Click "B" for brush and set the brush to Normal Mode, white and 50-100% opacity. Click on the black layer mask. Paint over the eyes and eyelashes. Then adjust the Eye Define layer's opacity to taste.
6. Bright Eyes: This layer brightens the iris and whites of the eyes. Click "B" for brush and set the brush to Normal mode, white, and 10-20%. Carefully paint over the iris, avoiding the pupil, and the whites of the eyes. Then adjust the Bright Eyes layer's opacity to taste.
7. Flatten and save!
Download the free CoffeeShop Baby PowderRoom PS/PSE Action HERE.
Do you want to download thousands of professional CoffeeShop PSE/Photoshop actions (including exclusive ones not found anywhere for free), textures/overlays, scrapbooking papers, clip art/design elements, photo storyboards and frames, and Lightroom presets from this site in one convenient zipped file AND help support this one-woman blog?
Just click here for my CoffeeShop Mega Download Pack!
Monday, November 23
Christmas Shopping and Amazon Gift Certificate Giveaway!
I wanted to thank all of you who have purchased our CoffeeShop Watermarking Action Kit. I am thrilled with the positive feedback and want to have a little giveaway to show my appreciation. Anyone that buys our action by this Wed. Dec. 2nd, 11PM central time is entered to win a $50 Amazon gift certificate! If you have already bought the action you are already entered. :-) I will randomly select one winner and post their name Thanksgiving weekend. Here is the action information:

My little sis Heather and I have teamed up and produced a time-saving cropping/sharpening/custom watermarking/cool edge effects action kit for Photoshop and Photoshop Elements. You use the same watermark and action for both vertical AND horizontal images! Make as many watermarks as you want.
You can find all of the information at our CoffeeShop Design site. It is not a freebie, but it is worth every penny if you post a lot of images. Buy this action by the Wed. Nov. 25th, 11PM central time and you are entered to win a $50 Amazon gift certificate!
--------------------------------------------------------------
Let's talk about Christmas shopping. I am one of those people who really does not like to shop. If I am lucky enough to get out of the house and spend any money, I would prefer to go out to eat or visit my favorite coffeeshop. So I am blessed to have family (both mine and my husband's) who are more into the celebration of eating and visiting (not necessarily in that order) for Christmas rather than the gift giving.
However, we all like to shop for the kids. And the best gift is always going to be a book. And my dear husband fills out optometric questionnaires for companies and gets "paid" in Amazon gift certificates, which he then sends my way. Did I mention I love my husband???
So a few days ago I received an email with $80 of $5-$15 gift certificates (it took him FOREVER to earn these), just in time to do my Christmas (and Duke's birthday) shopping! I jumped over to Amazon and bought these books for my boys:
My kids don't watch much TV (it makes them grumpy and hyper), but I have to have a few videos for those gloomy rainy days or those days I need a sanity break. :-) I danced with joy when I found the Charlie Brown holiday set. Duke already says "Good Grief" which makes me grin. However, the other day he was trying to play football with a little friend he met at the playground, and unfortunately he was inspired by Charlie a bit too much... And have I ever mentioned their passion for all things construction and farming?
I love shopping (when it involved free gift certificates and books!). Oh, I am also in heaven when I get to go shopping in a used bookstore. A used bookstore with a coffeeshop. A used bookstore with a coffeeshop, my husband, and the kids enjoying time with Granny. A girl must dream. :-)
Finally, the free CoffeeShop Baby PowderRoom is coming out before Thanksgiving!!!! You are going to love this action. I showed my husband how it worked last night and even he was impressed. My fan club of one. ;-)
Friday, November 20
Not a Freebie, but a Goodie! CoffeeShop Watermarking Action Kit
My little sis Heather and I have teamed up and produced a time-saving cropping/sharpening/custom watermarking/cool edge effects action kit for Photoshop and Photoshop Elements. You can find all of the information at our CoffeeShop Design site. It is not {...}
Monday, November 16
CoffeeShop 10 Pic Blog Header!

Here is another free storyboard blog header! Just add your images using clipping masks in Photoshop or Photoshop Elements (here is the tutorial if you need help). Note: The clipping masks are numbered on the top layer in the header .psd file to make it easy to add your images. Just turn that layer off after you are finished.
You can also make color boxes with or without text as seen in my sample above. Just select the black clipping mask of your choice with the magic wand tool and Edit, Fill with a color. I used Highland Perk from KevinandAmanda. Have I mentioned that I adore Kevin and Amanda and want to hang out with them? :-)
Make sure you crop this to size to fit your blog or when uploading select "shrink to fit". :-)
Download the free CoffeeShop 10 Pic Blog Header HERE!
I am working on a few things (including my newest retouching action, Baby PowderRoom). I am also trying to organize my blog so you can actually find things. Check out my top menubar links to start. I am putting all of the tutorials together now, you can find most of them here.
The search bar under my header is also great (I use it myself all of the time) and I have a label cloud on the bottom right of my blog. If you have any suggestions to make my blog more user-friendly please let me know. I have so much stuff here that I am finding it difficult to organize it all. But that is a good thing. ;-)
Do you want to download thousands of professional CoffeeShop PSE/Photoshop actions (including exclusive ones not found anywhere for free), textures/overlays, scrapbooking papers, clip art/design elements, photo storyboards and frames, and Lightroom presets from this site in one convenient zipped file AND help support this one-woman blog?
Just click here for my CoffeeShop Mega Download Pack!
Saturday, November 14
CoffeeShop Editing 101-Sponge Tool!


I just recently discovered the sponge tool in Photoshop and Photoshop Elements. Why I hadn't used it before[...]
Wednesday, November 11
Tuesday, November 10
My Nephew and Our New Car!

Here is my little sis Heather and my newest little nephew. Isn't he the cutest? And did I mention my sister is a tall natural blond who has run marathons? Thank goodness I met my husband when she was 13 and going through her gawky years... Heather is a stay-at-home mom to her little girl and little boy and an avid photographer. Recently she started working with me as a logo/button designer for CoffeeShop. It gives me a reason to talk to her more. I help her out with her Photoshop Elements' questions! :-)

Here is our "new" car! It is an old Corolla that has been completely rebuilt/redone by my brother-in-law. Isn't it cool looking? You should see the engine, you could eat off of it. And it has some thingie in there that makes that little engine roar. Look at those cool rims and roof scoop. And the hood is some special custom order job that has this 3D like paint effect. You can tell that I am a expert on cars, right? ;-)
You can see my husband on the left (well, maybe not his best side), my brother-in-law on the right (he is tough ex-Army), and my little sis holding a cute little doll. Wait, that is my nephew! :-)
I am putting the final touches on some new free actions and such so keep on visiting! Hope you are having a great week. We are about to head out to the neighborhood park, it is a lovely day.
Sunday, November 8
CoffeeShop Tutorial: Polaroid in Picture!
You might have noticed that I updated my blog yesterday. At one point it was a complete mess and I was a bit freaked out! I didn't just add a new background and header, but I changed out my template (the new one is a Blogger template I tweaked), and now I have a drop-down menubar. I will be working on updating it during the week, but so far so good.
I also noticed that Blogger now offers "Read More" on your posts. Just click on the "Read More" link at the bottom of my posts and the entire post will load up. I will use this on my loooooong posts so that my blog will load up faster. I don't think I will do when I first post, but after the posts have been up for a few days. Now if Blogger would only add static pages...
On to my tutorial.
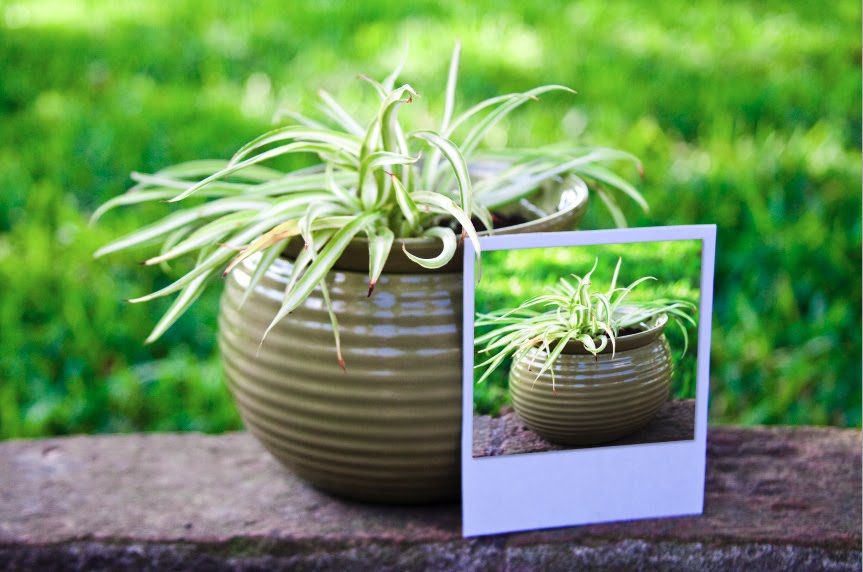
You have all probably seen this effect around Flickr[...]
Saturday, November 7
Catching Dragonflies

Processed with Golden Vintage.
He convinces his little brother they are going to catch dragonflies with old torn fishing nets they found in the barn. They are going to catch them because they have never touched a live dragonfly. He tells me they will capture four and put them in glass jars. We will put them in our bedrooms so we can look at them and enjoy their beauty.
After some time he comes running up to me. Mom, he says with disappointment in his voice, I didn't know dragonflies were so fast.
Another bittersweet moment and I suddenly stop and really listen to my son.
I know all about fast, little one. Those dragonflies have nothing on the speed of the days and months and years that are slipping by. My little babies are suddenly little boys. Another day, another gray hair, another realization that these are the memories I will put away in my mind and dust off in the later years when the house is quiet, clean, and sometimes a bit lonely.
The computer is calling, laundry is piling up, the dishwasher needs to be unloaded, bills need to be paid, the news drones on in the background and it seems mostly bad.
But wait. Perhaps I will grab a chair, sit down, and enjoy watching two little boys chasing their dreams of beautiful dragonflies in glass jars softly beating their wings. Just breathe.
Thursday, November 5
Prayers for Fort Hood
Sometimes you find yourself in a situation where you can't "post as normal". My Army brother-in-law (who did two tours in Iraq), little sis, niece and nephew just moved from Fort Hood to north Texas a few months ago. I am horrified about what happened in Fort Hood today, and I just wanted to send my prayers to the brave soldiers, civilians, and their families there. Rita
CoffeeShop Tutorial: Using Brushes!
Today I wanted to teach you how to use "arty" brushes in Photoshop or Photoshop Elements. Brushes are great to use to make cards, storyboard templates, textures, clipping masks, logos, etc. There are many free brushes out there, but some of my favorite can be found at Pixels & Ice Cream. You can also find all kind of free Photoshop brushes at Deviantart and Brusheezy.
For this tutorial I will load some free brushes from Pixels & Ice Cream. Jennifer has a great selection of completely free brushes and some amazing premium brushes. I am going to download the free Laurie Ornament Brushes.
Click on the download link and download the zipped file to your desktop. I have a folder on my desktop labeled "Downloads" so I can find them later. After you download the folder, find it and right click, Extract All, Extract.
Loading the brushes is really easy. I usually open Photoshop or Photoshop Elements, go to Edit, Preset Manager, select Brushes, and then load the brushes.

Tuesday, November 3
CoffeeShop Vintage Blush PS/PSE Action!

Thank you for all of the amazing names for this action. I loved so many and it was impossible picking one, so I finally just "grabbed" one and went with it. :-) CoffeeShop Vintage Blush, like most of my actions, is adjustable and runs in both Photoshop and Photoshop Elements. Vintage Blush adds a pinkish tone and haze to your image while muting the original colors.
CoffeeShop Vintage Blush UNWRAPPED!
Here are the action steps so you can duplicate the result on your own. Remember, you can adjust the blending modes and their opacity's to taste. The ones I have in the action are just starting points.

1. Pink Tone layer: Add a solid color fill layer with #eeb395 (a pinkish color) and put that layer into Overlay blending mode, 100% opacity.
2. Pink Haze layer: Add a solid color fill layer as above (#eeb395) and put that layer in Screen blending mode, 50% opacity.
3. Color Mute layer: Click on your foreground color swatch and change it to #eeb395and make the background swatch white. Add a Gradient Map adjustment layer with pink to white and put that layer in Color blending mode, 50% opacity.
Easy! And don't forget you can play with the blending modes, opacity's, and even the color fills. And each layer has a layer mask if you want to paint out part of the effect on a layer. If you don't know how to use layer masks please read this tutorial.
*******************************************************************************
Someone commented previously that this would be an excellent base action when you want to add a texture to your image. I thought that was a great idea so I played around and you can see my results below.

I used SkeletalMess's free texture Painterly Effect 2 on the image above, AFTER running CoffeeShop Vintage Rose. I dragged the texture just above my background so the colors would be tinted pink from the upper layers. I put this layer in Vivid Light blending mode, 100%. Then I copied this layer and put the copy in Soft Light blending mode, 100%. Now it looks like a soft vintage painting.
Download the CoffeeShop Vintage Blush PS/PSE Action HERE!
Do you want to download thousands of professional CoffeeShop PSE/Photoshop actions (including exclusive ones not found anywhere for free), textures/overlays, scrapbooking papers, clip art/design elements, photo storyboards and frames, and Lightroom presets from this site in one convenient zipped file AND help support this one-woman blog?
Just click here for my CoffeeShop Mega Download Pack!
Subscribe to:
Posts (Atom)
About Rita!

My name is Rita and I am a work-at-home and homeschooling mom to two amazing teenagers (Luke & Isaac) in Texas. I am passionate about photography, photo-editing, and graphic design. This blog is possible because of your support!
♥ Support This Blog!!! ♥

Help Support This Site! ♥

Site I LOVE!

Download all my goodies!
Get Everything in One Download!