Tuesday, March 31, 2009

CoffeeShop Cropping Tip!

If you use my storyboard actions that automatically crop your image, there might be times you can't see the crop bars and so you aren't able to drag them to fit your image. This is because your image is smaller in pixel size than the image I used to write the action. Well, don't be frustrated! There is a simple solution in both Photoshop and Photoshop Elements. This trick also works when you are not using my actions.

Just press Ctrl-0 (that is zero, not ohhh). It is really that easy! Your image will shrink and the gray background will grow and you will be able to see the crop lines so you can drag them to fit. Please see the sample below:


This trick has saved me so much frustration and I wanted to share it with you.

Sunday, March 29, 2009

CoffeeShop Eye Bright PS/PSE Action!


CoffeeShop Eye Bright is an action that runs in both Photoshop and Photoshop Elements. It brightens and defines eyes and removes redness from the whites (due to stress or allergies or late night coffee drinking!). If you love the eye enhancements in CoffeeShop PowderRoom 2 or Perfect Portrait, but don't need the skin softening/teeth whitening step on every image, then this is the action for you. And like all CoffeeShop actions, the enhancements are completely adjustable and the effects can be as subtle or dramatic as you wish.

Here is a complete tutorial with screenshots!

If you just need a little reminder, here are some simple notes. Eye Define layer: Select black layer mask and paint over eyes and lashes with a soft white brush set to 100% opacity. Eye Brighten layer: Use a soft low opacity white brush to paint over the iris, and a soft low opacity black brush to paint over the pupil and black around the iris. Whites Whiten layer: Click to select the black layer mask and paint over the eye whites with a soft low opacity white brush to remove redness and whiten the whites. You can adjust each layer opacity if the effects are too much.

Download the free CoffeeShop Eye Bright PS/PSE action HERE!

Do you want to download thousands of professional CoffeeShop PSE/Photoshop actions (including exclusive ones not found anywhere for free), textures/overlays, scrapbooking papers, clip art/design elements, photo storyboards and frames, and Lightroom presets from this site in one convenient zipped file AND help support this one-woman blog?

Just click here for my CoffeeShop Mega Download Pack!

Thursday, March 26, 2009

CoffeeShop Flower Patterns


When I made the CoffeeShop Distressed Flower Cards I decided to turn the flowers into Photoshop patterns. These patterns work in all newer versions of Photoshop and Photoshop Elements, just load them with Edit, Preset Manager. To fill something with a pattern, just select your paint bucket tool (or Edit, Fill, Pattern) and make sure Pattern is selected, select the pattern you wish to load, and then "pour" the pattern onto your background. These are seamless patterns so you can use them anywhere. They work great for texture backgrounds, cards, blogs, etc. You can easily change the colors by using hue/saturation and selecting Colorize.

Download the CoffeeShop Flower Patterns HERE!

Do you want to download my favorite CoffeeShop PSE/Photoshop Actions and Lightroom Presets or Design Elements in one convenient zipped file AND help support this blog? Just click here for my action pack or here for a download of some of my most popular design elements, storyboards, and textures. 

For complete info on installing all of my actions, click here.

Tuesday, March 24, 2009

CoffeeShop Give it Texture PS/PSE Action!


Click on image to see it bigger!

If you are like me and enjoy using textures on your images, you will love this action. This action opens and allows you to enhance the color and contrast of a texture, places it on your image, and also makes it possible for you to easily (but non-destructively) erase the texture from areas in your image while retaining the texture color.

Open your image and then start CoffeeShop Give it Texture. It first prompts you to open the texture image file you want to use on your image. Then it allows you to change the color by a hue/saturation adjustment box (adjust the saturation to add or remove color, or click colorize and change your texture's color) and then a levels adjustment box opens and you can adjust the texture's contrast. Then the action loads the enhanced texture on your image and free transforms it, and you just adjust it to fit your image. Then it puts the Texture layer into overlay mode (you can change this to multiply, soft light, hard light, etc. and also adjust the opacity of the layer at the end of the action) and adds a layer mask. It then copies that Texture layer, applies a Gaussian blur to remove the texture but retain the color of the texture and adds a black layer mask to that layer and names it Texture Color Add.

When the action is finished running you can remove the texture from parts of the image (like skin) simply by clicking to select the Texture layer's white mask and painting over the image with a soft black brush (adjust the opacity to taste). If you want to add back the texture color without the texture (for example, your texture is gold and once you erase it off skin the skin looks slightly cold and gray), click on the Texture Color Add layer's black mask and paint over the area with a soft white brush (at 100% opacity) and adjust the opacity of that layer to taste.

I love this action because I often want to remove texture from areas in the image but I hate to lose the texture color. This action will run in Photoshop and Photoshop Elements. Make sure you have your image open before starting this action!

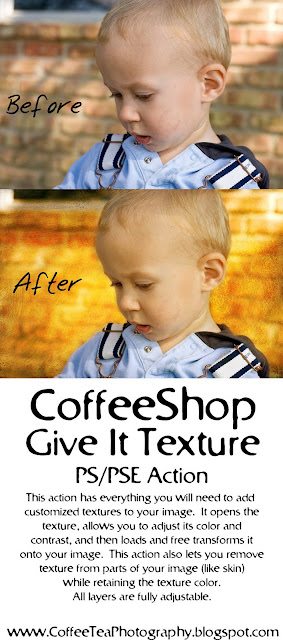
The texture used in my sample above was a free texture from Boccacino at Flickr.

To download the free CoffeeShop Give it Texture PS/PSE Action, click HERE!


Now some bad news/good news. First, the bad news. My beloved computer I bought when Duke was born (almost 4.5 years ago) is finally passing away. As you guys probably know, I run this blog on a shoe-string budget (those little tasty potato chips, not actual shoe-strings ;-) ) and I try to be very frugal. However, to post here (and email and pay bills and look up things on the net and edit photos and find movie reviews and the list goes on) I need a working computer. Even my monitor is old (8+ years, a CRT that was really good back then but now can not even be calibrated with modern devices).

But with the bad comes good! This weekend I reluctantly went to the computer store and bought a new computer and a amazing new and improved monitor. Lucky for me I am so far behind technogically in hardware that the low to mid-range computers and monitors are like futuristic sci-fi creations. I say reluctantly went to the computer store, but I left skipping with joy.

So right now I am transferring all of my files and learning how to use a new system, so you might notice I am not around quite as much this week. I am like a kid in the candy store! I wanted to thank you for visiting my blog regularly, putting up with my ads, showing interest in my Amazon can't-live-without links and helping the economy by making some purchases from there (I bought this new computer in hopes of getting us out of this recession ;-) ), and finally being so incredibly generous in these money-tight times and making donations. Seriously, every penny does help and I really do appreciate it. You helped make it possible for me to replace my poor machine and and therefore keep posting all of my CoffeeShop Crapp (hee hee) without having to sell my kids (or for goodness sake my camera!).

Do you want to download thousands of professional CoffeeShop PSE/Photoshop actions (including exclusive ones not found anywhere for free), textures/overlays, scrapbooking papers, clip art/design elements, photo storyboards and frames, and Lightroom presets from this site in one convenient zipped file AND help support this one-woman blog?

Just click here for my CoffeeShop Mega Download Pack!

Sunday, March 22, 2009

CoffeeShop Bracket Frames Pack 2!

Click on the image to see them larger!


Here is my second set of bracket frames (you can find the first set here). People have asked me what you do with these. Just open them up as any other image file in Photoshop or Photoshop Elements (or your editing program of choice). You can use them around your images on storyboards, greeting cards, blog headers, etc. You can also add patterns or colors in the middle instead of images. They work great in logos and business cards.

I have another set I am working on that are very ornate and perfect for weddings!

Download the CoffeeShop Bracket Frames Pack 2 HERE!

Saturday, March 21, 2009

Now for some photography...


Finally, some photography. Believe it or not, I actually do take photos and not just write actions. If I could only catch up processing all of my thousands of images...
We have our own personal bluebonnet field outside our kitchen window (in the front side yard) and I was taking some photos of the gorgeous bluebonnets when I noticed this little weed. I stopped for a moment and snapped its photo and was happy I did. The bluebonnets are more spectacular, but this humble weed is beautiful in its own right. I used my favorite walk-around lens EVER, my Canon EF 28-135mm f/3.5-5.6 IS USM Standard Zoom Lens for Canon SLR Cameras (if you don't have this lens, run and get it, it is great for everything from landscape to flowers to portraits!). I believe my aperture was pretty much wide open when I shot this, and that background is not photoshopped but the real deal. It looks like a painting or texture, but it is 100% from this lens! I processed this using my newest action set I am working on (and will be releasing soon). This action set is perfect for those flower/landscape images and I think you will love it.

And I also wanted to mention that my spectacular bluebonnets drive my poor husband CRAZY! They are in full glory for about a week (and get trampled by neighbors sneaking in to photograph their children with the blooms), but are a weed pit about a month before they bloom and 2 months after they bloom (to make sure they completely seed). My husband takes pride in our yard and having to look out at a field of questionable weeds for months is pretty upsetting to him. As I know he faithfully reads my blog (he does!), I wanted to thank him for being so patient with my flowers. And also thank him for not mowing them down as he threatens every spring during every breakfast while we are looking over the seeding bluebonnets being taken over by foot tall weeds! You are a true gentleman my dear.

Oh, I also need to catch you up on my chickens. I had zero, then 5, and now 31. It is an interesting story and one that needs to be told, on another day of course. And I have so many things coming your way. My texture loading action, an action to brighten eyes, the action I used above, and some B&W actions that will finally work in Photoshop Elements! Plus more storyboards, some patterns, brushes, frames, and whatever else I design late at night when the boys are asleep and my husband is resting his eyes ;-) . Oh, and I will be posting some bluebonnet photos very soon!

Friday, March 20, 2009

CoffeeShop 20x10 Storyboard PS/PSE Action & Template Redo!


I recently released the CoffeeShop 20x10 Storyboard Action Set 1 and I received many great suggestions to improve them. Well, I listened to you (I love my readers!) and here is the same set, with some minor changes. There are 3 folders in the zipped file. One contains templates (open like any other image, see below), and the other two are action folders, one for Photoshop Element users, the other for Photoshop (PS7 and all versions of CS) users. The Photoshop Elements folder contains the thumbnail and action .atn files for all 4 actions. Please don't forget that you have to have a random image opened before starting the actions or they won't work. The Photoshop folder contains one action set.

1. These actions DO NOT flatten the storyboard at the end. This way you can move your images around, Ctrl-T (free transform) them to different sizes, and also change the background color simply by selecting the background layer and Edit, Fill (with the color of your choice). You can also use an image or pattern as your background (make sure to drag it on the bottom of your layer pane).

2. You can add borders to your images. If you don't want borders just press OK when the Stroke box comes up (it is set at 1 px and white and will not be noticeable with the white background, but if you are changing the background make the color the new background color). If you want a border around your image just change the pixel size and color to taste!

3. Some of you are having issues with these actions in Photoshop Elements. For you I have included two versions of the templates as images. One is a .jpg where the boxes are black. You can drag your images on top and Ctrl-T them to fit. I also included a .psd (Photoshop) file where you can drag your images UNDER the template and then Ctrl-T (free transform) them to fit.

The original CoffeeShop Storyboard set is still completely valid, it just doesn't add borders (which saves time if you don't want them) and flattens the image at the end.

Download the CoffeeShop 20x10 Storyboard PS/PSE Action and Template Set 1 HERE! The download is a zipped file which contains an action set for both PS and PSE for the storyboard with and without borders, plus a folder that has the templates. REMEMBER, to use the PSE actions, you MUST have a random image open before starting it. Then click on the action button, the image will close, and the action will run.


NOTE: BTW, in the storyboard names, B means big and L means little. So BBL means Big photo, Little photo, Little photo. If any of these template actions is not working correctly, please comment below. I had a few versions and I might have become confused!

BIG TIP! If you can't see the crop lines because your image is too small, then just press Ctrl-0 (that is a zero, not an "o") and your image will shrink and the gray background will get huge and you will be able to see where you need to drag the crop bars.

Do you want to download thousands of professional CoffeeShop PSE/Photoshop actions (including exclusive ones not found anywhere for free), textures/overlays, scrapbooking papers, clip art/design elements, photo storyboards and frames, and Lightroom presets from this site in one convenient zipped file AND help support this one-woman blog?

Just click here for my CoffeeShop Mega Download Pack!

Wednesday, March 18, 2009

CoffeeShop Polaroid Blog Header!


If you notice I have a tendency to change my blog header quite regularly. You might be shocked to find out I design and maintain my own blog (hee hee, OK it is pretty obvious...), even though I have yet to learn HTML. Thank you Blogger for being idiot-proof! I like to do it myself because I get tired of looking at the same header and if I pay someone to do a great job I won't want to change it. So this morning while the boys were watching their farm tractor video I made this new header which you can download below. The downloadable one does not include the above background, text, or image, but it is very easy to customize.

To custimize the CoffeeShop Polaroid Blog Header:

1. Open the header in Photoshop or Photoshop Elements like any other image.

2. Click on the bottom layer (Header Background.) If you want to make it another color, just Edit, Fill with your color of choice. If you want to add a pattern or texture (as I did above, you can find that texture HERE), just open the texture and select your move tool and drag it above the Header Background layer. Turn off or delete the Header Background layer and then Ctrl-T (free transform) the texture layer to fit your header. Click "constrain proportions" and either click and drag or change the W or H and move the texture around until it looks nice. If you can't see the drag bars in Photoshop, just Ctrl-0 (that is a zero) and you will be able to see them.

3. Add your image. As you can tell I used just one in this header. Open the image of your choice and move it on your header, just above the Clipping Mask layer. Then click on your image layer to select it, and Ctrl-G to group it with the Clipping Mask layer. This will fill the polaroid template with your image and restore your background. Then Ctrl-T the image layer to fit. Make sure to move it around and change the size to get the best fit.

4. Select the text and change the font to taste. If you don't want the text just turn off the little eye icons or drag the text layers in the trash.

5. Flatten and save! It is 980x400 so you might have to "shrink to fit" in your blog.

Download the CoffeeShop Polaroid Blog Header HERE!

Do you want to download thousands of professional CoffeeShop PSE/Photoshop actions (including exclusive ones not found anywhere for free), textures/overlays, scrapbooking papers, clip art/design elements, photo storyboards and frames, and Lightroom presets from this site in one convenient zipped file AND help support this one-woman blog?

Just click here for my CoffeeShop Mega Download Pack!

Monday, March 16, 2009

Cool Photography Books!

First, a note on CoffeeShop Storyboard Template actions. I realize that some PSE users would prefer that they did not flatten the final image at the end, so I am writing a version that does not do that. Also, I am making a set that will round the corners and/or add a border (if you want to do that). All of these will be posted very soon on my blog, so keep an eye out for them!

Now, onto actual photography! I know many of you readers are parents who are just starting out in the world of photography, mainly because you have the most amazingly beautiful model living right under your nose. It is impossible to take too many photos of your baby or child (my husband disagrees, but only because he has to keep on buying external hard drives to hold all of my images of our children). However, you might find that you take picture after picture and you are just not happy with your results. You look at people's flickr photostreams and can't figure out what YOU are doing wrong. Learning how to take a great image is more important than learning how to edit. Anyone can edit a spectacular photo, but not everyone can take a spectacular photo. The capture is the most important part of photography.

When my sister had her little girl (the first little baby in my family) I was completely confused how to photograph that little adorable creature that just laid there, spitting up and little bald head flopping to the side. My pictures were often those lovely "deer in the headlight" shots, or so out of focus that my niece could have been my pet cat. I had quite a few photos looking up her tiny nose, or her surrounded by so many toys that you could not even tell there was a baby in there. "Why did you take a picture of the couch, oh, there is a baby there!". So I went online and I purchased this book hoping to learn something, and it made all of the difference in the world:


How to Photograph Your Baby is an amazing book for the beginner photographer. It is a quick and easy read and not full of confusing technical jargon. This book simply shows you how to take stunning images of your baby or child (or anyone for that matter). If you are just starting out (or very unsatisfied with your images), this is a wonderful simple book that should be on your reading list. One evening with this book and you will start loving your photographs. And you don't have to have fancy equipment either. Just a camera and a little one!

There are many other books out there that can improve your photos of children and babies. Here are a few:


If you are lucky your library might have some of these books. But if they don't and you buy them, they are great to pass on to new parents so they too can improve their photography. I think the best baby gift to a new parent would be a book on how to photograph their baby and a gift certificate to your favorite photo lab. You have only one chance to capture those images. And no professional photographer can take better photos than you, because you are there all of the time and have the unique opportunity to capture the most amazing moments in that baby's life.

Saturday, March 14, 2009

CoffeeShop Creamy Chocolate B&W PS/PSE Action!


Here is my latest new action, CoffeeShop Creamy Chocolate B&W. This action runs in both Photoshop and Photoshop Elements and is a personal favorite of mine. It not only adds a hint of chocolate color to your image, but it also makes everything slightly softened. All layers are completely adjustable with layer masks, including the Creamy soft layer (so that you can remove the softness from eyes or other parts of the image). This action is absolutely great for portraits.

If you want to see the Action UnWrapped step-by-step tutorial, click here.

You can download the CoffeeShop Creamy Chocolate B&W PS/PSE Action HERE!

Do you want to download thousands of professional CoffeeShop PSE/Photoshop actions (including exclusive ones not found anywhere for free), textures/overlays, scrapbooking papers, clip art/design elements, photo storyboards and frames, and Lightroom presets from this site in one convenient zipped file AND help support this one-woman blog?

Just click
here for my CoffeeShop Mega Download Pack!

Tuesday, March 03, 2009

CoffeeShop Texture Pack 4!


I am on a roll and made another CoffeeShop Texture Pack to share with you. These things are an addiction. As you probably have noticed, I have been using many of the freebies from Pixels & IceCream in my texture packs. I usually don't buy digital editing stuff because I have more fun trying to learn how to create it myself, yet I fell in love with Jennifer's Damask Pattern Set and had to purchase it. Not to mention I owe her big time for all of her amazing freebies I have downloaded and used on this blog. The lovely graphic design you see in these textures came from that set. This texture set was very fun to make, and I hope you can use it!

Just open them in Photoshop or Photoshop Elements like any other image. For suggestions and tutorials on using textures, click HERE.

Click on the image to download the CoffeeShop Texture Pack 4, or click HERE!

Do you want to download my favorite CoffeeShop PSE/Photoshop Actions and Lightroom Presets or Design Elements in one convenient zipped file AND help support this blog? Just click here for my action pack or here for a download of some of my most popular design elements, storyboards, and textures. 

For complete info on installing all of my actions, click here.

Monday, March 02, 2009

Upcoming to the CoffeeShop!

Just wanted to let you know that I am releasing another texture pack tomorrow (one of my favorites) and later on this week I will be posting my first set of 20x10 storyboard template actions. These actions will run in both Photoshop and Photoshop Elements and they build and load a 20x10 storyboard template. This is the first set of a series.