
The last couple of weeks my Pantone has been nagging me to calibrate (you can turn this feature off) but like my kids asking for chocolate before breakfast, I just ignored it...

Thursday, February 25
A Cautionary Tale!
I think it is really important to calibrate your monitor and I use the inexpensive Pantone Huey  and it has worked great. It even reminds you to recalibrate your monitor every few weeks. I am one of those people who need reminders... However, this is a cautionary tale of what happens when you ignore your calibrator.
The last couple of weeks my Pantone has been nagging me to calibrate (you can turn this feature off) but like my kids asking for chocolate before breakfast, I just ignored it...
The last couple of weeks my Pantone has been nagging me to calibrate (you can turn this feature off) but like my kids asking for chocolate before breakfast, I just ignored it...
Tuesday, February 23
CoffeeShop Vintage Clipping Mask Set 1!

Do you want to download my favorite CoffeeShop PSE/Photoshop Actions and Lightroom Presets or Design Elements in one convenient zipped file AND help support this blog? Just click here for my action pack or here for a download of some of my most popular design elements, storyboards, and textures.
For complete info on installing all of my actions, click here.
CoffeeShop Editing 101: Dodge and Burn Tutorial and PS/PSE Action!

You might have noticed that I am trying to organize this blog more.I now have updated my Action Install page (button link on top) and I am also putting together a FAQs page (button link on top). I will be adding as things come up. I am trying to make this blog easier to navigate and also be able to answer more of your questions. :-)
We were chatting over on my Flickr CoffeeShop group about using dodge and burn (lighten and darken) on images in Photoshop and Photoshop Elements. The dodge and burn tools are pretty effective on the newest versions of each program, but some of us prefer doing it "old school".
BTW, I used my free CoffeeShop Color Block It action on the after sample above. A few people over at my Flickr CoffeeShop group suggested trying to make a version that adds a texture to the color block area. Look at this beautiful image from Kelly. I love this effect and I will see if I can make a second version that lets you easily add texture. I love new ideas and my readers are the best!
I never dodge or burn directly on my image. I always make a duplicate of the background or use the little tip I am sharing today.
Old School Dodge/Burn:
This tutorial works in both Photoshop and Photoshop Elements. And if you want to save some time, you can download my little free action below. ;-)
1. Make two blank new layers over your background.
2 Edit/Fill both with 50% gray.
3. Put them in softlight or overlay blending mode.
4. Name one layer dodge and paint over your image with a soft white low opacity brush on areas you want to lighten. This is a wonderful way to lighten and remove minor color casts from skin.
5. Name one layer burn and paint over your image with a soft black low opacity brush on areas you want to darken. This is a great way to get a custom vignette or make your colors "pop".
6. If you make a mistake, just refill the layer with 50% gray and start over.
7. Flatten your image.

Since I am a nerd, I made an action that works in Photoshop and Photoshop Elements if you want add the dodge and burn layers quickly. You don't have to use this action on a flat image. If you have been editing and have layers, just start the action. :-)
You can download the action HERE. And you can download the PSE5 .png thumbnail HERE and the PSE6-PSE8 .png thumbnail HERE! PSE USERS, you need the .atn and a thumbnail file!
Want all of my favorite CoffeeShop Actions or Design Elements in one simple download AND help support this blog? Just click here for my action pack or here for a download of some of my most popular design elements, storyboards, and textures. For complete info on installing all of my actions, click here.
Saturday, February 20
CoffeeShop Editing 101 - Creating Storyboards with Text Cut-Outs

I have had a few readers ask me to write a tutorial on making storyboards with text cut-outs in Photoshop and Photoshop Elements...
Friday, February 19
CoffeeShop Web Color Block It PS/PSE Action!

If you loved the CoffeeShop Web Rounded Corners and Web Drop-Shadow actions, then you will love CoffeeShop Web Color Block It... Just like my other web actions, Web Color Block It crops and sharpens your images for the web. But it also adds a custom colored color block on any side of your image AND adds optional rounded corners. This action does it all and it works in both Photoshop and Photoshop Elements (of course!).
If there is a web action that you would love to see me offer for free on this blog, just comment below and I will see what I can do!

This action is a great way to get your images ready for the web. After you finish editing your image start the action. It flattens the image (if needed) and sharpens for the web (you can adjust this to taste).
Then the Canvas Size box will pop up. See (1.) above. Decide on the anchor point (if you want the color block on only one side or completely around the image) and set the final pixel width and/or height. In this case I added 300px of color to the right side of my image. NOTE: If you just want to add color to one side, make sure you make either the width or height 0px!
Select the color from the Canvas Extension Color on the bottom via the drop-down menu. You can select a color from your image by selecting "Other" as I did and use the eye-dropper tool and click on your image (2.). Click on OK (3.) and then OK (4.).
The action will add the color block(s) and round the corners. Then it will prompt you to enter the final px width of your image (it is preset to 750px wide).

After the action runs you will have two layers, Plain and Rounded Corners. Turn on the little eye by the layer of choice and drag the layer you don't want into the trash. Save as a .jpg if you want the Plain version, save as a .png if you want the Rounded Corners and don't want the corners to be white (for example, if your blog background is colored). If you post these on Flickr, save them as .jpgs, not .pngs or you will see black or gray corners.
If you want to download the CoffeeShop Web Color Block It PS/PSE Action .atn file, click HERE! If you want to download the PSE5 action thumbnail, click HERE. If you want to download the PSE6-PSE8 action thumbnail, click HERE.
Some people have issues opening zipped files, so I will try, when possible, to just link individual files. If you have Photoshop Elements (PSE), make sure you download the action AND thumbnail needed for your program! Photoshop CS users only need the .atn file. PSE5 users need the .atn and .psd thumbnail, and PSE6-PSE8 users need the .atn. and .png thumbnail.
Do you want to download my favorite CoffeeShop Actions or Design Elements in one convenient zipped file AND help support this blog? Just click here for my action pack or here for a download of some of my most popular design elements, storyboards, and textures.
Wednesday, February 17
Cabin Fever!

What do you do when it is cold outside and you are stuck inside with two little boys that have head colds? Simple...
Tuesday, February 16
Blogger UnWrapped: Adding "Add This" Button!
This Blogger UnWrapped Tutorial applies to anyone who has a website or blog and wants to make it easy for readers to share your information.
You might have noticed I have a little Share button on the bottom of my posts...
You might have noticed I have a little Share button on the bottom of my posts...
Sunday, February 14
CoffeeShop Sun Kissed PS/PSE UnWrapped Tutorial and Action!
UPDATE! I have posted a new tutorial with some tips/tricks for this action, you can read it here, and I have also posted a newer version of Sun Kissed here!
----------
Happy Valentine's Day!
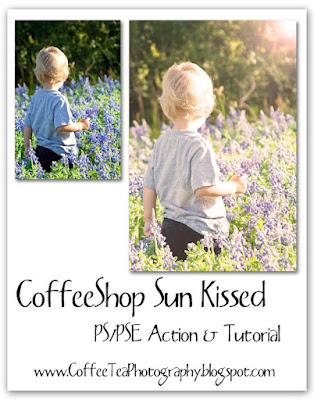
Today I want to talk about lens flare. Sometimes you are lucky and you can get amazing lens flare like I did in this image of my boys playing in the back field. However, there are other times you have great light in your image but you want to enhance the lens flare look and even add a bit of tint... At the end of the tutorial I have a link to download an action I wrote to go along with this tutorial.It is all about being artistic!
I am going to start with this simple image. The best images are ones that you can see which direction the light is coming from AND has an area of bright sky showing. I used this image to show you that you can add lens flare even when you don't have any light sky or natural lens flare present. You can see the light is coming from the upper right, but no lens flare... So why don't we add a photoshopped version. There are a million ways to do this edit, but I will show you one way I would try.
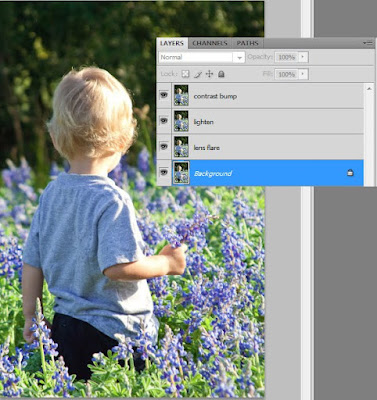
I made 3 duplicates of my background (Ctrl-J) and labeled them (from the top) Contrast bump, Lighten, and Lens flare.
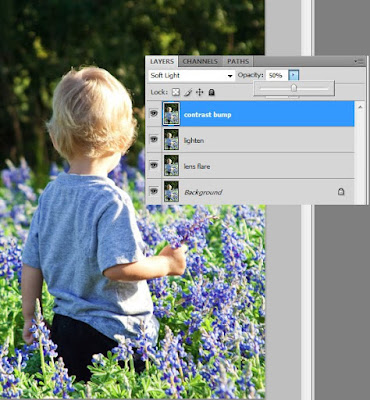
I started with the top layer, Contrast bump, and put that layer in soft light blending mode, 50% opacity. You can also use overlay and/or play with the layer opacity. This is a good starting point, you can always tweak it later.
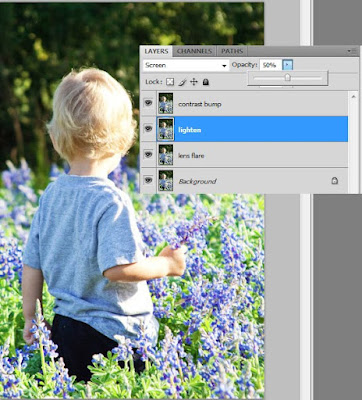
I put the Lighten layer in screen blending mode, 50% opacity. This lightens the midtones.

Now I am going to add my sun or lens flare. Click to select your Lens flare layer, and then go to Filter, Render, Lens Flare.
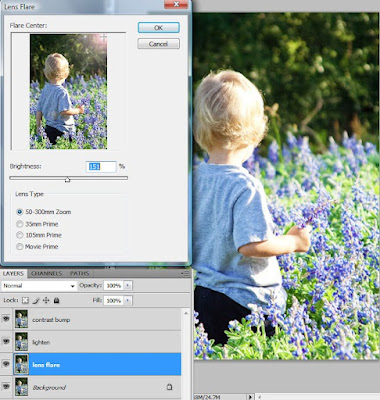
I usually use the top lens type (50-300mm zoom) but I would suggest trying all of them to see what you like best. You also have to physically move the lens flare to location and adjust the brightness to taste. Press OK. This layer I keep in normal blending mode, 100% opacity.
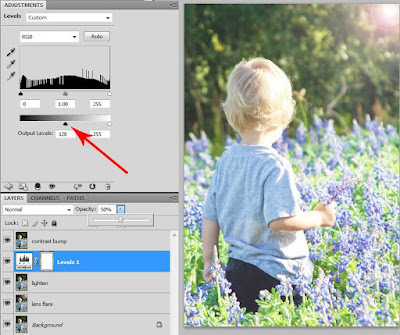
You might want to add in some haze. Simply click on the Lighten layer and then add a Levels adjustment layer. Click on the little black Output levels triangle (red arrow) and move it to the right approx. midway. Keep this layer in Normal and lower the opacity of that haze layer to taste.
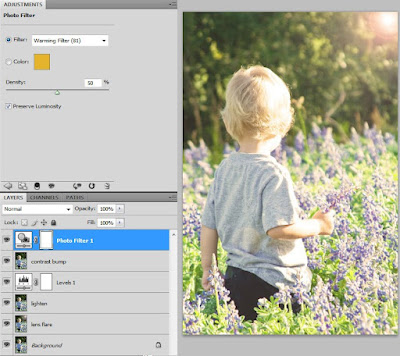
You might want to add a color filter. I want this to look like afternoon sun, so I added a Photo adjustment layer on top and used Warming filter 81 (I also love 85), 50% density, and checked preserve luminosity.
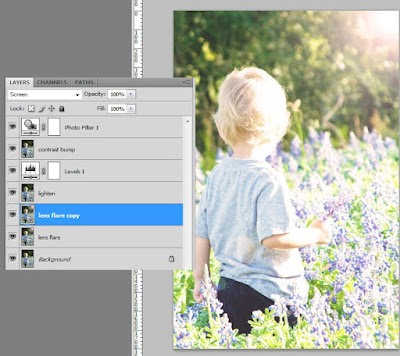
Now you can play with all of the layers to enhance the effect for your individual image. I decided I wanted more lens flare, so I simply clicked on the lens flare layer, duplicated it, and put the copy in screen blending mode, 100% opacity. You can also reduce lens flare by lowering the opacity of the layer.
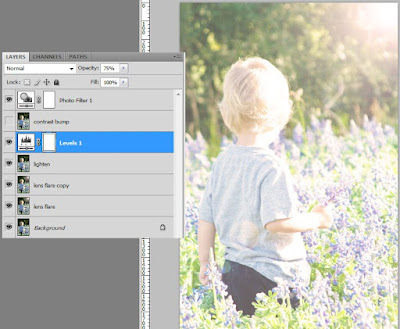
I also decided to add some more haze. I turned off the Contrast bump layer and upped the haze layer (Levels) up to 75% opacity. I like this low-contrast hazy effect.
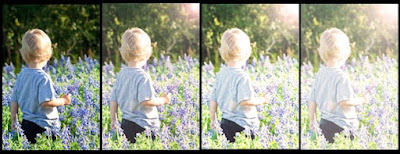
By simply adjusting the layers (blending modes and opacities), you can get so many great looks. Try turning off the lens flare layer and bring up the haze layer opacity. Play with these layers, this action does so much.
I hope you enjoyed learning how to fake your sun/lens flare!
Download the free CoffeeShop Sun Kissed PSE/PS Action!
Want all of my favorite CoffeeShop Actions or Design Elements in one simple download AND help support this blog? Just click here for my action pack or here for a download of some of my most popular design elements, storyboards, and textures. For complete info on installing all of my actions, click here.
----------
Happy Valentine's Day!

Today I want to talk about lens flare. Sometimes you are lucky and you can get amazing lens flare like I did in this image of my boys playing in the back field. However, there are other times you have great light in your image but you want to enhance the lens flare look and even add a bit of tint... At the end of the tutorial I have a link to download an action I wrote to go along with this tutorial.It is all about being artistic!

I am going to start with this simple image. The best images are ones that you can see which direction the light is coming from AND has an area of bright sky showing. I used this image to show you that you can add lens flare even when you don't have any light sky or natural lens flare present. You can see the light is coming from the upper right, but no lens flare... So why don't we add a photoshopped version. There are a million ways to do this edit, but I will show you one way I would try.
I made 3 duplicates of my background (Ctrl-J) and labeled them (from the top) Contrast bump, Lighten, and Lens flare.

I started with the top layer, Contrast bump, and put that layer in soft light blending mode, 50% opacity. You can also use overlay and/or play with the layer opacity. This is a good starting point, you can always tweak it later.

I put the Lighten layer in screen blending mode, 50% opacity. This lightens the midtones.

Now I am going to add my sun or lens flare. Click to select your Lens flare layer, and then go to Filter, Render, Lens Flare.

I usually use the top lens type (50-300mm zoom) but I would suggest trying all of them to see what you like best. You also have to physically move the lens flare to location and adjust the brightness to taste. Press OK. This layer I keep in normal blending mode, 100% opacity.

You might want to add in some haze. Simply click on the Lighten layer and then add a Levels adjustment layer. Click on the little black Output levels triangle (red arrow) and move it to the right approx. midway. Keep this layer in Normal and lower the opacity of that haze layer to taste.

You might want to add a color filter. I want this to look like afternoon sun, so I added a Photo adjustment layer on top and used Warming filter 81 (I also love 85), 50% density, and checked preserve luminosity.

Now you can play with all of the layers to enhance the effect for your individual image. I decided I wanted more lens flare, so I simply clicked on the lens flare layer, duplicated it, and put the copy in screen blending mode, 100% opacity. You can also reduce lens flare by lowering the opacity of the layer.

I also decided to add some more haze. I turned off the Contrast bump layer and upped the haze layer (Levels) up to 75% opacity. I like this low-contrast hazy effect.

By simply adjusting the layers (blending modes and opacities), you can get so many great looks. Try turning off the lens flare layer and bring up the haze layer opacity. Play with these layers, this action does so much.
I hope you enjoyed learning how to fake your sun/lens flare!
Download the free CoffeeShop Sun Kissed PSE/PS Action!
Want all of my favorite CoffeeShop Actions or Design Elements in one simple download AND help support this blog? Just click here for my action pack or here for a download of some of my most popular design elements, storyboards, and textures. For complete info on installing all of my actions, click here.
Friday, February 12
Amazing Valentine Mozy and Colorincprolab Sale!!!
You have to check out these "sweetheart" Valentine deals! ...
Thursday, February 11
Blogger UnWrapped: Adding Pages To Your Menubar and Blog!
I love Blogger. There I said it. I know many people love WordPress, but I have been a fan of Blogger for years. Not only is it free, but it is easy to customize. However, I was annoyed that Blogger did not allow you to post "pages" like you can in WordPress. A page is like a post but does not have a date on top.
Pages are great for when you want to link information like "About Me", "Tutorials", "Prices", "Favorite Links", etc. on your menubar.
Pages are great for when you want to link information like "About Me", "Tutorials", "Prices", "Favorite Links", etc. on your menubar.
Tuesday, February 9
CoffeeShop Editing 101 - Fun with Photoshop Photo Filters!

You have probably played with a Photo Filter adjustment layer in Photoshop or Photoshop Elements...
Sunday, February 7
CoffeeShop "Contact Me" Mini-Envelope Icon!
I am sure you have seen those cute little Contact Me Envelopes all over blogs and websites. You click on these little guys and your email program automatically opens up with their email address. Nifty right! Well, today I am going to share the "secret" to putting one on your blog. :-)
Download link to this envelope is toward the bottom of this post.
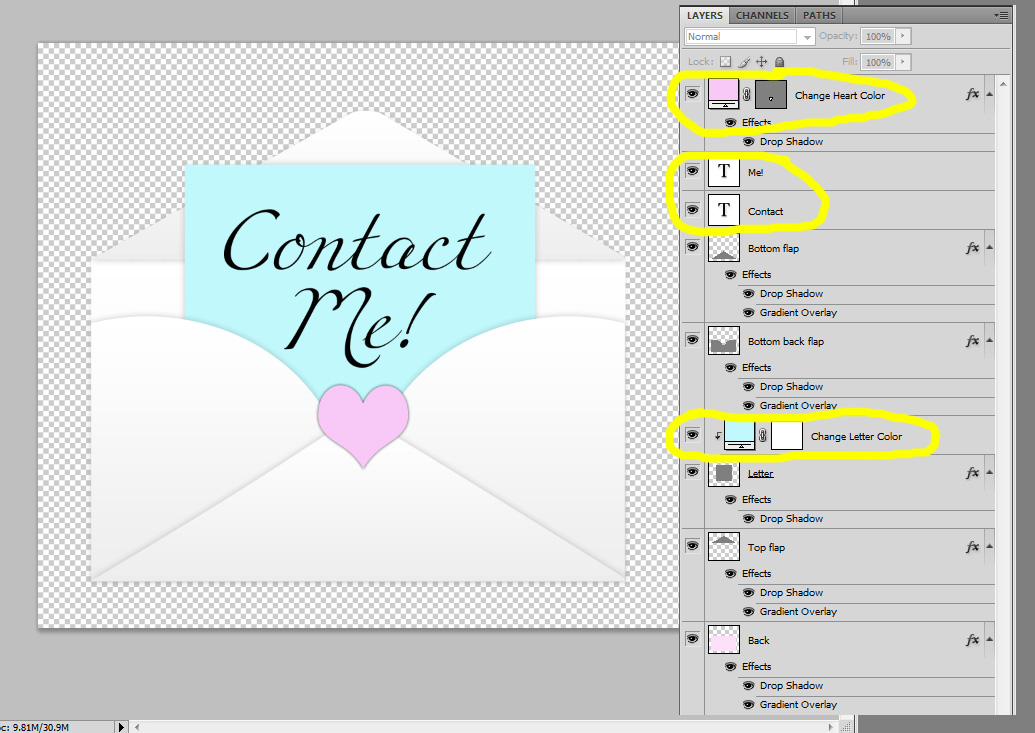
This is what the image will look like when you open it up in Photoshop or Photoshop Elements. It looks scary with all of those layers, but you only have to change the color of the heart and little letter, and adjust the text.
Simply click on the top pink Solid Color adjustment layer box to change the heart color and click on the blue Solid Color adjustment layer box to change the letter color. You can remove the heart by turning off the heart layer. :-) And you can customize the text (the text layers are circled in the image above).
Then "Merge Visible" if you are putting this on a background that is not white, or "Flatten" if the background is white. Then Image, Image Size and adjust the width of the envelope to taste. I made the one I posted above 150px wide. Make sure to adjust the image size, the original envelope is HUGE!
Upload the little envelope to an image sharing site.
Paste the code you see below (put your email address where it says "youremailaddress" and the Direct Link you copied in place of the TinyPic URL already there) in a post or on a HTML gadget in Page Elements in Blogger. Remove the center code if you don't want the image centered.
Download the incredibly cute CoffeeShop Envelope Icon file HERE!
Do you want to download all of my favorite CoffeeShop PSE/Photoshop Actions (including exclusive ones not found anywhere for free), Textures, Papers, Design Elements, and Lightroom Presets in one convenient zipped file AND help support this blog? Just click here for my CoffeeShop Mega Download Pack!

This is what the image will look like when you open it up in Photoshop or Photoshop Elements. It looks scary with all of those layers, but you only have to change the color of the heart and little letter, and adjust the text.
Simply click on the top pink Solid Color adjustment layer box to change the heart color and click on the blue Solid Color adjustment layer box to change the letter color. You can remove the heart by turning off the heart layer. :-) And you can customize the text (the text layers are circled in the image above).
Then "Merge Visible" if you are putting this on a background that is not white, or "Flatten" if the background is white. Then Image, Image Size and adjust the width of the envelope to taste. I made the one I posted above 150px wide. Make sure to adjust the image size, the original envelope is HUGE!
Upload the little envelope to an image sharing site.
Paste the code you see below (put your email address where it says "youremailaddress" and the Direct Link you copied in place of the TinyPic URL already there) in a post or on a HTML gadget in Page Elements in Blogger. Remove the center code if you don't want the image centered.
<center><a href="mailto:youremailaddress@yahoo.com">
<img src="http://i49.tinypic.com/npkyl4.jpg"> </a></center>
<img src="http://i49.tinypic.com/npkyl4.jpg"> </a></center>
Download the incredibly cute CoffeeShop Envelope Icon file HERE!
Do you want to download all of my favorite CoffeeShop PSE/Photoshop Actions (including exclusive ones not found anywhere for free), Textures, Papers, Design Elements, and Lightroom Presets in one convenient zipped file AND help support this blog? Just click here for my CoffeeShop Mega Download Pack!
Friday, February 5
My Early Valentine's Present, or Life is Too Short For Bad Coffee!

I don't know if I have mentioned this before, but I am a tiny bit addicted to coffee...
Wednesday, February 3
CoffeeShop Retouching Tutorial: Skin Retouching in LightRoom2

I love Adobe Photoshop Lightroom 2 as I have mentioned a few times before. Did you know you can do minor retouching in LR? Today I am going to show how to remove small blemishes and smooth skin...
Monday, February 1
CoffeeShop Blogger UnWrapped: Sharing Your Stuff!
I know there are so many of you that would love to offer your own actions, storyboards, images, etc. for download. I get asked quite often how one goes about sharing things on their blog, so I wanted to put together a small tutorial on how I do it.
I use MediaFire and 4shared as they both have free versions.
I use MediaFire and 4shared as they both have free versions.
Subscribe to:
Posts (Atom)


