Sunday, February 14

CoffeeShop Sun Kissed PS/PSE UnWrapped Tutorial and Action!

UPDATE!  I have posted a new tutorial with some tips/tricks for this action, you can read it here, and I have also posted a newer version of Sun Kissed here!
----------

Happy Valentine's Day!
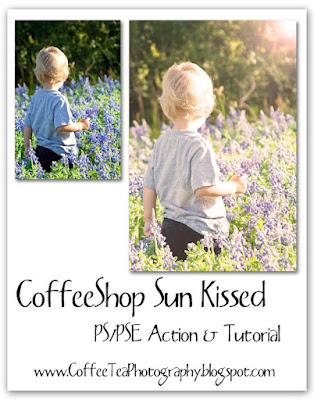


Today I want to talk about lens flare. Sometimes you are lucky and you can get amazing lens flare like I did in this image of my boys playing in the back field. However, there are other times you have great light in your image but you want to enhance the lens flare look and even add a bit of tint...  At the end of the tutorial I have a link to download an action I wrote to go along with this tutorial.It is all about being artistic!


I am going to start with this simple image. The best images are ones that you can see which direction the light is coming from AND has an area of bright sky showing. I used this image to show you that you can add lens flare even when you don't have any light sky or natural lens flare present. You can see the light is coming from the upper right, but no lens flare... So why don't we add a photoshopped version. There are a million ways to do this edit, but I will show you one way I would try.

I made 3 duplicates of my background (Ctrl-J) and labeled them (from the top) Contrast bump, Lighten, and Lens flare.


I started with the top layer, Contrast bump, and put that layer in soft light blending mode, 50% opacity. You can also use overlay and/or play with the layer opacity. This is a good starting point, you can always tweak it later.


I put the Lighten layer in screen blending mode, 50% opacity. This lightens the midtones.


Now I am going to add my sun or lens flare. Click to select your Lens flare layer, and then go to Filter, Render, Lens Flare.


I usually use the top lens type (50-300mm zoom) but I would suggest trying all of them to see what you like best. You also have to physically move the lens flare to location and adjust the brightness to taste. Press OK. This layer I keep in normal blending mode, 100% opacity.


You might want to add in some haze. Simply click on the Lighten layer and then add a Levels adjustment layer. Click on the little black Output levels triangle (red arrow) and move it to the right approx. midway. Keep this layer in Normal and lower the opacity of that haze layer to taste.


You might want to add a color filter. I want this to look like afternoon sun, so I added a Photo adjustment layer on top and used Warming filter 81 (I also love 85), 50% density, and checked preserve luminosity.


Now you can play with all of the layers to enhance the effect for your individual image. I decided I wanted more lens flare, so I simply clicked on the lens flare layer, duplicated it, and put the copy in screen blending mode, 100% opacity. You can also reduce lens flare by lowering the opacity of the layer.


I also decided to add some more haze. I turned off the Contrast bump layer and upped the haze layer (Levels) up to 75% opacity. I like this low-contrast hazy effect.
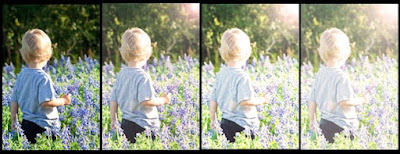

By simply adjusting the layers (blending modes and opacities), you can get so many great looks. Try turning off the lens flare layer and bring up the haze layer opacity. Play with these layers, this action does so much.

I hope you enjoyed learning how to fake your sun/lens flare!

Download the free CoffeeShop Sun Kissed PSE/PS Action!

Want all of my favorite CoffeeShop Actions or Design Elements in one simple download AND help support this blog? Just click here for my action pack or here for a download of some of my most popular design elements, storyboards, and textures. For complete info on installing all of my actions, click here.

43 comments:

  1. Beautiful action Rita...many thanks! Happy Valentines Day to you and yours! :)

    ReplyDelete
  2. Thank you for another wonderful action and tutorial!

    ReplyDelete
  3. great tut! thanks for sharing, I have been wanting to know how to add some faux lens flare! happy v-day!

    ReplyDelete
  4. Thanks Rita.....I love this look but didn't want to aim at the sun...it might break my camera...no need to worry now!!!! I love it. Thanks again for all of the actions!!! xxxRobby

    ReplyDelete
  5. Thank you so much for the action. I love lens flare (usually I get it by accident).

    Beautiful photos!

    ReplyDelete
  6. Thank you sweetie!!! You're the BEST!!!!

    ReplyDelete
  7. Thank you so much Rita! I was just trying to figure this out this past week! Mmmwwwah!

    ReplyDelete
  8. Thank you for freebies. Link on your post was added to Lori's freebie list

    ReplyDelete
  9. Thank you! This blog post will be advertised on CraftCrave in the Tutorials category today (look for timestamp: [15 Feb 01:00pm GMT]).

    ReplyDelete
  10. Oh Yes!! Thank you for the walk-through.
    I'd always rather learn HOW to do something than use an action.

    ReplyDelete
  11. Thank you so much for this Freebie. I want to let you know that I posted a link to your blog in CBH Digital Scrapbooking Freebies, under the Page 14 post on Feb. 15, 2010. Thanks again.

    ReplyDelete
  12. My first (but not last) visit and I am blown away! I got photoshop elements for Christmas - not even installed it yet! Too scared! This site is invaluable. Many many thanks. - Dawn

    ReplyDelete
  13. I just used this today on a snow pic and I LOVE it! Of course I had great intentions to "do it myself" following your tutorial but you just make it way too easy to use the action! ~thank you~

    ReplyDelete
  14. Looks like another awesome action! TFS. -- A Canuck

    ReplyDelete
  15. This is one of my FAVS that you have done!! LOVE it and overuse it!! LOL!!

    Any idea when the PW actions that you converted will be available? Just curious.

    ReplyDelete
  16. Rita,

    This is my favorite action to date!! I even used it on a photo to give the illusion of a great window light source!!

    ReplyDelete
  17. I love it when you explain the long way to do these! I've learned so much from that!

    ReplyDelete
  18. thanks for this... It worked perfectly for a photo I had taken of my daughter and her kitty. the sun was behind them, but no flare...now it's a spectacular shot, according to me..haha. thanks again!

    ReplyDelete
  19. I just found your website/blog and I am loving your tutorials. I am new to PSE and your tutorials are really helping me understand what the program can do. Thank you!

    ReplyDelete
  20. Thank you Rita,
    i love flare and you tutorial is so good

    ReplyDelete
  21. Just wanted to let you know that I am learning so much just reading through your blog! Thank you so much!

    ReplyDelete
  22. i just found your website and am so happy i did! the tutorials are awesome! but i have a problem. i'm running PSE 6 on Windows 7 and can't find a photo effects folder to save my soul. i don't know where to load the actions. my files aren't the same ones you have so kindly listed in your screen shot. any ideas?

    ReplyDelete
  23. wowza!!! thanks so much.. you're a beauty asset to digital editing

    ReplyDelete
  24. What an amazing and generous place this is!! :)
    Many thanks!!

    ReplyDelete
  25. Hi there! Love the site and the tutorials/actions are helpful! Thank you. Here is my blogspot :) Anyone up for a offer of critque?

    -self taught
    Vee
    http://veehagenphotography.blogspot.com/

    ReplyDelete
  26. Thank you so much for the free actions! I'm just learning and I really apprciate all of your knowledge!

    ReplyDelete
  27. I just came upon you site and I am so excited to try to learn from you and enhance my images! Thank you so much!

    ReplyDelete
  28. Rita, thankyou so much...I have learned so much here!!

    ReplyDelete
  29. Thank you, thank you, thank you! I am learning SO MUCH from you, and I am so excited to try this action!!

    ReplyDelete
  30. This was a great tutorial! Thanks so much.

    ReplyDelete
  31. Thanks so much for sharing your actions and how you made them. I am learning a lot, I really, really appreciate it!

    ReplyDelete
  32. heya

    http://www.flickr.com/photos/asmamirza/4796160368/in/photostream

    Thats where I used ur action I love it :)

    ReplyDelete
  33. Excellent tutorial. Thank you :) The Creativity Project on facebook posted a link to this today and I am so glad they did!

    ReplyDelete
  34. Thank you! Goodness, I can't thank you enough. I've been working on creating my own PS lens flare for what seems like ages, and you're just better at it than I am! Thank you again for sharing, you rock!

    ReplyDelete
  35. Does this not work with pse9? When I uploaded it, it said it wasn't compatible.

    ReplyDelete
  36. Thank you so much for the actions! I love them! For some reason I can't move the sun flare to another place on my photo. Am I doing something wrong?

    ReplyDelete
  37. Rita,
    Love this action. Thanks so much. It's exactly what I was looking for but wasn't able to create on my own! I'm just wondering if there's an easy way to move the flare around to different parts of the image?

    Thanks!

    ReplyDelete
  38. I do not understand how to download the actions from your website. I dont see the link

    ReplyDelete
    Replies
    1. They are all in the post where I discuss the actions. :-)

      Delete
  39. I was curious if there is a way to flip the sun flare to the other side? I need it to come in from the top left but am not sure how to flip it.

    ReplyDelete
    Replies
    1. Yes, you can move it! When the Lens Flare settings pop-up, simply click on the image in the setting where you want to place it. It can be anywhere you want.

      Delete

Thank you for taking the time to leave a message, I love reading them! All comments are personally moderated by me and I will post and answer them them as soon as possible.
Rita