Thursday, July 31

CoffeeShop Vivid Action is here!

Here is the newest free color action in the CoffeeShop family. The CoffeeShop Vivid action is all you need for basic color photo processing, and it is my easiest action so far. This action, which works in both Photoshop and Photoshop Elements, allows you to choose from 4 custom color pop layers (soft, vivid, urban, and bright) and adjust the level of pop of that layer, sharpen your image, and even selectively lighten/darken parts of your image (including adding a custom vignette). It sounds complicated but it is actually really simple and the action does most of the work for you. 

I have two versions for download. The first version, CoffeeShop Vivid, runs on a duplicate of your original image and includes notes within the action. The second version, CoffeeShop Vivid No Wait, runs the action on your original file and there are no notes within the action to save time in running it. Both actions include full .pdf instructions within the zipped file. 

 Click on the image below to download the free action!


There are two versions. The Vivid No Wait does not include instructions in the action so it runs faster.

You will be downloading a zipped file that contains the action file (.atn), an icon for Elements 6.0 (.png), an icon for Elements 3, 4, and 5 (.psd), instructions for the action (.pdf), and the above photo of the action in "action" (.jpg).

Do you want to download thousands of professional CoffeeShop PSE/Photoshop actions (including exclusive ones not found anywhere for free), textures/overlays, scrapbooking papers, clip art/design elements, photo storyboards and frames, and Lightroom presets from this site in one convenient zipped file AND help support this one-woman blog?

Just click here for my CoffeeShop Mega Download Pack!

Sunday, July 27

Coming Soon, More PSE Actions

Just wanted to let you guys know that I am rewriting my "classic" CoffeeShop actions (Creamy Toffee Latte and such) to work in PhotoShop Elements. They will be available for download in the next few days (hopefully).

Also, for those of you that have Elements 4 and 5, I will be adding a .psd icon file for your photo effect folder as apparently the .png file does not work in your programs. I will also include a copy of the action that does not include the notes or comments for those of you that don't want to read the instructions while running the action to save time. So the CoffeeShop Barista action folder you download will contain the .atn (action file), .png (icon for PS6), .psd (icon for PS4 and PS5), another .atn (action file) that does not include notes (and it will have matching .png and .psd icons) and an instructional PDF file on the actions. I will try to get this up in the next week.

Friday, July 25

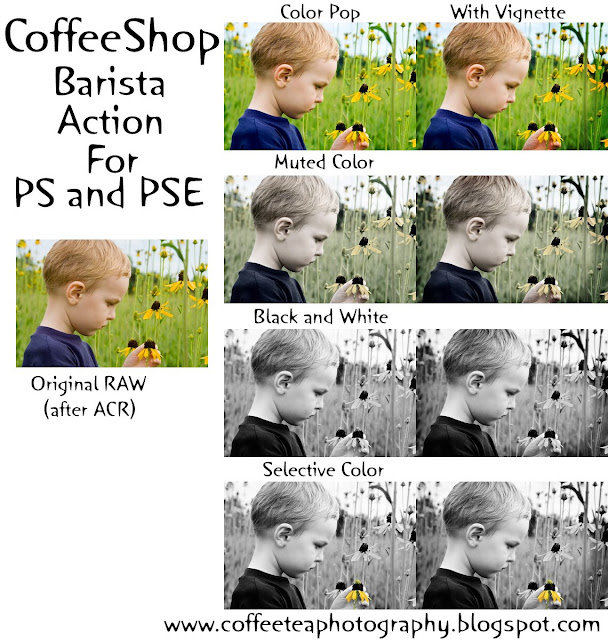
CoffeeShop Barista Tutorial/Action for PSE/PS is HERE!

Click here to download the free action!


This is a tutorial on how to enhance your photos with color pop (with a little layer addition capable of making them B&W, muted color, or even B&W AND color). I have written an action that can be run in both PhotoShop Elements AND PhotoShop and this is the step-by-step tutorial that will tell you how to get the same look without using the action. It is also invaluable as instructions on running the action and understanding what you should do in each step.  The photos above are only a representation of what you can do. Every layer is completely adjustable so YOU decide your final look.

This method will “pop” your colors with both an increase in saturation and contrast. It also adds a layer where you can selectively dodge and burn (lighten and darken) areas of your photo (lighten skin and eyes, darken background or make a vignette). It also allows you to sharpen your image. I added an adjustable layer that you can toggle off and on (by adjusting the opacity) to make your photos B&W, muted colors, OR have a selective color effect where they have both B&W and color elements.

1. Open the image you wish to process.
2. File then Duplicate (opens a copy of your file to work on so your original does not get altered, great to see Before/After)
3. LEVELS: Add a Levels Adjustment layer. Use your black eyedropper to click on something black to remove any color cast. You can also click on something white with the white eye dropper. If your photo looks worse, then reset and click somewhere else until you get the look you want. Then adjust Level's sliders to taste. I usually move the midpoint over to the left a bit to lighten the midtones.
4. DODGE/BURN: Add a new blank Layer above Levels and call it Dodge/Burn. Fill it with 50% gray and put the blending mode in Overlay or Softlight. Type B to get your brush tool and use a low opacity (10% or so) soft brush and paint over anything you want lightened. I usually paint over skin and eyes to brighten them a bit. Then, using a low opacity soft black brush, paint over anything you want darkened. I usually darken the background some, or you can use this method to paint a vignette around the edges of your photo. Increase the opacity to 25% or so if you are doing a vignette. If you completely mess up, then just Edit then Fill Layer then 50% gray and it returns your layer back to the original setting, and repaint.
5. CONTRAST: Select Background, Ctrl-J to make a copy. Change the blending mode to Soft Light and move the opacity down to 25%.
6. SHARPEN: Select Background, Ctrl-J to make a copy. Run the Unsharp Mask over this layer to sharpen your image. I usually start with Amount 125%, Radius 1, Threshold 3. Put the blending mode into Luminosity. Adjust opacity as needed.
7. Color Saturation: Select the Dodge/Burn layer and add a new Hue/Saturation layer above it. Put the Saturation setting on 20 and change the blending mode to Color, Opacity 20%.
8. B&W/Muted Color: Now add a Gradient Map Adjustment layer on top. Make sure it is set to Black, foreground to transparent. This is a great way to turn your photo B&W. Now adjust the opacity of this layer to 0% to keep your photo color, 100% for B&W, or anywhere in between for muted colors. You can also make a B&W image with “colorized” parts. Just adjust the opacity to 100% (so your photo is B&W) and use a soft black brush (opacity of choice depending on how vivid you want the colored parts to be) and paint over anything you want in color.
9. Now you can adjust all of your layers to taste. The opacity's I gave you are just a starting point so don’t be afraid to change them.
10. Flatten your image and save! Rerun the action on this image once again to get a really vivid photo.

Do you want to download thousands of professional CoffeeShop PSE/Photoshop actions (including exclusive ones not found anywhere for free), textures/overlays, scrapbooking papers, clip art/design elements, photo storyboards and frames, and Lightroom presets from this site in one convenient zipped file AND help support this one-woman blog?

Just click here for my CoffeeShop Mega Download Pack!

Monday, July 21

Elements 6.0 Actions Coming Soon!

After downloading and playing with the free trial version of Photoshop Elements 6.0, I now realized why most of my actions don't work in Elements. So I have decided that I will edit/rewrite some of my PS ones, and create some new actions that are completely compatible with Elements. I am seriously surprised that Elements is such a great and powerful photo-editing program, and completely affordable (unlike its badboy stuck-up older brother CS3). If only it had an action writing option!

Anyway, stay posted and check out my blog in a week or so and I should have some free Elements friendly actions (that will also work in PS of course).

Saturday, July 12

Free CoffeeShop Color Pop Actions!

These actions only work in Photoshop, not Photoshop Elements.

Click on image to download!


The CoffeeShop Color Pop free actions are finally here! This set contains 4 color pop actions plus a little burn-the-edges action. All layers are adjustable before flattening, so if you find your photo looks too vivid or mute then just adjust up or down the opacity of layers or play with the blending modes. And please post any samples of your work using these actions at http://www.flickr.com/groups/coffeeshopfreeactions/ with the tag "coffeeshopactions". I love seeing what you do with them!

Wednesday, July 9

CoffeeShop Color Pop Actions almost done!

I have almost finished the testing of my new free color pop actions. There will be a multi-step complex color pop that it adds vivid colors, more contrast, sharpening, and a burned edge and is fully adjustable. I will also have a simple soft pop and a mute pop action that hopefully will work in Elements also. And I have thrown in an action that allows you to add custom burned edges to your photos.

So please check back soon, the free downloadable actions will be here! Hope you guys like them.

Thursday, July 3

Photoshop Color Pop tutorial.

This tutorial was written for Photoshop, so all of the steps will not work in Photoshop Elements.

Free Coffee Shop color pop actions will be posted here in the next few days, including this one.


Click on the photo to see the larger pic. Then click on "All Sizes" on top and then click on large to see a large copy.

Here is one way I do color pop.

1. Contrast layer: Curves layer to adjust color (use black eyedropper to click on black on image, use white to click on white in image, if looks strange hold down alt key and press reset and start over) and then adjust contrast with minor S curve.
2. Lighten layer: Click on background, then ctrl-J to copy it. Put that layer in screen and lower opacity to taste. Mask out anything else you want darker.
3. 50% gray layer for lightening skin: Add new blank layer, fill with 50% gray and put it in overlay blending mode, then use a soft white brush with lower opacity and brush over skin to lighten. If you mess up just brush over areas you want back with a soft black brush. You can then lower the opacity of this layer if needed to taste. This is not always necessary, but sometimes I want a slightly lighter desaturated skintone.
4. Hue/Saturation layer: Add saturation (40 - 50% or to taste), put layer in color, then fill layer mask with black. Use a lower opacity white brush and paint in background and anything you want really colorful. You can also adjust the opacity of this layer if needed.
5. Selective color layer: I take away cyan and add yellow to red, then add extra yellow to yellow, add more black to black. Play around with this, it is to taste!
6. Burn edges layer: Click on background, ctrl-J for copy of background. Use burn tool set at low opacity and burn edges to taste.
7. Sharpen layer: Click on background, ctrl-J for copy, move above lighten layer. Use high pass filter (adjust setting where you see light outline of what you want sharpened), then put that layer in overlay, and adjust opacity to taste. Or just use a unsharp mask on this copied background layer to taste.
8. Top layer to custom set the entire effect: Make a new blank layer on the top. Hold down alt key and go to Layer<Merge Visible. This should merge all of your layers into the top layer without affecting any of your other layers. Make visible this layer and your background, turning off all of the other layers (as seen in the picture). Then adjust opacity of the top merged layer to taste. Then flatten and save!

I will make a free action for this color pop technique which I will post here shortly. Sorry about the poor quality capture, I was just playing around with a substandard SOOC (straight out of camera) photo today and found a color pop technique I like, and did not have time to work on a decent shot!


Monday, June 9

Actions Updated and New File-hosting

OK, I just updated all of my actions (made a few tweaks to make them more user friendly) and now you have two options of where you can download them. Hopefully one or the other will work for you! Both links are the updated actions (the action name is followed by June08). Please let me know if you have any issues downloading the files or problems with the actions themselves.

I have had many people ask me how to load the actions into Photoshop. Download the file onto your desktop (or somewhere you can find it). Then open the action pane in Photoshop and click on the top right corner for the action menu, and then select load actions. Find your action on your desktop (or wherever you stored it) and click on it and it should be loaded. Open up the little action folder, select the action you want to run, and press the little run button on the bottom. Good luck and have fun!

Friday, May 2

Problems downloading free actions?

I am having some issues with my file-hosting site (Mediafire), so if you are having problems downloading my free actions then try again a few hours later (or even the next day), or email me at coffeephotolove@yahoo.com and let me know which actions you want and I will send them to you.

I am so sorry for the inconvenience. I am looking for a more dependable free hosting site.

One reader suggested this way around the problem, you can see if it works for you! When I tried to download the Coffee at the Bakery - Coffee shop actions I would click on the link at the mediafire site and it would take me to another page that was just a lot of text. So I tried doing a right click and chose "Save Linked File As...". The name of the file had a .txt at the end of it. So I saved it to my desktop without the .txt. I then loaded into PS. I would suggest also adding .atn at the end to make it an actual action file. Let me know if this works!
Rita

Friday, April 25

Examples of images processed with CoffeeShop actions


I am going to start posting some amazing captures from photographers over at Flickr who have been kind enough to play with my actions.


SunKissedSam at http://www.flickr.com/photos/samanthahanlon/ posted the above cute images. The top left is the original, the top right is "Hint of Color", the bottom left is "Tritone", and the bottom right is "Gradient". All three are from my B&W action set. I think this photo set demonstrates that an excellent picture is 99% due to the actual capture and only 1% the action.


The pictures above are all done by Kpauli http://www.flickr.com/photos/wendypictures/ . She has a gorgeous photostream that you have to check out. She used the Creamy Toffee Latte action on the little girl and the dog and on the little girl wrapped in the towel (which made Flickr Explore on April 4th!). The garden scene has the blueberry glaze action applied.