

Click here to download the free action!
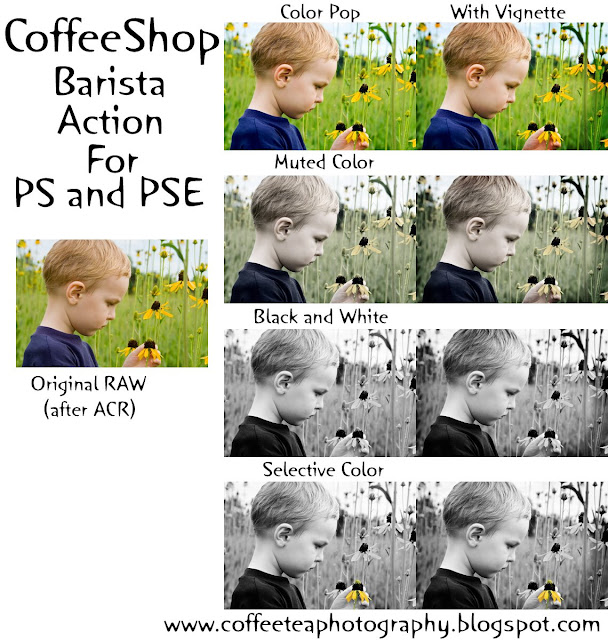
This is a tutorial on how to enhance your photos with color pop (with a little layer addition capable of making them B&W, muted color, or even B&W AND color). I have written an action that can be run in both PhotoShop Elements AND PhotoShop and this is the step-by-step tutorial that will tell you how to get the same look without using the action. It is also invaluable as instructions on running the action and understanding what you should do in each step. The photos above are only a representation of what you can do. Every layer is completely adjustable so YOU decide your final look.
This method will “pop” your colors with both an increase in saturation and contrast. It also adds a layer where you can selectively dodge and burn (lighten and darken) areas of your photo (lighten skin and eyes, darken background or make a vignette). It also allows you to sharpen your image. I added an adjustable layer that you can toggle off and on (by adjusting the opacity) to make your photos B&W, muted colors, OR have a selective color effect where they have both B&W and color elements.
1. Open the image you wish to process.
2. File then Duplicate (opens a copy of your file to work on so your original does not get altered, great to see Before/After)
3. LEVELS: Add a Levels Adjustment layer. Use your black eyedropper to click on something black to remove any color cast. You can also click on something white with the white eye dropper. If your photo looks worse, then reset and click somewhere else until you get the look you want. Then adjust Level's sliders to taste. I usually move the midpoint over to the left a bit to lighten the midtones.
4. DODGE/BURN: Add a new blank Layer above Levels and call it Dodge/Burn. Fill it with 50% gray and put the blending mode in Overlay or Softlight. Type B to get your brush tool and use a low opacity (10% or so) soft brush and paint over anything you want lightened. I usually paint over skin and eyes to brighten them a bit. Then, using a low opacity soft black brush, paint over anything you want darkened. I usually darken the background some, or you can use this method to paint a vignette around the edges of your photo. Increase the opacity to 25% or so if you are doing a vignette. If you completely mess up, then just Edit then Fill Layer then 50% gray and it returns your layer back to the original setting, and repaint.
5. CONTRAST: Select Background, Ctrl-J to make a copy. Change the blending mode to Soft Light and move the opacity down to 25%.
6. SHARPEN: Select Background, Ctrl-J to make a copy. Run the Unsharp Mask over this layer to sharpen your image. I usually start with Amount 125%, Radius 1, Threshold 3. Put the blending mode into Luminosity. Adjust opacity as needed.
7. Color Saturation: Select the Dodge/Burn layer and add a new Hue/Saturation layer above it. Put the Saturation setting on 20 and change the blending mode to Color, Opacity 20%.
8. B&W/Muted Color: Now add a Gradient Map Adjustment layer on top. Make sure it is set to Black, foreground to transparent. This is a great way to turn your photo B&W. Now adjust the opacity of this layer to 0% to keep your photo color, 100% for B&W, or anywhere in between for muted colors. You can also make a B&W image with “colorized” parts. Just adjust the opacity to 100% (so your photo is B&W) and use a soft black brush (opacity of choice depending on how vivid you want the colored parts to be) and paint over anything you want in color.
9. Now you can adjust all of your layers to taste. The opacity's I gave you are just a starting point so don’t be afraid to change them.
10. Flatten your image and save! Rerun the action on this image once again to get a really vivid photo.
Just click here for my CoffeeShop Mega Download Pack!


