Showing posts with label Jill Wellington. Show all posts

Wednesday, March 6

CoffeeShop "Pretty Roses" Square Storyboard Set!


Today it is sunny and slightly warmer, so as far as I am concerned it is spring! Thus inspired, I decided to design a new floral storyboard set. This set is 10x10 and can be printed or posted on the web on blogs/websites/social media.

Add images using clipping masks and easily change the color of the roses/leaves using the installed Solid Color adjustment layers. I have a little tutorial below how to customize them.

The roses design on these storyboards was modified from a beautiful vintage rose lace design at The Graphics Fairy. Please check out their site, it is such a resource for vintage designs with great terms-of-use. I am also a part-time instructor over there. The pretty images used in the storyboard on this post are from Jill Wellington (Etsy ShopFacebook, Blog, YouTube Videos, Pixabay).


Customizing CoffeeShop "Pretty Roses" Storyboards:


Add your image to the clipping mask. In this case the roses are too big, so I will make them smaller.


Select the Top Roses layer along with its two Solid Fill layers for Leaves and Rose color. 


Cntr(Cmd)-T to Free Transform them to the size you want, then move them to position.


Then change the  roses and leaves color to match your image by double-clicking on the Solid Color fill layers.

Hope you have fun playing with theses Rose storyboards.

Download the CoffeeShop "Pretty Roses" Storyboard Set!

Do you want to download my favorite CoffeeShop PSE/Photoshop Actions and Lightroom Presets or Design Elements in one convenient zipped file AND help support this blog? Just click here for my action pack or here for all the actions/presets and professional design elements, storyboards, and textures.

For complete info on installing all of my actions, click here.


More from Rita:
Facebook | Instagram | Pinterest | Twitter

Wednesday, December 19

CoffeeShop "Heavenly Foil Papers" & Photoshop/PSE Tutorial!


OK, I think this is probably the last Christmas design post of the year. I am so sorry I am so far behind this season, I just had a lot going on last month and didn't have enough energy/creatively to design. But I am back in the saddle, finally. And it feels so good!

Today I wanted to share a pack of foil digital papers. They aren't just for Christmas, you can use them year round. These are gorgeous used alone as digital paper on designs or clipped to text or frames to add some beautiful shimmer. I have a tutorial below on some of the ways you can use them and I even show you how I can customize the colors to match colors in your image!

These papers come with free commercial terms-of-use, like everything I post on my blog. So have fun with them!

Click here to see all of my free Christmas actions and digital designs.  And you can download all of my favorites in my Mega Download Pack (which includes this huge Holiday pack)! My designs/actions can be used personally or commercially, no attribution necessary. :-)

This is the tutorial I used to create these papers. And this is the free Leckerli font I used in my tutorial below. The image with the lovely woman in the white coat is from Jill Wellington (Etsy ShopFacebook, Blog, YouTube Videos, Pixabay). The girl in skates is from Pixabay.

CoffeeShop "Heavenly Foil Papers" Tutorial:


I am going to show you how to add these foil papers to text to make it gloriously shimmery!

Add Text: Add your text to the image. I used the free Leckerli font for this tutorial. This is one of my favorite decorative texts and I love that you can use it commercially for free.


Add Gold Foil: File or drop and drag the foil paper on top of the text.


Free-Transform, Cntr (Cmd)-T, and drag it to fit over the text.


Clip it to the text as seen in the screenshot above. Clip the gold texture to the text layer. To do this, click to select the "CoffeeShop Gold Foil" layer  and go to Layer Create Clipping Mask on the top menubar. Alternatively, select the gold texture and hold down the alt/option key while holding the mouse cursor between the two layers. When you see a little white box show up, click on it and the gold texture layer will be grouped to the text layer below it.


Add Rose Foil: I wanted to add both the gold and rose gold papers to this text. So I placed and grouped the rose gold texture on top as seen in the screenshot above.


I added a layer mask to the rose gold layer.


And then I clicked to select that layer mask and used a hard 100% opacity black brush on the letters I wanted to appear gold. I think this is so pretty!


Bevel and Emboss Text: If you want to add some dimension to your text, click on the text layer and go to the top menubar and click Layer < Layer Style and select Drop Shadow or Bevel and Emboss and adjust the settings to taste.


Add Foil Frame: It is really easy to add a foil frame. 

With the top layer selected, grab your rectangular Marquee tool (M) and draw in the frame as seen above. Then go to the top menubar and click Select < Reverse.


Add a Color Fill layer, any color on top. Don't clip this to anything!


Add the rose gold foil on top of the Color Fill layer and clip it to it. Now you have a beautiful pink shimmery frame!


Changing the Foil Color: It is also very easy to customize the foil paper color to match your image. I followed the steps above and added the gold foil to the text "JOY".


I added a Color Fill layer that was the color of her hat (I clicked to select that color) and then clipped that layer to the gold layer.


I put the Color Fill layer in Color blending mode. As you can see it is too light.


To darken the color and add contrast, I added and clipped a Levels Adjustment layer to the Color Fill layer and adjusted the shadow/midtone sliders to taste. I love this color, it is so pretty.

I hope you enjoyed this tutorial and get some use from these papers.

Download the CoffeeShop "Heavenly Foil Paper Set"!

Do you want to download my favorite CoffeeShop PSE/Photoshop Actions and Lightroom Presets or Design Elements in one convenient zipped file AND help support this blog? Just click here for my action pack or here for all the actions/presets and professional design elements, storyboards, and textures.
More from Rita:
Facebook | Instagram | Pinterest | Twitter

Tuesday, December 18

CoffeeShop "Gilded Christmas Card/Storyboard" Set!


Today I have a new set of Christmas storyboards/cards. These are Photoshop/PSE psd files and have beautiful gold foil decorations and are completely customizable. You can change the background and text colors and placement of the text.

These storyboards/photo templates can be printed as cards or used on social media/websites/blogs. They come with free commercial terms-of-use, so use them any way you want, just don't resell them "as-is".

NOTE: I used the free Leckerli font on these cards, so if you don't have it and want to use it, download Leckerli here! I LOVE this font, it is gorgeous.

Click here to see all of my free Christmas actions and digital designs.  And you can download all of my favorites in my Mega Download Pack (which includes this huge Holiday pack)! My designs/actions can be used personally or commercially, no attribution necessary. :-)

Original Images: (family,  bridal). The little baby image is from Jill Wellington (Etsy ShopFacebook, Blog, YouTube Videos, Pixabay).

Tomorrow I am posting the gold foil texture I used on these cards and a tutorial on how to add them to text and make frames.


Do you want to download my favorite CoffeeShop PSE/Photoshop Actions and Lightroom Presets or Design Elements in one convenient zipped file AND help support this blog? Just click here for my action pack or here for all the actions/presets and professional design elements, storyboards, and textures.

More from Rita:
Facebook | Instagram | Pinterest | Twitter

Sunday, December 16

CoffeeShop "Christmas Gold Glitter Frames" Set!


I am trying to get my last Christmas designs out here before it is too late. Where has the time gone... Just yesterday I finished all of my Christmas shopping and it feels so good. We just buy for the kids  in our families, so it is actually pretty fun. 

But as the kids get older the shopping gets more challenging. Duke just turned 14 and I asked him to make an Amazon list of things he loves. I gave him two weeks because I know he is slow. So a few days ago I checked his list and he had a total of four Star Wars miniature games. All variations of the same (boring) game, priced from $31-$90. 


I told him that it would be great if he could add some additional ideas on his list, and he turned to me and said "I have no idea what I want, I need more time!". If he doesn't know what he wants, how in the world can I figure out what to buy him? So yesterday, after consulting with Paul, I made some decisions and bought his gifts so they would have time to arrive before Christmas.

I told him last night I was done and he said "I hadn't finished my list!". 

"So, what did you want to add?" I asked him.

"I don't know, I need more time to look" he told me.

I had to explain that the ship had sailed and he was going to be happy with what we picked out and he seemed quite relieved.

Meanwhile, Isaac told me exactly what he wanted down to every last detail last month. Both my boys are so different!

Today I have a set of 10 large glitter-gold frames. You can add images and print them or post them on your social media or website/blog. They are simple png files so you can use them in any editing program. Simply open the frame, drag and drop your image below the frame, and resize the image to fit.

Thanks to Jill Wellington (Etsy ShopFacebook, Blog, YouTube Videos, Pixabay) for allowing me to share her lovely images in this post!


Here is a screenshot of how you use the frames. Drag your image under the frame and resize it to fit.

Download the CoffeeShop "Christmas Gold Glitter Frames" Set.

Do you want to download my favorite CoffeeShop PSE/Photoshop Actions and Lightroom Presets or Design Elements in one convenient zipped file AND help support this blog? Just click here for my action pack or here for all the actions/presets and professional design elements, storyboards, and textures.

For complete info on installing all of my actions, click here.


More from Rita:
Facebook | Instagram | Pinterest | Twitter

Tuesday, December 11

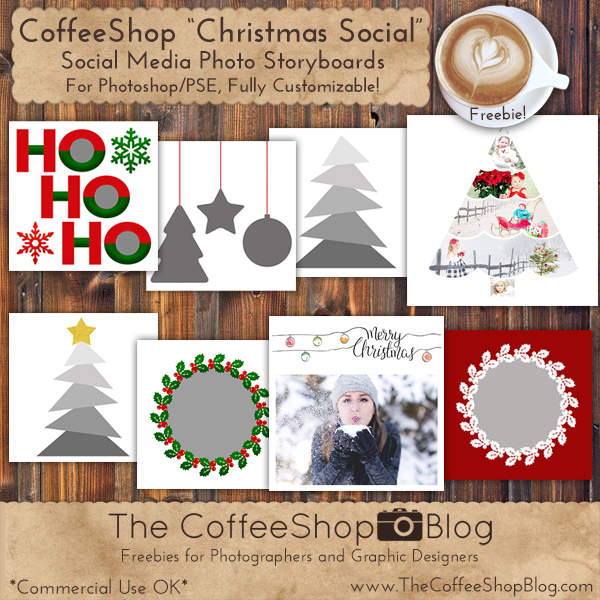
CoffeeShop "Christmas Social" Social Media Photo Storyboard Set!


I love photo storyboard templates so I made a new Christmas set today to share with you! These are all 2000 x 2000 and perfect for posting on any social media site like Instagram or Facebook. You can also use these on websites/blogs or on cards/stickers or other printable designs.

Add your images using the clipping masks (tutorial and Photoshop action), and even change the colors, background, and placement of the designs.

They come with free commercial terms-of-use, so feel free to use them personally or for business. And I love to see them, feel free to post them on my Facebook page!

Some of the original design elements I used in these designs: (1, 2, 3, 4).


A special thanks to Jill Wellington (Etsy ShopFacebook, Blog, YouTube Videos, Pixabay) for allowing me to use her images in my example above.

Download the CoffeeShop "Christmas Social" Photo Storyboard Set!

Do you want to download my favorite CoffeeShop PSE/Photoshop Actions and Lightroom Presets or Design Elements in one convenient zipped file AND help support this blog? Just click here for my action pack or here for all the actions/presets and professional design elements, storyboards, and textures.

For complete info on installing all of my actions, click here.


More from Rita:
Facebook | Instagram | Pinterest | Twitter

Monday, October 15

CoffeeShop "Autumn Luxe" Photoshop/PSE Action Revisited!


We are about to get plastered with a huge storm so I don't have much time on the computer today. A cool front has finally come in and it is in the 60's, but there is a huge line of storms headed our way for the next day or two.
I am working on a new action, but I don't have time to finish posting it before the lightening hits. So today I wanted to repost one of my favorite autumn-inspired actions called "Autumn Luxe".  I have hundreds and hundreds of actions I wrote posted on this site so I know it can be difficult to find a specific edit.  This action is amazing and I use it all of the time, and not only on fall images. I really love the vintage version, it looks lovely on so many images. I ran it today on a few images below, such a quick and easy edit!


I love this beautiful muted edit. (original image)


I love how much the colors pop on this one! (original image)


"Vintage Luxe" is gorgeous on portraits. (original image)


I love how this version warmed up the image. (original image)


This is a subtle edit, but the colors are so lovely. (original image)

So on to the repost!

________________________________

I am so excited to release my newest Autumn-inspired action set called "Autumn Luxe". I have several other fall actions (Autumn Vintage, Autumn Pop, Soft Autumn Glow) but this is one of my favorites. It has six different fall edits and I think they are all gorgeous.

I used a beautiful images from Jill Wellington (Etsy ShopFacebook, Blog, YouTube Videos, Pixabay) on this tutorial.


CoffeeShop "Autumn Luxe" Photoshop/PSE Action Tutorial:


This is the image from Jill. It is already gorgeous but I love to create new artistic versions.


Run "Autumn Luxe" on the image. The first pop-up will be a Curves layer that allows you to adjust the Matte-Effect on the Vintage Autumn edit.


Simply adjust the area circled above. Up lowers contrast, Down adds contrast, Right darkens shadows, Left lightens.

Press OK when you are finished adjusting the point.


This pop-up will come up once more for the Bold Autumn Color edit. Adjust as necessary.


When the action finishes you won't see any changes. You must turn on the layers of your favorite fall edit. You can also adjust the opacities or paint on the layer masks as necessary.


Vintage Autumn


Vintage Autumn + Cool Tint


Vintage Autumn Matte


Bold Autumn Colors


Bold Autumn Colors + Cool Tint


Bold Autumn Colors Matte


Here is another edit on an image by Jill using the Vintage Autumn Matte layer.

I hope you enjoy this new action set and be sure to post your own edits using it on my Facebook page. It might end up here on my blog as a reader sample!!!

Download the CoffeeShop "Autumn Luxe" Photoshop/PSE action.

Do you want to download my favorite CoffeeShop PSE/Photoshop Actions and Lightroom Presets or Design Elements in one convenient zipped file AND help support this blog? Just click here for my action pack or  here for a download of some of my most popular design elements, storyboards, and textures.