
I have have had fun working on my CoffeeShop Blogger Unwrapped series, where I post tutorials on customizing Blogger templates. Now you know how to remove that sometimes distracting Nav bar on top, fool Blogger and load larger images, add a lovely new background, and even add a custom header.
The normal Blogger Minima template is less than 700px wide. This is great for those who have tiny monitors and don't mind loading tiny images, but if you are a photographer or crafter or anyone that wants to proudly display large images on your blog then you need more space. After all, if you are going to spend hours editing your images in Photoshop or Photoshop Elements using fun CoffeeShop Actions you want to show off!

Thursday, October 29
Tuesday, October 27
Inside toilets RULE!
If you read my black widow spider post and were scared, I just wanted to add some more to it. I just found out from my mother-in-law that my husband's great grandfather DIED of a black widow spider bite!
Monday, October 26
Who cares about snakes, I am scared of SPIDERS!
I have blogged about my snake "issue". When you live in the country you have snakes. When you have chickens you have even more snakes. Snakes are a part of life out here and they scare me a bit, but unlike my husband I am not terrified of them. I figure if one of us gets bit we will be fine. Scared almost to death, sure, but we will live.
Well, now I have met my true match, face-to-face. I have to confess I have an unreasonable fear of spiders.
Well, now I have met my true match, face-to-face. I have to confess I have an unreasonable fear of spiders.
Sunday, October 25

Friday, October 23
CoffeeShop Rounded Corners 2 PS/PSE Action and Moody Pop and Bold Pop Actions Enhanced!
Sometimes I make actions and days or even months later I am kicking myself because I could have made them even more powerful. The three actions below have been tweaked to be more useful, so please go download the new and improved versions when you get a chance. :-)
I have improved the CoffeeShop Bold Pop and Moody Pop PS/PSE Actions by adding a B&W Conversion layer. You can turn on this layer to convert your image to B&W, or turn it on and lower its opacity to create a muted color tone. The download links on those posts lead to the updated versions now.

I realized recently that the original CoffeeShop Rounded Corners action does not work in CS4, so I have rewritten it. This action is also faster as the original as it smooths only two times, so Photoshop Elements users might want to download this new and improved version also. For large images use the preset settings of 100px smoothing, for small web images use 25px or less. I would suggest rounding the corners of your large high resolution images and then make them web-size as the rounded corners will be much nicer.
Download the CoffeeShop Rounded Corners 2 PS/PSE Action HERE!
If you want an action that not only rounds the corners of your image but also sharpens and crops it for the web, please check out CoffeeShop Web Rounded Corners PS/PSE action.
I have noticed that visits to my blog are steadily growing every month and I wanted to let you all know that I really appreciate it. I love your comments and encouragement. If you have any questions about loading the actions in your Photoshop Elements or Photoshop, please check out this link.
And thank you so much for your generous support. Because of your donations and ad revenue from this blog, I am able to stay home with my boys and have fun creating new things for CoffeeShop. Thank you so much for making that possible, you don't know how much I appreciate it. Not only do I get to be around my crazy boys all of the time (yes, that is a good thing MOST days ;-) ) but I can make money doing something I really love. :-) In this economy every penny counts and because of you, my loyal readers, I can keep everything on this blog free.
I also wanted to remind everyone that you can use anything on this site personally or commercially. Just don't repackage free CoffeeShop stuff, as-is, and try to resale it as your own. :-)
I also wanted to let you know that I am always looking for new ideas to post here on CoffeeShop. If there is something you would like to see me create (a new action, template, etc.) just comment below. I love to be inspired!
Do you want to download thousands of professional CoffeeShop PSE/Photoshop actions (including exclusive ones not found anywhere for free), textures/overlays, scrapbooking papers, clip art/design elements, photo storyboards and frames, and Lightroom presets from this site in one convenient zipped file AND help support this one-woman blog?
Just click here for my CoffeeShop Mega Download Pack!
Wednesday, October 21
CoffeeShop Bold Pop PS/PSE Action and Charlie Update!
UPDATE OCT 23rd. I have uploaded a new version of CoffeeShop Bold Pop! This version has a B&W conversion layer built-in, which you can also adjust for muted tones. The download links have been changed.


 The chicken photos above were taken today when I went to the coop to check on Charlie the Chick. Charlie was still having issues with her leg until two days ago when she suddenly started pulling that leg forward and walking on it! My grandmother called me completely thrilled and amazed to report the chicken miracle. So Charlie came home last night and joined her 11 brothers and sisters.
Charlie is not 100% yet of course. She started the day walking around well enough that Duke could not tell her apart from the other chicks. But by the end of today she was completely exhausted and resting in a comfortable spot in the corner of the pen. But for the first time since the accident I am starting to believe that Charlie is going to not only survive, but be able to live life as a normal chicken. I will keep you posted.
I also must mention that because I posted about chickens AGAIN my google ads are going to temporarily be about chickens and pesky rodents and incubators... So if you are interested you can start your own little chicken farm and deal with the rats and the snakes and the poop. Oh, and the fresh eggs which are amazing if you can deal with the rats and the snakes and the poop. ;-)
The chicken photos above were taken today when I went to the coop to check on Charlie the Chick. Charlie was still having issues with her leg until two days ago when she suddenly started pulling that leg forward and walking on it! My grandmother called me completely thrilled and amazed to report the chicken miracle. So Charlie came home last night and joined her 11 brothers and sisters.
Charlie is not 100% yet of course. She started the day walking around well enough that Duke could not tell her apart from the other chicks. But by the end of today she was completely exhausted and resting in a comfortable spot in the corner of the pen. But for the first time since the accident I am starting to believe that Charlie is going to not only survive, but be able to live life as a normal chicken. I will keep you posted.
I also must mention that because I posted about chickens AGAIN my google ads are going to temporarily be about chickens and pesky rodents and incubators... So if you are interested you can start your own little chicken farm and deal with the rats and the snakes and the poop. Oh, and the fresh eggs which are amazing if you can deal with the rats and the snakes and the poop. ;-)
Download the free CoffeeShop Bold Pop PS/PSE UPDATED Action HERE!
Do you want to download thousands of professional CoffeeShop PSE/Photoshop actions (including exclusive ones not found anywhere for free), textures/overlays, scrapbooking papers, clip art/design elements, photo storyboards and frames, and Lightroom presets from this site in one convenient zipped file AND help support this one-woman blog?
Just click here for my CoffeeShop Mega Download Pack!
Sunday, October 18
CoffeeShop Faded DayDreams PS/PSE Action!

Here is my newest free action, CoffeeShop Faded DayDreams! It should work in Photoshop and the newer versions of Photoshop Elements (I don't know if it will run in PSE5). Each layer is adjustable and has a built-in layer mask.
Try changing the ivory color fill layer (the 5th from bottom) from multiply to screen for a hazy effect. Read below to see the action "unwrapped" (where I tell you step-by-step what is going on in the action).
Download the free CoffeeShop Faded DayDreams PS/PSE Action HERE!
Do you want to download thousands of professional CoffeeShop PSE/Photoshop actions (including exclusive ones not found anywhere for free), textures/overlays, scrapbooking papers, clip art/design elements, photo storyboards and frames, and Lightroom presets from this site in one convenient zipped file AND help support this one-woman blog?
Just click here for my CoffeeShop Mega Download Pack!
CoffeeShop Faded DayDreams UnWrapped.
1. Copy background (Ctrl-J), screen blending mode, 25% opacity.
2. Copy background (Ctrl-J), gaussian blur 15 pixels, soft light blending mode, 100% opacity.
3. Color Fill layer (hex#fdfce7), color blending mode, 25% opacity.
4. Copy the Fill layer from 3, multiply or screen (for hazy effect) blending mode, start at 25% opacity.
5. Copy background, drag it on top. Image, adjustments, desaturate or convert to B&W, normal blending mode, 40% opacity. On this layer Image, adjustments, Brightness/Contrast (Brightness 71%, Contrast 19%).
6. Color Fill layer (hex#efec9e), multiply blending mode, 25% opacity.
7. Color Fill layer (hex#fadaf9), multiply blending mode, 29% opacity.
Adjust all layers to taste!
Friday, October 16
Adventures of Charlie the Chick

I would love to introduce you to Charlie J. the Chick. Named by my grandmother who hopes Charlie is a girl. Charlie is quite adorable, one of our 12 new baby chicks born last month. She is part Rhode Island Red and Buff Orpington. Originally one of the 12 eggs the boys and I held every day, waiting for them to hatch. One of the 12 eggs we held as it hatched, watching the tiny wet baby chick emerge to this new exciting world. However, like Mike the Headless chicken I blogged about a few weeks ago, Charlie has had a tragic accident.

Notice that Charlie's right leg is not in the proper place. Honestly, it is amazing that little Charlie is even alive. Last week I was in the chicken pen with Imp (my 2 year old). Blackie, the mother hen, and her 12 little chicks are in this huge rat and snake-proof cage that was placed up on a piece of plywood a few inches off the ground due to flooding fears.
This day was a dry one and I wanted to put the cage on the floor so the little chicks could have fun scratching in the dirt. The floor of the cage is pretty wide chicken wire so they can get at the ground. I usually just tip the cage, the chicks run to the far corner (that's covered in tiny chicken wire to keep the varmints out) and then I can drag and drop it down.
As I was carefully moving the cage, Imp started screaming "ants!" and I glanced over at him and noticed his boots were covered in fire ants. At the same time I felt ant stings on my feet and legs and realized BOTH of us were standing in fire ants. I quickly dropped the chick cage and grabbed Imp and rushed us out of the pen and frantically brushed off the hundreds and hundreds of fire ants covering our lower extremities. Luckily I was quick to respond and we only suffered from a few dozen bites each.
Remembering my little chicks, I ran back in there (sitting Imp up on a bench safe from ants AND Zebra the rooster who has some attitude) and heard a little chick peeping frantically. Unfortunately little Charlie's leg had fallen through the wider part of the bottom of the cage and he was trapped. I lifted the cage and gently removed him and realized he was probably going to die from internal bleeding. I noticed he could not move his back leg and he appeared dazed.
So little Charlie was brought to the house. I told Duke and Imp that she was probably going to die because the cage fell and crushed him. Duke said he hoped Charlie was a rooster because he didn't want a hen to die. Imp kept on saying "Chicken died, chicken died".
A few hours later Charlie was still alive and in good spirits and was car-lifted to my grandmother's house. She loves to doctor little animals and she recently lost her beloved little dog, so she wanted something to nurture. And amazing enough, Charlie lived!

As you can see Charlie's leg is probably never going to be perfect, but she can move his toes and use it to support herself. My grandmother gives her twice daily physical therapy (which involves moving her leg gently to keep it from stiffening and making her grasp her fingers with her toes). She doesn't walk but can hop short distances. She eats and drinks (and poops) with gusto and gets excited when we hold her. Not to mention that every day she gets stronger. She isn't in any pain and manages to get around quite well.
So we are going to keep Charlie the Crippled Chick. Hen or rooster, this little chick is going to get plenty of love and a safe home in our coop. I will report back later on her progress. The funny part of this story is little Imp loves to go up to people and say "chicken died, chicken died". They look at me puzzled and I tell them that he is telling them a story about the day that Charlie the Chick almost died.
I have been working on a few new actions and will be posting those in the next weeks! I have plenty of other goodies coming out, so keep visiting the CoffeeShop. :-)
Tuesday, October 13
CoffeeShop Web Drop Shadow PS/PSE Action!

Here is another one of my actions that will hopefully make your blogging/website photo-posting easy! This action crops your image to fit on your site, sharpens for the web, and even adds a drop shadow effect. The download includes the Photoshop and Photoshop Elements action and full instructions.
Download the free CoffeeShop Web Drop Shadow PS/PSE Action HERE.
Preview of new vintage action coming out in a day or two(I need naming help!):
 Do you want to download my favorite CoffeeShop Actions or Design Elements in one convenient zipped file AND help support this blog? Just click here for my action pack or here for a download of some of my most popular design elements, storyboards, and textures.
Sunday, October 11

Wednesday, October 7
CoffeeShop Moody Pop PS/PSE Action!
Oct. 23 Update: I have updated the CoffeeShop Moody Pop action and made the changes on the download links below. The new version has a B&W conversion layer. Turn it on for a B&W image, or turn it on and dial down its opacity for a muted color effect!

I think it is about time for me to post an action that is actually creative and not just practical. I have a few WIPs (works-in-progress) sitting in my action pane and I found this great action there, forgotten and unloved. :-)
I LOVE this action and can't believe I had "lost" it! This applies a moody contrast pop to both color and B&W images and a tiny bit of soft glow. It can even be used on portraits. There are three final layers; the original image, the Moody Pop layer, and a Vignette layer. You can adjust the opacity of the Vignette and Moody Pop layer to taste. If you want more Moody Pop or Vignette, just copy that layer (Ctrl-J) and adjust the opacity. I also included layer masks so you can reduce or remove the enhancements on parts of the image (such as skin).
Download the free CoffeeShop Moody Pop PS/PSE UPDATED Action HERE! And thank you so much for your wonderful commments and generous donations! Because of you, my amazing reader, I am able to keep everything free and I retain my excitment about blogging and posting new creations.
Do you want to download thousands of professional CoffeeShop PSE/Photoshop actions (including exclusive ones not found anywhere for free), textures/overlays, scrapbooking papers, clip art/design elements, photo storyboards and frames, and Lightroom presets from this site in one convenient zipped file AND help support this one-woman blog?
Just click here for my CoffeeShop Mega Download Pack!
Sunday, October 4
CoffeeShop Storyboard Tutorial-Creating Storyboards Using Clipping Masks
I receive many emails from readers asking how to make and load storyboards with clipping masks, so I finally put together this small tutorial. I am a firm believer in using clipping masks in storyboards, and if you don't know how to use them, please check out my Clipping Mask UnMasked tutorial or read the second part of this post for more details. This storyboard tutorial works in both Photoshop Elements and Photoshop.
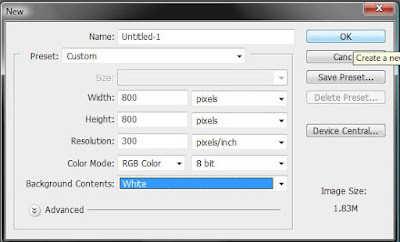
For this example I am making a web storyboard, but you can make any size storyboard you want. If you are going to print it, make sure it is 300dpi.
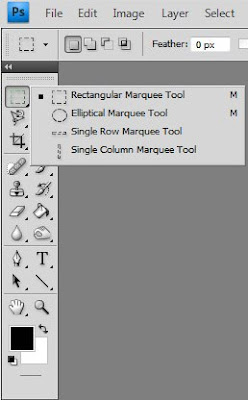
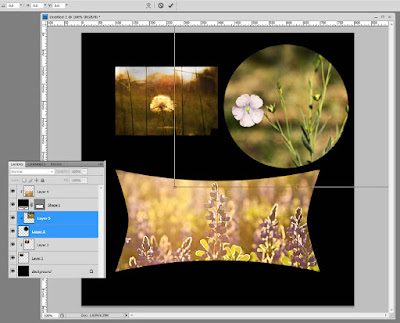
Every storyboard needs cutouts. I use clipping masks to make mine. For my first one, I will make a rectangular cutout using my rectangular marquee tool.
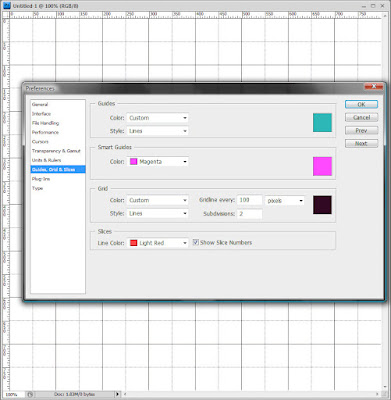
I want to see a grid for image placement, so I went View, Show, Grid. If you want to change the settings for your grid, go to Edit, Preferences, Guides Grid Slices and adjust them there.
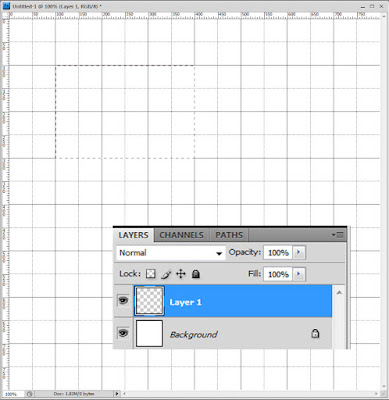
I made a new blank layer (I clicked on the "create a new layer" icon on my layer pane) and drew a rectangle with my marquee tool. Don't worry too much about the size or placement, this can all be easily adjusted later.
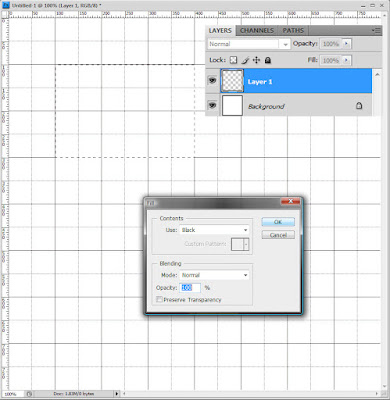
Now you must fill this selection with a color. Any color will work, but I will Edit, Fill with black.
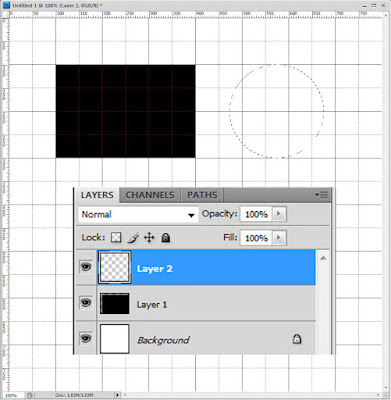
I made a second new layer and selected the the elliptical marquee tool and drew a circle. Again, size and placement are not critical, you can change this later.
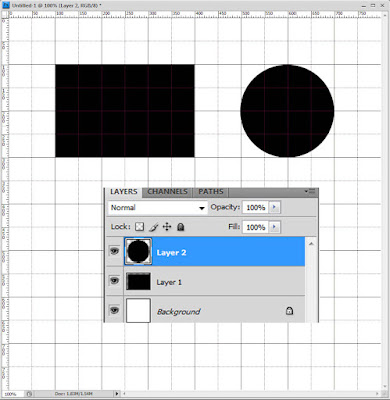
Edit, Fill with black. I also selected the move tool (V) and moved it to the right a bit. You can also free transform it (Ctrl-T) and adjust the size and placement. You can adjust this later if you want.

Perhaps you want a fancy shape cutout. Click on the shape tool in your toolbox and select one of the shapes listed (I love the rounded rectangle tool) or click on the custom shape tool as I did in this tutorial.
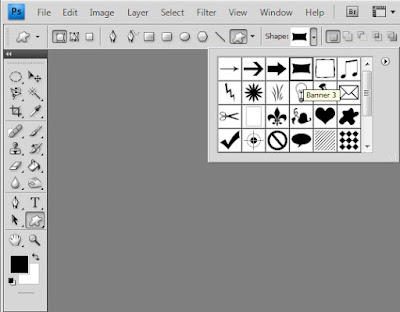
Find your favorite shape in the list in the top drop-down menu. You can also find free shapes on the Internet. Or you can take your paintbrush and paint your own custom shape right on a new layer, the sky is the limit! I picked the cool boxy thingy (banner 3).
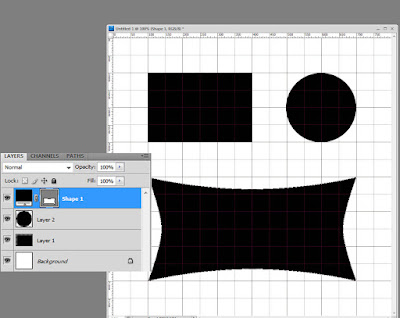
Here is my shape on my storyboard. You don't have to make a new layer, the shape tool automatically does this. Now I want to get rid of the grid marks (they are distracting) so I went to View, Show and unchecked Grid. Save this blank storyboard as a .psd so you can use it over and over. And now add your images.
Loading Images Via Clipping Masks!!!
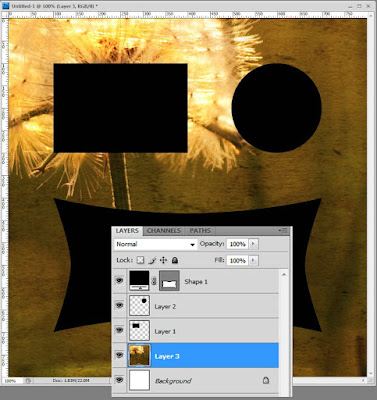
Open your first image and drag it (use the move tool, V) on top of your storyboard. In this case it fell just above the background. You can leave it here if you want an image background, but for this tutorial I wanted it in a cutout. I moved it just above layer 1, the rectangle and then grouped it with that layer. Please read my Clipping Mask Tutorial for more details on grouping.
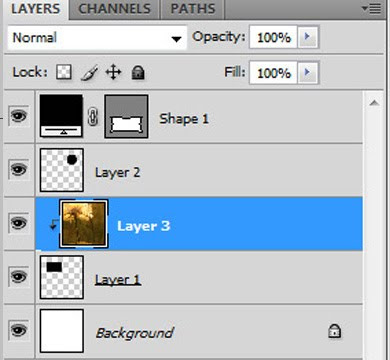
Now the image is grouped with my rectangle clipping mask as seen just just above and below.
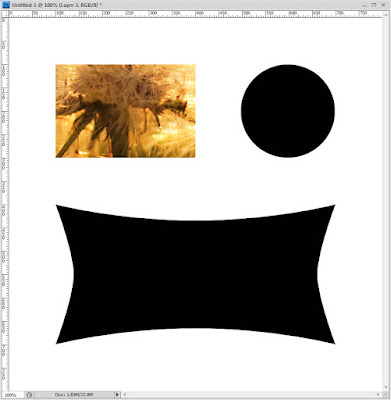

To move it around and resize your image, just free transform (Ctrl-T, Ctrl-0, zero, if you can't see the bars) and adjust the shape and placement. Make sure that constrain proportions is checked in Photoshop Elements or that you hold the shift key in Photoshop so your image will not become warped. After you adjust your image size simply Ctrl-0 again if you want to make your storyboard fill the screen.

Continue to add your images this way, drag and drop them on your storyboard, drag them just above your clipping mask, group them and adjust by free transforming. After adding your images you can change the color of the background by selecting the background and Edit, Fill with a color or dragging another image just above the background layer.
Say you want to adjust the size or placement of one of your images. This is so easy. Click to select the image and its clipping mask layer at the same time, Ctrl-T and adjust the size and move it around to taste. Then flatten and save.
I hope this tutorial helps you make your own storyboards. And yes, this storyboard is supposed to resemble a Halloween pumpkin! I am already in the spirit after seeing all of the pumpkins in the stores this dreary fall weekend. :-)
If you have any questions or need additional advice, please post your questions over at the CoffeeShop Flickr Group!

For this example I am making a web storyboard, but you can make any size storyboard you want. If you are going to print it, make sure it is 300dpi.

Every storyboard needs cutouts. I use clipping masks to make mine. For my first one, I will make a rectangular cutout using my rectangular marquee tool.

I want to see a grid for image placement, so I went View, Show, Grid. If you want to change the settings for your grid, go to Edit, Preferences, Guides Grid Slices and adjust them there.

I made a new blank layer (I clicked on the "create a new layer" icon on my layer pane) and drew a rectangle with my marquee tool. Don't worry too much about the size or placement, this can all be easily adjusted later.

Now you must fill this selection with a color. Any color will work, but I will Edit, Fill with black.

I made a second new layer and selected the the elliptical marquee tool and drew a circle. Again, size and placement are not critical, you can change this later.

Edit, Fill with black. I also selected the move tool (V) and moved it to the right a bit. You can also free transform it (Ctrl-T) and adjust the size and placement. You can adjust this later if you want.

Perhaps you want a fancy shape cutout. Click on the shape tool in your toolbox and select one of the shapes listed (I love the rounded rectangle tool) or click on the custom shape tool as I did in this tutorial.

Find your favorite shape in the list in the top drop-down menu. You can also find free shapes on the Internet. Or you can take your paintbrush and paint your own custom shape right on a new layer, the sky is the limit! I picked the cool boxy thingy (banner 3).

Here is my shape on my storyboard. You don't have to make a new layer, the shape tool automatically does this. Now I want to get rid of the grid marks (they are distracting) so I went to View, Show and unchecked Grid. Save this blank storyboard as a .psd so you can use it over and over. And now add your images.
Loading Images Via Clipping Masks!!!

Open your first image and drag it (use the move tool, V) on top of your storyboard. In this case it fell just above the background. You can leave it here if you want an image background, but for this tutorial I wanted it in a cutout. I moved it just above layer 1, the rectangle and then grouped it with that layer. Please read my Clipping Mask Tutorial for more details on grouping.

Now the image is grouped with my rectangle clipping mask as seen just just above and below.


To move it around and resize your image, just free transform (Ctrl-T, Ctrl-0, zero, if you can't see the bars) and adjust the shape and placement. Make sure that constrain proportions is checked in Photoshop Elements or that you hold the shift key in Photoshop so your image will not become warped. After you adjust your image size simply Ctrl-0 again if you want to make your storyboard fill the screen.

Continue to add your images this way, drag and drop them on your storyboard, drag them just above your clipping mask, group them and adjust by free transforming. After adding your images you can change the color of the background by selecting the background and Edit, Fill with a color or dragging another image just above the background layer.

Say you want to adjust the size or placement of one of your images. This is so easy. Click to select the image and its clipping mask layer at the same time, Ctrl-T and adjust the size and move it around to taste. Then flatten and save.
I hope this tutorial helps you make your own storyboards. And yes, this storyboard is supposed to resemble a Halloween pumpkin! I am already in the spirit after seeing all of the pumpkins in the stores this dreary fall weekend. :-)
If you have any questions or need additional advice, please post your questions over at the CoffeeShop Flickr Group!
Thursday, October 1
Flypaper Texture Tutorial!
Oh my, I have been so busy with everything I haven't posted in some time. I have a pile of stuff sitting here, waiting to be finished and posted and I just need to get my rear in gear. My husband says I live in the State of Exhaustion and is that ever true, especially being a full-time mom to a 2 and 4 year old! I need to post some pictures of the dozen little chicks our hen Blackie hatched last week. They are so cute. The boys and I held many of the eggs as the little chicks came out. It was amazing and something the boys will always remember. Anyway, we have been having a great time here fishing, playing outside, and hanging out with loved ones and not enough time blogging. ;-)
In my continuing quest to to find beautiful textures, I know I have directed my readers to the Flickr photostream of Paul Grand and Jill. They both have amazing images and I have featured their free textures on several of my tutorials here on CoffeeShop.
Well, you can imagine how excited I was when Paul emailed me and told me that they started their own website, Flypaper Textures, where they are selling an amazing texture pack and also posting step-by-step texturing tutorials. Paul and Jill are offering a $5 discount on their texture pack for all of my readers, just enter "flypaper" when you order. This discount is good until next Friday, Oct. 9th.
I love promoting sites like Flypaper Textures. Paul and Jill have been providing amazing textures and tutorials for free on Flickr for quite some time, and I love to see them finally make a little money from all of their hard work and incredible generosity. Even if you don't want to buy any textures, you can read the Flypaper tutorials and apply their notes using your own textures and images.
I have a Flypaper texture pack sitting right here on my desktop, begging me to find a few minutes to play. There are 25 beautiful high resolution textures, including bokeh and vintage fabrics. I seriously can't wait to use these textures and will be posting some of my results in the next day or two.
Here is a little tutorial on using textures that Paul and Jill sent my way. For the Photoshop Element users out there, you can use Levels instead of Curves and adjust the RGB levels using the drop-down menu. Please read it and then check out their site, Flypaper Textures, to read more tutorials and check out their texture pack (and use your flypaper discount code if you decide to purchase them).
---------------------------------------------------------------------------
In this first tutorial of what we hope will be a continuing series, I'll show you how to easily transform a photo by adding our Flypaper Textures.
Before:

After:

The original photo is nice enough,
In my continuing quest to to find beautiful textures, I know I have directed my readers to the Flickr photostream of Paul Grand and Jill. They both have amazing images and I have featured their free textures on several of my tutorials here on CoffeeShop.
Well, you can imagine how excited I was when Paul emailed me and told me that they started their own website, Flypaper Textures, where they are selling an amazing texture pack and also posting step-by-step texturing tutorials. Paul and Jill are offering a $5 discount on their texture pack for all of my readers, just enter "flypaper" when you order. This discount is good until next Friday, Oct. 9th.
I love promoting sites like Flypaper Textures. Paul and Jill have been providing amazing textures and tutorials for free on Flickr for quite some time, and I love to see them finally make a little money from all of their hard work and incredible generosity. Even if you don't want to buy any textures, you can read the Flypaper tutorials and apply their notes using your own textures and images.
I have a Flypaper texture pack sitting right here on my desktop, begging me to find a few minutes to play. There are 25 beautiful high resolution textures, including bokeh and vintage fabrics. I seriously can't wait to use these textures and will be posting some of my results in the next day or two.
Here is a little tutorial on using textures that Paul and Jill sent my way. For the Photoshop Element users out there, you can use Levels instead of Curves and adjust the RGB levels using the drop-down menu. Please read it and then check out their site, Flypaper Textures, to read more tutorials and check out their texture pack (and use your flypaper discount code if you decide to purchase them).
---------------------------------------------------------------------------
In this first tutorial of what we hope will be a continuing series, I'll show you how to easily transform a photo by adding our Flypaper Textures.
Before:
After:
The original photo is nice enough,
Subscribe to:
Posts (Atom)


