


I am so excited to release my newest free retouching action, CoffeeShop 2 Minute Miracle. This does not replace any of my old retouching actions, like Perfect Portrait 3
(my one-stop does-it-all-enhancing and retouching action with auto-skin smoothing), Baby PowderRoom (perfect for retouching baby portraits), or PowderRoom 2 (my classic retouching action). All of those actions stand on their own.
I also released Eye Bright, which enhances eyes, but I had many readers request a simple action that they could run on an already edited image that would just enhance eyes AND skin. So I sat down and put together a new action that uses the automatic skin-smoothing of Perfect Portrait 3 (I am so proud of this feature, it took me hours to figure out), the eye enhancement layers of Eye Bright, and also a nice little layer that boosts the image and makes skin glow.
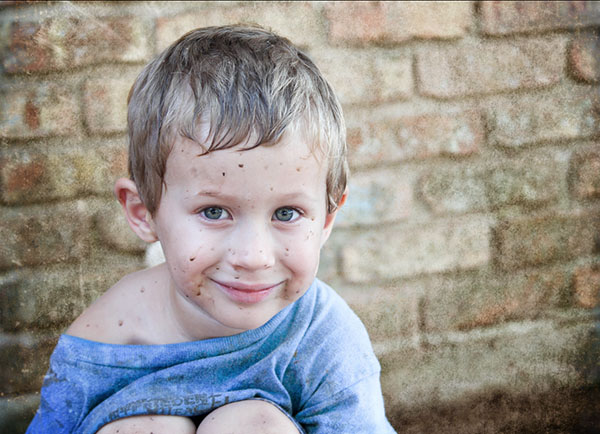
This is actually a two part tutorial, with Part 1 showing how I added texture to this photo of Imp. In today's tutorial I will show you how I used my CoffeeShop 2 Minute Miracle action (you can find the free download at the bottom of this post) to enhance Imp's eyes and skin. You can see the before/after from this tutorial in the image below by mousing over it.
CoffeeShop 2 Minute Miracle Action Tutorial:
1. This action runs in both PSE and Photoshop. Open your image. This action will automatically flatten the image before running. Make sure your image is RGB and 8-bit. You should run this action on images that have already been color/contrast adjusted. You can add texture before or after running the action.

2. This action uses the automatic skin smoothing technique seen in Perfect Portrait 3. This technique is actually quite simple. When you see the Replace Color screen pop-up (as seen below), click on a clear area of skin (I usually pick the top of the nose) and adjust the Fuzziness to taste. Any area that turns white on the screen will be smoothed.
Don't worry if it smooths some of your background, you can always erase it off later. Press OK when finished.

3. After the action finishes you will have 5 layers above your background. Skin will look smooth will glow, but the eyes will look unchanged. These have to be edited by hand to get beautiful realistic results.

4. Zoom in on the eyes and edit them using the top three layers (Eye Define, Bright Eyes, White Whites) following the CoffeeShop Eye Bright tutorial.

5. Once you have finished editing the eyes, zoom out to 100% and make sure the eyes don't look over-processed as they do in my image below. I find over-edited eyes scary-looking, so try to be conservative.

In this case I dialed down the Bright Eyes layer to 58% and also reduced the White Whites layer.
Now it looks more artistic and less scary (at least I hope so). I would probably reduce the effect even more if I did not have texture on this image.

6. Finally, adjust the Boost and Smooth Skin layer opacities to taste. If part of your image is too soft from the Smooth Skin layer, paint it out using a black brush on the layer mask. It is also useful to use the Eye Define layer to paint over hair and rustic or urban backgrounds.
I hope you find this new action useful! Download the free CoffeeShop 2 Minute Miracle action.
Do you want to download my favorite CoffeeShop Actions or Design Elements in one convenient zipped file AND help support this blog? Just click here for my action pack or here for a download of some of my most popular design elements, storyboards, and textures.
For complete info on installing all of my actions, click here.


