Sunday, April 20

Free CoffeeShop B&W Actions!

These actions will not run in Photoshop Elements!
 
Here are my newest free actions. The first one (CoffeeShop B&W) is a set of 8 actions that convert color images to B&W. They are completely adjustable and apply the actions to a duplicate of your image, so you can compare the before and after. The second action (CoffeeShop Tea Selections) has so many totally adjustable options. It turns a color image B&W, and then you can apply a hint of "tea" color (or keep it B&W), and then you have the option of adding a softening step. In the example I posted below the colors are quite intense, but they are easily dialed down to make a softly tinted beautiful image. I hope you enjoy them! 

Click here to download actions!

Do you want to download thousands of professional CoffeeShop PSE/Photoshop actions (including exclusive ones not found anywhere for free), textures/overlays, scrapbooking papers, clip art/design elements, photo storyboards and frames, and Lightroom presets from this site in one convenient zipped file AND help support this one-woman blog?

Just click here for my CoffeeShop Mega Download Pack!

Wednesday, April 9

Tutorial: Make your own Photoshop actions!

This tutorial will not work in Photoshop Elements! You can only write actions in Photoshop.

So what is an action? Photoshop actions are recorded steps that you perform on an image; these steps can be saved and replayed on another image at a later date. They are great for your basic workflow. Maybe you like to do a curves adjustment, then a levels adjustment, then a color pop, and finally a slight sharpening on your photos for your album. Why not write an action so that you won't have to perform each of these tasks on each photo. These screenshots are from PS7, but the general idea should work in later versions of PS, and even Elements.

1. Open your Actions pane.


2. You probably already have actions there, many come with your program.


3. Click on your Action pop down menu, and this is what you should see.

OK, now you know what it looks like. So lets make a simple action that should work in PS and Elements. We will do a basic color pop.

1. Open an image. Make sure your layer pane is also open.

2. Click on 4, "Create new set". Call your set "Practice actions". This can be renamed any time.

3. Click on 5, "Create new action". Name your action "Color Pop" and make sure the set is "Practice actions". You can also assign a function key to operate this action. Say you make it F1. When you press F1 then your action will automatically run.

4. Press Record.

5. Image>Duplicate and name it Color Pop. This opens a duplicate image that you will work on. Your original document will be untouched and you can compare the before/after. This will also keep you from saving over the original!

6. In your layers pane, drag your background to the little "Create a new layer" icon on the bottom, or press Ctrl-J to make a copy.

7. Put this blending mode in Soft light.

8. Go to your Action pop down menu and click on "Insert Stop". A comment box pops up. Type "If happy with the picture, press Continue. Otherwise, press Stop, make changes (perhaps change the blending mode to hard light and/or change opacity of the layer), and then press play selection to flatten the image." Then click on "Allow continue", then OK.

9. Layer>Flatten image OR Shift-Ctrl-E.

10. Select 1, "stop recording/playing" on your action pane.

Your action should be finished! Now compare your before/after pictures.

OK, now some extra things. Say you are recording an action and make a mistake. No problem! Just go to the action pane and select "Stop recording/playing" and find the part of the action that should not be there and drag it to 6, "Delete". Go back to your image and Edit>step backward until you get back to where you want to be, and press 2, "begin recording" on your action pane once again.

You can also add things to your action after you finish recording. Just click in the action where you want to add something (Adjustment layer, etc.), press record, do that thing on ANY image, and press stop recording. You can also add "Insert menu item" without pressing record.

Now there are several ways to record an action. Say you want your adjustment layers set the exact way for every run. Then record your action and make the adjustments to your adjustment layers as your record. For example, if you want your Curves adjustment layer to have a slight S curve on it for every image, make that adjustment on your curve while recording.

However, perhaps you want to do an unique adjustment for every action run. Then as you are recording your action, click on "create new fill or adjustment layer" on your layer's pane, select what adjustment layer you want, and then just press OK, without making any adjustments. After recording your action, you need to click on the second little box (dialog on/off) to the left of that adjustment layer in your action pane. When the action runs, the adjustment layer dialog box will pop up and you can make any adjustments you want.


If you originally made changes to that part of the action (say set the Gaussian Blur to 5), then the dialog box will pop up with that setting, but you can change it while running the action. If you don't turn on the dialog box, then the action will run, without pause, and have the Gaussian Blur set at 5.

You can also enter a Stop while recording or after recording the action. For example, you can record a stop that says "Set the Gaussian blur to 5 - 10". So stops are used to tell people what they need to do in the next step (make sure you click on "Allow continue" or the action will stop!), or to tell people to stop the action, make changes to their layers, and then press play to finish the action.

When you add a stop after recording, just click where you want it in the action and go to the pull down menu and select "Insert Stop". If it is not in the proper place, then move it where ever you want after entering it. You don't have to press record if you use the action menu.

To save the action set (you can't save individual actions, just sets, so make sure you drag the actions to the set you want to save) just select "save actions" from the Action pull-down menu.

OK, hope this makes sense. Let me know if you have questions! This is just the basics, but it can get you started.

Friday, April 4

My "Coffee at the Bakery" Free Actions!

These only work in Photoshop, not Photoshop Elements. Click here to download the Photoshop version. However, you can find a similar PSE-friendly version HERE!

 
I have fun using actions I have written for Photoshop 7 (these should work in later versions of photoshop). Here are two sets that you are welcome to download and use for free! Click on the photos to see them bigger. In a few days I will hopefully have time to also add a tutorial so you can see what steps I did to process my photos, and how to actually make your own actions. These actions have the orton effect in most of them so they are rather dreamy looking, with the addition of hue/saturation or color balance layers added for color glazes. I did not invent any of these techniques, but just cobbled them together from all of the great free actions/websites out there.

Just download the files (click on the action image and follow the instructions), and save them to your desktop. To then load them into your actions in Photoshop, just click on the little upper right hand button on your action pallet. Select "load action" and find it on your desktop and open it. Then open the properly exposed image you wish to use it on and press the tiny play button at the bottom of the pallet.

Do you want to download thousands of professional CoffeeShop PSE/Photoshop actions (including exclusive ones not found anywhere for free), textures/overlays, scrapbooking papers, clip art/design elements, photo storyboards and frames, and Lightroom presets from this site in one convenient zipped file AND help support this one-woman blog?

Just click here for my CoffeeShop Mega Download Pack!

Tuesday, April 1

Free Action: Orton Effect with Contrast Kick!

One effect I love to use on many of my photos is the Orton Effect http://www.naturephotographers.net/articles0106/dw0106-1.html .
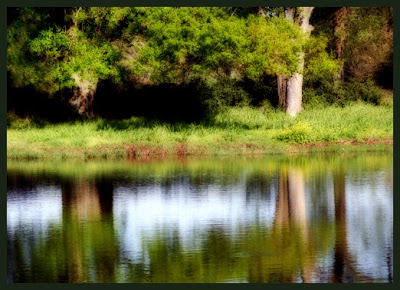
Here are two versions of a photo taken at our pond. The first is SOOC (straight out of camera) and the second has the Orton effect applied to it.


SOOC (Straight out of camera)


Orton Effect


I actually combined a few things I have picked up along the way to get this effect. I use PS7 so this should work in PS7 and up. It might work in Elements, and please let me know if you find that it does. The free action can be downloaded via the link at the bottom of this post.


Open your image. Do a quick Curves to boost contrast and adjust color. Then open levels and bring the middle slider up until your image is very light and the middle input level above the curve is around 2. Your photo will look completely washed out, that is what you want.


If you used adjustment layers, flatten your image. Make two copies of your image. On the top image apply a Gaussian blur of 20. Merge this down. Now you should have 2 layers. Change the top layer's blending mode to multiply. Flatten the image. If you are happy with how this looks then you are finished. If you want more contrast like I have in my picture, continue on to the next steps.


First I will bring up the contrast in the darker sections. Ctrl-click on your RGB channel (this selects the highlights), invert it, then feather it 5-10. Then Ctrl-J to make your selection into a new layer. Change its layer blending mode to soft light. Ctrl-click on your RGB channel once again, invert it, then feather it 5-10. Add a brightness/contrast new adjustment layer. Bring up the contrast to 10-20 (whatever looks nice to you).


Now I like to bring up the contrast in the lighter sections. Ctrl-click on your RGB channel, feather it 5-10 (do not invert it this time!), and add a brightness/contrast new adjustment layer. Bring up the contrast to 20 (or whatever number you need to get a nice punch of contrast). Flatten your image.


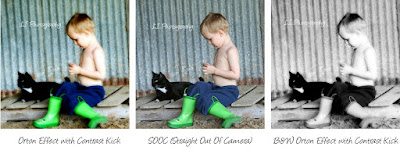
Here is the effect on a photo of a child. The B&W Orton turns a color picture to B&W and then applies the orton effect.


Download CoffeeShop Orton Effect with Contrast Kick

Monday, March 31

Actions Q&A

What are actions? How do I install the ones you have here in my version of PS?

http://www.peachpit.com/articles/article.aspx?p=434249

I have Adobe Elements Version X.XX . Can I use your actions in my program? How do I install them?

OK, I wish I had an answer to this, especially since I have heard such great things about Elements. Apparently it is more difficult to load actions into Elements, and this article is supposed to help, even if you have a higher version.
http://www.hiddenelements.com/actions_whitepaper.html
And this sounds pretty promising:
http://www.graficalicus.com/modules.php?op=modload&name=News&file=article&sid=164

I will try to figure out how to make Elements friendly actions in the near future. One thing I have seen is if you come to a stop or continue box, you have to continue or it stops working.

Friday, September 28

CoffeeShop Free LightRoom and ACR Presets

CoffeeShop presets can be used in LightRoom 1 and 2 and Photoshop and Photoshop Elements ACR. For directions on loading presets, please check out this link.

Thursday, September 27

CoffeeShop Free Photoshop Only Actions

The actions listed below work in Photoshop 7 and all versions of CS ONLY! They do not run in Photoshop Elements. If you have any questions about these actions, please post them at the CoffeeShop Flickr Group.


Free Actions-Orton Effect


Free Actions!  Check out my blog.


CoffeeShop B&W Actions
CoffeeShop Tea Selections


CoffeeShop Color Pop Free Actions!


CoffeeShop Color Pop Tutorial


Wednesday, June 6

Loading CoffeeShop Presets in Photoshop and Photoshop Elements ACR and LightRoom 2.

Loading Presets into LightRoom 2:
Place your .lrtemplate (LIGHTROOM) files here:

C:\Documents and Settings\HP_Administrator\Application Data\
Adobe\Lightroom\develop settings
or
C:\User\/your user name\AppData\Roaming\Adobe\LightRoom\Develop Presets .

After your .lrtemplates are placed in the LR2 folder, you should see them in
Lightroom under the presets palate.
-------------------------------------------------------------------------------------------------
These are instructions for installing  ACR presets in PCs. Once I get information on installing them in Macs I will update. ACR presets (.xmp files) are to be used in Photoshop with ACR (such as CS3 and CS4) and .dng image files are used in Photoshop Elements 6 and 7 (see below how to do this). LightRoom 2 presets (.lrtemplate files) only work in LightRoom. If you have any questions, please post them over at the Flickr CoffeeShop Group. Here is a link that might also help if you can't get it to work from reading the information below.

Loading ACR Presets into Photoshop:
Place your .xmp (Adobe Camera RAW) files here:

C:/Documents and Settings\HP Administrator\Application Data\
Adobe\Camera Raw\Settings
or
C:\User\your user name\AppData\Roaming\Adobe\CameraRaw\Settings .

After your .xmp file is copied to the camera raw setting's folder, you must then load the presets in ACR. Open a RAW or .dng file in Photoshop and look at the top right side of your camera raw window under the histogram and you will see a "settings" pull down menu. Using the small arrow to the left, select "load settings" and select each .xmp file individually and click "load". Repeat this step for each preset. To select the preset while using ACR, open the preset tab and select which preset you would like to apply to your image,.

Loading ACR Presets into Photoshop Elements:

To use ACR presets in the “lite” version of ACR which comes with Photoshop Elements 6 and 7, you have to be a bit tricky. I include a folder of .dng images for PSE users. These images are labeled with the preset name and are photos I applied a CoffeeShop preset on in LR2 and then saved as a digital negative file (.dng). To make it easy on yourself, make a new folder on your desktop and label it "PSE RAW Presets" or something like that. Then store all of your CoffeeShop presets in that folder so you can easily find and load them. NOTE: Other people's presets will not work in PSE unless they include a .dng file as I do. You can't load presets in your program, but are loading images with presets applied!

Version 1: Open the image “preset” of your choice with PSE open and ACR will automatically open. Look at the top right side of your camera raw window under the histogram and you will see a "settings" pull down menu. Using the small arrow to the left, select “Save New Camera Raw Defaults”. PSE is only able to remember one preset at a time, and now you have put the preset setting applied to that image into its memory. Click done.

Now open your RAW image (or .jpg image opened as a RAW) you wish to apply the preset on. You can even select several images at once. The image(s) will open in ACR with the preset applied, and you can tweak and save the image(s). You can continue to open new images and the preset will be applied to each. Once you are finished with that preset, just open the top right menu again and click “Reset Camera Raw Defaults”. Then "load" a second “preset” image if you wish!

Version 2 (if Version 1 does not work): Open the .dng image "preset" of choice with PSE open, and ACR will automatically open. Click "done". Then open one or more RAW images and ACR will pop up and should have automatically applied the preset . If not, then click on the little menu to the upper right and select "Previous Conversion". Then adjust and save your images as normal!

All of my LR2 and ACR preset collections will include a folder of .dng images for PSE users. See, I didn't forget about you!!! :-)

Saturday, November 11

Storyboard Actions

These free actions build and load storyboard (templates). Just load the actions into Photoshop or Photoshop Elements. More directions can be found by clicking on the images below. If you want to have some premade templates/storyboards or even photo frames that are not actions and you can use in any editing program like any other image, please click HERE! Unless specified, all actions will run in Photoshop 7 up to CS4 and Photoshop Elements 5, 6, and 7. If you want help installing actions, please click HERE and if you have any questions, please post over at the CoffeeShop Flickr Group.


Thursday, October 19

CoffeeShop Assorted Goodies

Here are assorted things I have created that don't fit into Actions, Textures, Storyboard, or Tutorials.


Photoshop or PSE Brushes:


Photoshop and PSE Patterns:


COFFEESHOP CARD TEMPLATES: Different types of card templates, including holiday and baby announcements.

COFFEESHOP BLOG HEADERS AND BACKGROUNDS: A assortment of premade blog headers and backgrounds

All of these design elements (unless noted) are custom-made by me. Install the patterns and brushes into in your editing program (Photoshop and Photoshop Elements). Everything here can be used however you wish, just don't repackage it and sell it as is! Enjoy. Rita