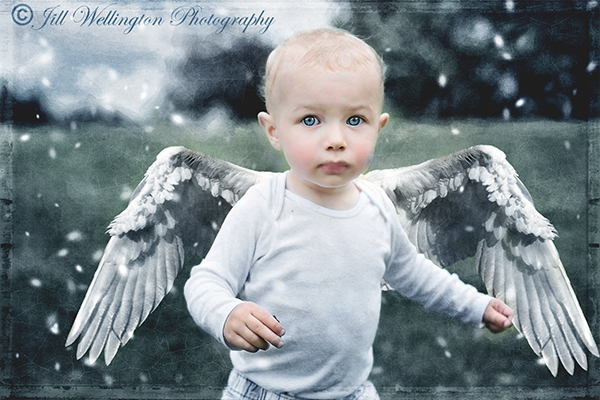
Photoshop and PSE are incredible editing programs, but I usually prefer using Lightroom for my basic clean-edits (color/contrast adjustments). But where Photoshop and PSE really excel is when I want to create more complex artistic edits with textures, brushes, collages, and overlays like the angel wings seen above.
I love vintage photos and cards which feature adorable children with angel wings. So today I wanted to show you how I started with a summer image of a little boy and turned him into a fantasy winter snow-angel. This is a really fun technique and everything I use in this tutorial is a free resource found here on my blog or on the web.
This type of edit would also be gorgeous on a young man or woman.
I used a gorgeous image from Jill Wellington (Facebook, Blog, YouTube Videos, Pixabay) on this tutorial. Jill is known for her beautiful use of light light and vivid colors, but I thought it would be fun to show you how you can take a summer photo and turn it into one that looks like it was photographed during the winter.
For those of you who prefer a warmer summer edit (I love both!), I will also show you how I edited this colorful version (seen above).
I also just posted a new tutorial called "Snow Angel" that contains some free angel wing pngs and vintage gold frame overlays.
Here is a beautiful reader edit from Mathilde Strochinski Photography using this tutorial. Mathilde also used my "Lovely Light" and "Velvet Mocha Matte" actions on this image before adding the angel wings. This would be so lovely on a Christmas card. ***Swoon!***
CoffeeShop "Winter Angel" Tutorial: Part 1
In the first part of this tutorial I am going to add the angel wings and remove much of the vibrant summer colors. On Part 2 I will continue the tutorial by running a winter action on this edited image and adding snow.
One of the reasons I used this gorgeous image from Jill was because I knew it would be easy to isolate the little boy from the background so I could add the angel wings. I found these wings at Pixabay and they can be downloaded for free here.
Now I will isolate the child from the background. I have already posted a step-by-step tutorial with more details, but I will do a quick walk-through here on one of my favorite selection methods.
Grab your Quick Selection Tool (W). Make sure you aren't using the Magic Wand Tool which is the first tool that comes up when you press "W".
Click and drag to select the little boy. Hold alt and click and drag to remove from the selection.
After I finished the selection, I went to the top menubar and clicked on the Refine Edge button (or go to Select, Refine Edge) and adjusted the settings until I had a clean selection.
Once the child was selected, I pressed Ctrl-J to copy him on a new layer.
I then clicked on and dragged and dropped the wings over on the image (between the boy and the Background) and Free-Transformed (Ctrl-T) them to fit.
I isolated the boy on a new layer rather than simply using the erasure tool or a layer mask to remove the extra wing that would covered his body because I like to have the ability to quickly adjust the placement of the wings. I also think this method is faster and looks more realistic.
This next step is optional but handy if you want to make sure your wing color tint matches the rest of the image. Watch Jill's video for detailed instructions.
Click on the Background and go up to the menubar and select Filter, Blur, Average. Grab your eyedropper tool (I) and click on the background color to select. Then Edit, Undo Average to recover the background.
Add a color fill adjustment layer over the wing layer (it will automatically fill with the color you just selected) and group it to that layer. The wings will look horrible but don't worry!
Put the color fill adjustment layer in Soft Light blending mode and adjust the opacity to taste. Now the color cast of the wings will match the rest of your image.
NOTE: If you would prefer to have a bright colorful angel edit, you can simply stop here or run a pretty action like Aphrodite Posh. I think this version looks like it belongs in a storybook. LOVE!
Continue to follow the tutorial below for the winter edit.
This next step is very important if you are using a summer image. The greens and blues have to be toned down.
Add a Hue/Saturation layer on top and dial down the Master Saturation until the background colors are very muted and winterly.
Then use a 100% soft black brush to remove that layer off any skin/clothing. I ended up removing it only from the skin in this version. I also went back and lowered the Saturation a bit more to remove additional green from the grass. I want the background to have soft-gray winter tones.
I think he is looking great and tomorrow I will post Part 2 of this tutorial where I add a winter tint and beautiful snow using one of my favorite actions and finish the image up with a texture that can also be found here on my blog.
Click here to read Part 2 of the "Winter Angel" artistic editing tutorial.
If you are on a computer, mouse over the image below to see the before/after.

Do you want to download my favorite CoffeeShop PSE/Photoshop Actions and Lightroom Presets or Design Elements in one convenient zipped file AND help support this blog? Just click here for my action pack or here for a download of some of my most popular design elements, storyboards, and textures.
For complete info on installing all of my actions, click here.
Facebook | Pinterest | Twitter


