


Happy Veteran's Day! I wanted to thank all of the veterans who bravely sacrificed so much to keep us safe and allowed my family to live such an amazing life here in the US.
This is the second part of a two part tutorial I call "Winter Angel". In Part 1 of my "Winter Angel" tutorial I showed you how I added wings (the download for the free wings can be found in that post) and desaturated a summer image to prepare it for today where I will run a winter action and add snow!

This is where we ended the tutorial in Part 1.

I ran the CoffeeShop "Winter Dreams" action on the image. This is what the image looks like with no adjustments. I will add some warmth back to his skin while keeping the rest of the image cold.

The first adjustments I did was turn off the "Winter Boost" layer (it blew out the whites) and raised the opacity of the "Darken" layer to 58%. I like the darker background but now I think his face is too contrasty.

I clicked on the "Darken" layer mask and used a 100% soft black brush to paint over his skin.

Next I clicked on the "Winter Colors" layer mask and used a soft black brush at 100% to remove that cool tint from his face and hands. You will notice further down in this tutorial I actually think I overdid this and ended up dialing it down some. :-) That is why I use and love layer masks because I can go back and tweak if needed.

I then clicked to select the "Add snow brush" layer and grabbed the "Winter Dreams" snow brush (make sure you have white as the foreground color) and added snow.
You will find full instructions on using this free brush here. I love my snow brush!

Use the eraser tool to remove unwanted snow on the face or anywhere else on the image. I usually remove it from skin as I find it can be distracting.


This edit was crying for a texture (so says this texture-addict) so I added one of my recent favorites, Cracked Glass below the "Darken" layer. I added a layer mask to the texture layer and removed 100% of the texture from his skin and about 50% off his outfit using a soft black brush.
When I started this edit I loved the warm glow around his face as I felt it made him more angelic. But now I find it distracting so I am going to remove some of it.

I went back to the "Winter Colors" layer and grabbed a soft white low-opacity brush and painted some of that effect back in on his face and hands. I think it looks much better.
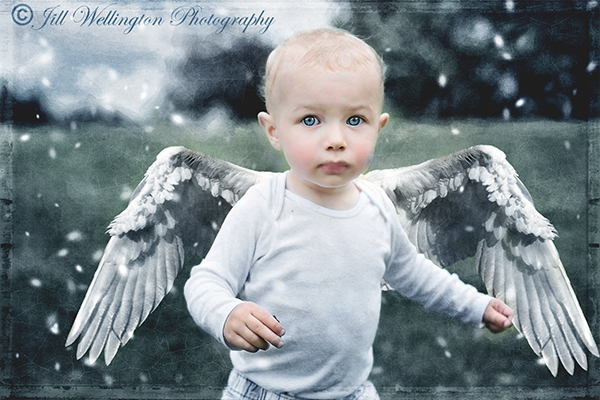
We are now finished with my "Winter Angel" edit! I would love to see your own edits using this tutorial posted on my Facebook page.
Mouse over the image below (if you are on a computer) to see the after.
Do you want to download my favorite CoffeeShop PSE/Photoshop Actions and Lightroom Presets or Design Elements in one convenient zipped file AND help support this blog? Just click here for my action pack or here for a download of some of my most popular design elements, storyboards, and textures.
For complete info on installing all of my actions, click here.
Facebook | Pinterest | Twitter


Terrific tutorial. The cracked glass texture and snow brush are the perfect finishing touches!! Plus they are so versatile you can use them on so many images. Thanks. Kate
ReplyDelete