


I wanted to post the Action UnWrapped tutorial for my CoffeeShop Gray Velvet action. This tutorial will show you the steps to get the same effect without using the action. You can download the free action at the bottom of this post.
CoffeeShop Gray Velvet Action UnWrapped Tutorial:
NOTE: The first part of this tutorial only works on Photoshop; you can't do the steps in PSE. However, you can skip those steps and still get a similar effect or download the free CoffeeShop Gray Velvet Action which has all of the steps. Skip down to Step 7 if you have PSE.

1. Open your image.

2. Photoshop ONLY: Click on the Channels tab and then click on the Load Channel as Selection button on bottom. This selects the highlights in your image.

3. Photoshop ONLY: Go to Select, Inverse to select the shadows.

4. Photoshop ONLY: Go back to Layers and then Ctrl-J to copy the shadows to a new layer, and then make a copy of this new layer. You should have the Background and 2 identical layers that contain the shadows of your image.

5. Photoshop ONLY: Put the top layer in Overlay blending mode.

6. Photoshop ONLY: Click on the middle layer and Filter, Other, High Pass. Set the High Pass filter to 10 or so, and then put that layer in Overlay blending mode. This sharpens the shadows which really makes eyes pop.

7. NOTE: PSE users can follow this tutorial from this step on. Add a color fill adjustment layer using hex# faf7e3.

8. Put this layer in soft light, and set the opacity to 26%.

9. Add a black to white Gradient Map adjustment layer, click Reverse (yes, I am an idiot and did everything in reverse in the screenshots!), and adjust the opacity to 50%.


10. Add another Gradient Map Adjustment layer, light gray to dark gray. Click on the gradient map to open the Gradient Editor. Then click on the left little box (1), click on the Color (2) and set the hex# to c6c6c5 (3, ignore the settings on the screenshot!). Do the same for the right little box, but use hex#3a3939. Click Reverse as seen in Step 9. I have a great tutorial on using Gradient Map Adjustment layers here.

11. Keep this layer in normal, 100%. And you are done!
NOTE: In the action I added one additional layer, just above the background called Lighten Darks. I selected the highlights using the channel method (Step 2), did not invert it, clicked on the background and Ctrl-J. I put this in multiply, 50%. I turn this layer on when my lights get too blown, especially in fair skin.
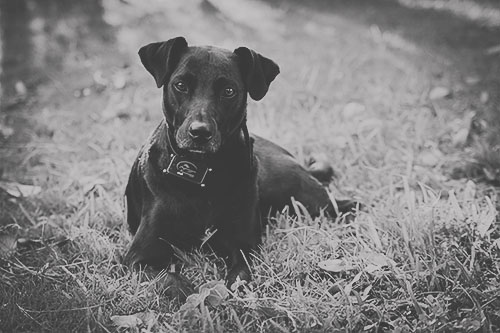
Mouse over to see the before:
If you want to download the free CoffeeShop Gray Velvet Action please go read this post.
Do you want to download my favorite CoffeeShop Actions or Design Elements in one convenient zipped file AND help support this blog? Just click here for my action pack or here for a download of some of my most popular design elements, storyboards, and textures.
For complete info on installing all of my actions, click here.


