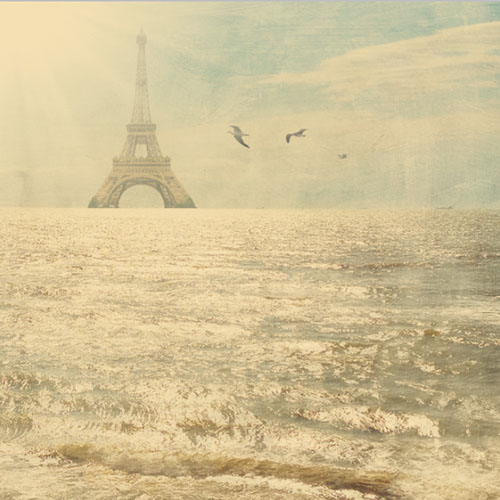
This is Part 2 of the Velvet Truffle Fantasy Photoshop/Photoshop Elements tutorial. You can read Part 1 here. I have a few design elements I used in today's tutorial posted for free download at the bottom of this post. That way you can play along with me if you want. If you make your own fantasy art using my tutorial, please link your before/after watermarked image in the comments of this post. I will pick my favorites and link your art in a future post!
Fantasy art is not for everyone, but I personally love to play in Photoshop and make these types of arty images. You can create your own using photos or vintage art. I isolated the Eiffel Tower from a vintage postcard at The Graphics Fairy and the seagulls are from one of my own photos. Please make sure to check all terms of use before using design elements you find on the internet in your own art, especially if you are planning on selling it. My design elements come with a free commercial license, just don't sell them as-is or post them anywhere for download. :-)
CoffeeShop Velvet Truffle Fantasy Tutorial, Part 2:
1. I ran the free CoffeeShop Velvet Truffle action and applied a few of my own free-for-download textures on my image as seen in Part 1 of this tutorial.
2. I made a new layer above my texture layers but under the Velvet Truffle layers. This way my design elements will have the color tint from the action but not the applied textures. I added the Eiffel Tower design element (download at bottom of this post), Ctrl-T to make it fit, and then lowered the opacity of that layer to 41%.
3. I wanted some seagulls in this image, so I made a new layer above the Eiffel Tower layer and added the birds (found in the download below) and Ctrl-T to make them fit. I lowered the opacity of this layer to 58%.
4. Finally, I wanted to add a sunburst effect, so I used the CoffeeShop Sunburst brush 1. I made a new layer above the seagull layer, selected white as my brush color, and added the sunburst effect in the right corner. I used Ctrl-T to adjust the final size and placement and kept this layer at 100% opacity.
Mouse over to see the before:

I hope you enjoyed this tutorial. If you end up creating your own fantasy art, I would love to see the before/after watermarked images! Please link them in the comments on this post. They don't have to contain my design elements. I will pick my favorites and link your artwork in a future post.
Download the CoffeeShop Assorted Digital Design Pack which contains the design elements used in this tutorial. You can also download it here.
Do you want to download my favorite CoffeeShop Actions or Design Elements in one convenient zipped file AND help support this blog? Just click here for my action pack or here for a download of some of my most popular design elements, storyboards, and textures.
For complete info on installing all of my actions, click here.


