


I am so excited to share this new Photoshop/PSE tutorial and action! I call this effect "Luminous" because it fills the image with light. This is a slightly more complicated edit as it involves many layers and the use of layer masks, but even new users will be able to do this type of edit if you follow my tutorial and use the action.
Today I wanted to post Part 1 of the tutorial and the next post will cover Part 2 and also have an action.
On this tutorial there are some areas that PSE and Photoshop users will have to use different methods to get the same effect, but the action will "unlock" many of the Photoshop adjustments so PSE and Photoshop users can use the same editing technique. However, I also wanted to show you that PSE users can edit just as professionally and beautifully as Photoshop users with a few simple adjustments. If you are unwilling/unable to pay a monthly rental fee for Photoshop, don't worry! PSE is a powerful program, so don't feel pressure to upgrade.
CoffeeShop Luminous Tutorial:

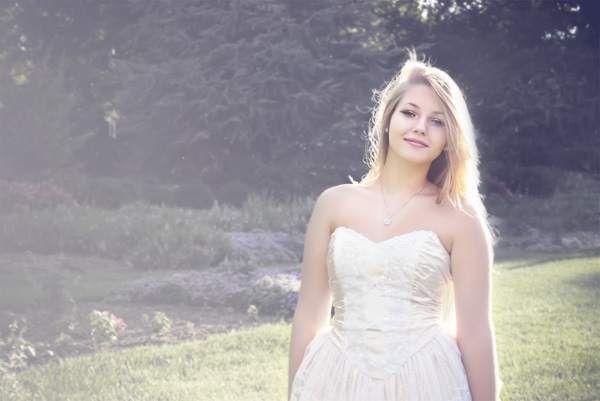
I am using an image from Photography by Ziza & Lara. This is the original unedited photo of Lara's beautiful daughter.
The first thing I noticed was the house in the upper right corner. I find it distracting so I will remove it.

Remove Distracting Background Features: There are many ways to remove elements, but in this edit I Ctrl-J (duplicated the background) and used the Clone Stamp Tool (S) at 100% opacity to sample trees and flowers from the right side. I didn't worry about getting them on the girl, I will mask them out in the next step. Make sure you take some time doing this part of the edit so it is not too obvious.
Always clone on a copy of your background so you can throw it away if you mess up.

I added a layer mask and used a soft black 100% opacity brush in normal mode to remove cloned background from her face and hair.

Soften Background: I wanted to add some depth-of-field by softening the background, so I copied the clone layer and used the Gaussian Blur filter.

I clicked on the layer mask and used a 100% opacity soft black brush to remove the blur from the portrait. If you want to see the red mask as seen in the screenshot above, click shift, alt/option on the layer mask (and repeat to remove it).

As you can see, the girl is sharp and the background is soft.

Define: Now I want to add some additional sharpness to her facial features and dress. This is important because you will be adding some haze to this image and you will want her face to stand out.
Advanced Photoshop Users (See PSE version for new Photoshop users): Select the background then go to Channels and select the Highlights. Inverse the selection, Ctrl-J the selection to a new layer and apply the High Pass filter at 10. Put this layer in Overlay blending mode and drag it to the top.
PSE Users: Copy the Background, apply the High Pass filter at 10, and put this layer in Overlay blending mode. Drag it to the top.

Add a black layer mask and then use a soft white 100% opacity brush to paint in sharpness where needed (eyes, lips, hair, necklace, dress, etc.).

Mute Background Colors: To mute the background colors, add a black to white Gradient Map layer on top and adjust the opacity to taste. I used 58% in this edit.

Paint back in color where needed. In this edit I used a soft black brush at 100% opacity to remove all of the B&W layer from her skin and hair and a 50% opacity brush to remove it from her dress. To see where you are painting (as seen in the screenshot), click Alt/Option on the layer mask (and the same to remove it).

Now the background colors are muted. I think this is a good time to take a break and play with the boys! I will continue the rest of this tutorial (and post the action) this weekend!
You can see the finished edit below. I love it! And this is completely possible to create in PSE. Mouse over to see the "before".
Do you want to download my favorite CoffeeShop PSE/Photoshop Actions and Lightroom Presets or Design Elements in one convenient zipped file AND help support this blog? Just click here for my action pack or here for a download of some of my most popular design elements, storyboards, and textures.
For complete info on installing all of my actions, click here.


Thank you so much! This is an awesome tutorial and I will definitely be trying it. Looking forward to part 2 this weekend and then trying it out. I love your work and thank you so much for sharing!
ReplyDelete