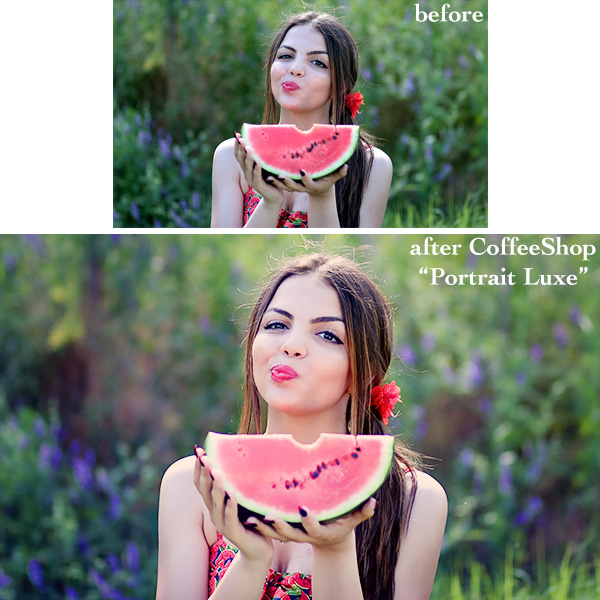
Today I am excited to release my newest portrait action for Photoshop/PSE. This action is called "Portrait Luxe" and adds beautiful saturated color, skin smoothing, contrast adjustments, vignette, and gorgeous color tints to your outdoor portraits. "Portrait Luxe" is completely adjustable like most of my actions.

This is the "before" and "after" image. This beautiful image is from Adina Voicu and you can download the original image here if you want to follow along with my tutorial.
CoffeeShop "Portrait Luxe" Photoshop/PSE Action Tutorial:
Open your image. This action looks best on outdoor portraits, but you can also run it on other types of images.
Start "Portrait Luxe". The first prompt will allow you to soften the skin. Adjust the radius and threshold to taste. You can make further adjustments to this layer after the action finishes running.
This is the image after "Portrait Luxe". I usually go in and adjust a few layers.
I lowered the "Luxe Skin" layer's opacity a bit. You can also click on the Color Fill box on that layer and tweak the color setting.
I also lowered the "Contrast Pop" layer's opacity.
I clicked on the "Blue Luxe" layer mask and used a soft black brush to remove the blue tint from her hair and eyes (100%) and skin (50%).
I wanted to add more red to the background, so I clicked on the "Red Luxe" layer to open the Levels adjustment, selected Red in the pull-down menubar on top, and then adjusted the mid (gamma) slider under the curve and the Output Level to add some more red to the image.
I want "Red Luxe" applied to the background only so I painted most of that layer off her face and skin.
Finally I adjusted the "Vignette" layer to taste.

I love this edit!!! I would love to see your own before/afters using "Portrait Luxe" on my Facebook page.
Download the "Portrait Luxe" Photoshop/PSE Action, here, or in my huge action download pack.
Do you want to download my favorite CoffeeShop PSE/Photoshop Actions and Lightroom Presets or Design Elements in one convenient zipped file AND help support this blog? Just click here for my action pack or here for a download of some of my most popular design elements, storyboards, and textures.
For complete info on installing all of my actions, click here.
Facebook | Pinterest | Twitter


Thank you for the great info! I'm new to PSE and am curious how you "paint most of the layer off of her face"? and "use a soft black brush to remove the blue tint from her hair and eyes."? Thank you!!!!
ReplyDeleteYou have to paint on the layer masks. I have several tutorials here on my blog that walk you through that. It is easy once you figure it out!
Delete