


Today I have a new angel-inspired tutorial that is perfect for your winter edits, but would also be lovely for any season. The download below includes several angel wing overlays you can add to your own image. I started with these wings and transformed/cloned/and painted them in Photoshop to make them fuller and more angel-like.
I also made two beautiful vintage gold frame overlays that you can drag on top of your image.
I used an adorable image from Jill Wellington (Etsy Shop, Facebook, Blog, YouTube Videos, Pixabay) on this tutorial. Jill has so many beautiful photoshop goodies over at her Etsy store, including her gorgeous angel wings and beautiful snow backgrounds (for those of us that never see real snow). They look so soft and fluffy and would be a perfect addition to your editing toolbox.

"Snow Angel" Tutorial:
Here is the "recipe" for my angel edit. The download for the free angel wings and vintage gold frame can be found on the bottom of this post.
A. Add angel wings (Angel Wings Tutorial). The download below has three beautiful angel wing png overlays.
B. Run the CoffeeShop "Creamy Luxe" action on the image. I turned on the "Define" layer, upped the "Creamy" layer a bit, and painted in her rosy lips and cheeks on the top layer.
C. Add the CoffeeShop Timeworn Texture. I wanted to make this image look vintage with faded edges. I copied the Timeworn texture to four layers (Ctrl-J). Starting with the bottom texture layer (see screenshot above):
- Screen blending mode, used a black soft brush on the white layer mask to remove 100% off her face and 50% off her body and wings.
- Screen blending mode, painted black over the entire layer mask leaving only the outer edges white to distress the edges even more. If you are adding the gold frame overlay, this step is not necessary.
- Screen blending mode, blurred the texture completely then added a black layer mask. Removed 100% of this layer off her face, 50% off her body and wings. This layer removes some of the contrast on her face and body.
- Soft Light, this layer adds contrast. I used a black soft brush to remove most of it from the little girl and snow, leaving the top of the image white. I wanted a pop of contrast on top to really accentuate the colors of the trees and streaming light.
D. I added the Gold Frame Overlay to the top of the image.
If you are on a computer you can mouse over the image to see the before.
If you are on a computer you can mouse over the image to see the before.
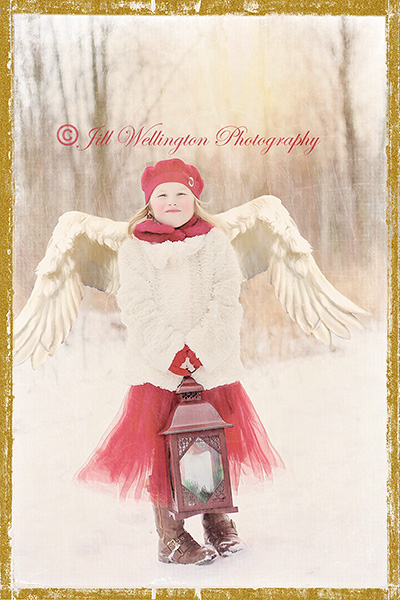
I LOVE the finished product! Wouldn't it look gorgeous on a Christmas card? You could even print them and add actual gold glitter to the edges before sending.
If you make your own Snow Angel using my tutorial please post your results on my Facebook page. I love to see your art!
Do you want to download my favorite CoffeeShop PSE/Photoshop Actions and Lightroom Presets or Design Elements in one convenient zipped file AND help support this blog? Just click here for my action pack or here for a download of some of my most popular design elements, storyboards, and textures.
For complete info on installing all of my actions, click here.
Facebook | Pinterest | Twitter


