


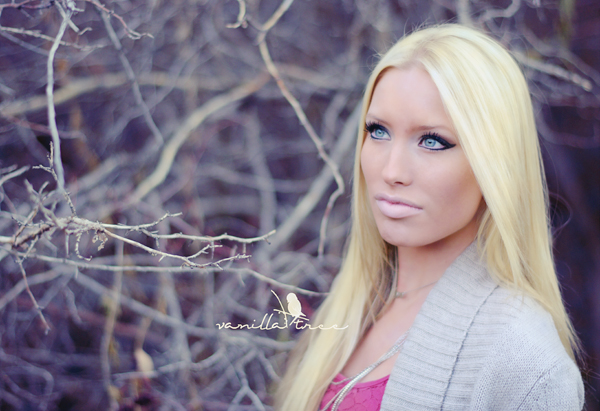
As promised, today I am going to show you how I went from the "before" image (this beautiful unedited image was donated from Vanilla Tree Photography) to the "after" using two of my free actions. If you haven't done it yet, please go download CoffeeShop Berry Luxe and Portrait Express. This is a quick and easy edit and I absolutely love the results!
CoffeeShop Berry Luxe Photoshop/PSE Editing Tutorial:

1. The unedited image was a bit dark, so I added a levels adjustment layer and brought up the highlights (right slider) and midtones (middle slider) by moving the sliders to the left and slightly added some shadow by moving that slider (left slider) to the right. Then I flattened the image.

2. I ran CoffeeShop Portrait Express to smooth the skin and make the eyes pop. Adjust the Surface Blur Radius to soften the skin. You can over-smooth the skin on this step and then dial down the opacity of that layer after the action is finished running.

3. I made no adjustment to any of the layers after Portrait Express finished running. In this screenshot image I overdid the skin smoothing so you would see a difference on your monitor. However, if I were editing this for a client or myself I would use significant less skin-smoothing since I prefer skin to look more natural and not like poreless plastic. I decided to go a bit more "Vogue" with this tutorial. ;-)

4. As a final step, I ran the CoffeeShop Berry Luxe action on the image. This action works great with no adjustments on still life or landscape images, but I usually like to remove part of it on skin in portraits.
You can see what I set the blending mode and opacity of each layer in the screenshot above. I used a soft low opacity black brush to remove the Color Haze layer from her sweater and some of the Berry Luxe layer off her skin. I changed the top Contrast Pop layer from Overlay to Soft light and didn't adjust the auto-layer mask.
Mouse over to see the before/after image.
This entire edit took me a few minutes and I love how it turned out. I would love if you would post your own before/afters on my Facebook page!
Do you want to download my favorite CoffeeShop PSE/Photoshop Actions and Lightroom Presets or Design Elements in one convenient zipped file AND help support this blog? Just click here for my action pack or here for a download of some of my most popular design elements, storyboards, and textures.
For complete info on installing all of my actions, click here.


