


I posted some digital sticky tape for download a week or so ago, and I had some readers ask for me to write a tutorial, so here is how I make my tape. After you make the tape you can make a tape brush.
If you want to download the Photoshop brush, vintage paper, and the tape I made in this tutorial, the link is at the bottom of this post. :-)

1. Make a new document. I wanted high resolution tape, so I made mine 3000px wide by 1000px high. Then I decided it was too big and resized it to 2000px wide. :-)

2. Select your Rectangular Marquee Tool.

3. Draw a rectangle.


4. Edit, Fill with 50% gray. Then Ctrl or Command-D to remove the selection ants.

5. I designed a triangle brush to make the tape's serrated edges. You can download my brush at the bottom of this post. Make a new layer. Adjust the brush size to taste, make sure your new blank layer is selected, and click just above the top left side of the take, then hold shift and click on the bottom of the left side. You should have a serrated edge.

6. Select the black area with the magic wand and then click on Layer 1. Then press Delete. You won't see any difference, but the left side of the tape is now serrated.

7. Click back on Layer 2 with the black serrated marks, and Ctrl-T and flip the serrated edges and slide them over the right side of the tape. Select the black with the magic wand and then click on Layer 1 (the tape) and press Delete.

8. Delete Layer 2 (the black edges) and your tape should look like this:

9. Now add some bevel and emboss. Go to Layer, layer style and play around with the settings. You could use my settings in the screenshot above.

10. You can adjust the opacity of the tape layer to taste. I want my image to show through, so I brought it down to 35% in this example. You could also save the tape at 100% and just lower the resolution when you add it to your project.

11. To make masking tape, simply group a paper texture over the tape. Make sure the tape and paper layer are set to Normal, 100% opacity. You can download this vintage paper texture (from Lori Peterson) at the bottom of this post.

12. I love adding a vintage effect to my tape, so in this example I used a wonderful texture from the Flypaper Textures Fly Edges set. On a side note, Jill and Paul just released a new set, Autumn Painterly, and it is gorgeous!
Group the vintage texture above the paper layer and put it in multiply blending mode and adjust the opacity to taste.

13. If you want a transparent vintage tape, just add the vintage texture above the tape. In this case I made the opacity of the tape layer 49% and put the vintage texture in overlay mode.

14. If you want to add some color to your tape, group a color fill adjustment layer over the vintage layer and put it in color mode. I used hex#b7aa90 for this tutorial to give my tape an old discolored feel.

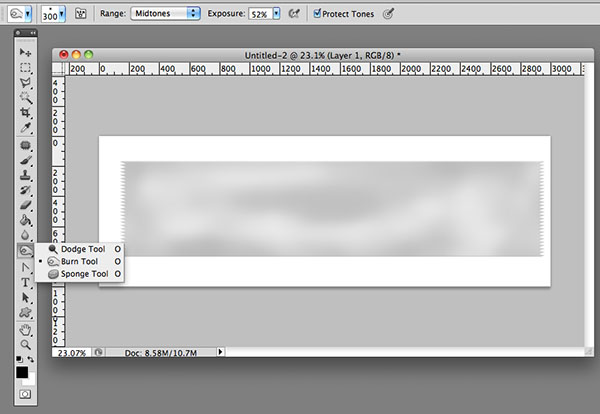
15. It is also fun to dodge/burn the tape some to add a more realistic effect. I used the dodge tool at 37% on the midtones and the burn tool at 52% on the midtones on this tape.
After you make the tape, turn off the white background if you added one (I usually work with one so I can see the opacity of my tape) and then save the tape as a png file so the background will be transparent. When you add the tape to your images, you can adjust the final opacity. You can also make a tape brush to quickly add it to your images.
I hope you had fun following this tutorial. I put together a little download that contains the brush I use to make my tape, the vintage paper for the masking tape, and the tape I made for this tutorial.
Download the CoffeeShop Digital Tape Kit. You can also download it from MediaFire.
Want all of my favorite CoffeeShop Actions or Design Elements in one simple download AND help support this blog? Just click here for my action pack or here for a download of some of my most popular design elements, storyboards, and textures (including the digital sticky tape kit!).


