Most images are not perfect SOOC (straight-out-of-camera) and could use a few tweaks. I am going to give you a few quick tips to lighten, darken, and/or "pop" your images easily and quickly in Photoshop or Photoshop Elements.
Lighten:

You took a lovely photo but it is too dark and you want a quick fix.

Ctrl-J your background (this makes a copy; you can also use Layer, Duplicate Layer). Then put this copied layer into Screen Blending mode and adjust the opacity to taste. This is a great method to brighten skin.
Darken:
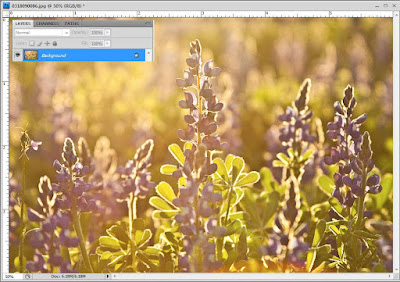
Maybe you want to darken your image slightly.
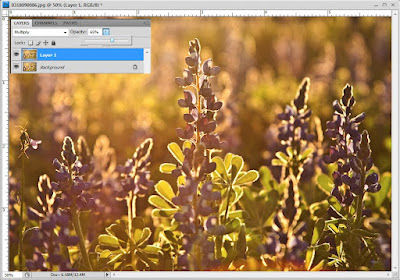
Ctrl-J your background (or Layer, Duplicate Layer). Then put this copied layer into Multiply Blending mode and adjust the opacity to taste. This is a great way to burn in backgrounds.
Pop:
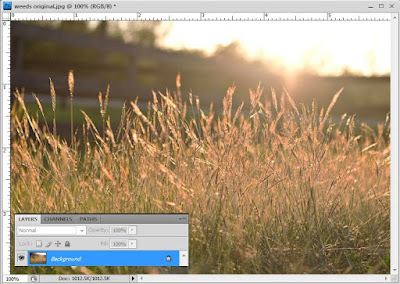
One really popular photo-enhancement is making your image "pop", which basically means you are adding more contrast. Here is a quick "pop" technique.
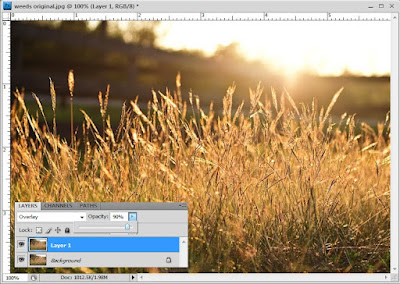
Ctrl-J your background (or Layer, Duplicate Layer). Then put this copied layer into Soft Light or Overlay blending mode and adjust the opacity to taste. Use Hard, Vivid, Linear, or Pin light if you are really adventurous. This is such a simple adjustment but the results can be quite stunning.
All of these adjustments can be used on color or B&W images. Easy isn't it! You can also combine the different effects (screen on one layer, soft light on a second), or use two of the same effects (if your image is really dark, make 2 copies, put each in screen, and adjust top layer's opacity to taste). Use layer masks to mask out the enhancements where needed (if you have PSE, download my PSE layer mask action). You can use a screen layer to brighten skin (mask out the rest of the image) and then a soft light layer on everything BUT the skin (mask out the skin). Play around with it! I used all three blending modes with layer masks on the after image below.
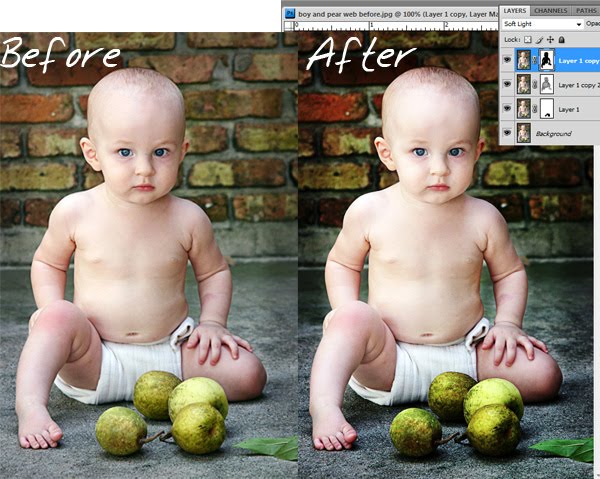
My next Editing 101 Tutorial will explain why you would want to use a S-curve adjustment layer, and include a free action for you PSE users who can't access Photoshop curves. Then I am going to have a tutorial covering Layer Masks and why you should love them! If there is a basic tutorial you would like to see me post here, please just comment below and I will try to add it to my list. :-)
I forgot to mention the Mozy sale this month! Click on the banner below, enter the text "AUGUST" when you check out and get 10% off your Mozy plan!!!


Are you freak'n kidding me!! I could just kiss your feet. After reading and rereading instructions and books I never understood it. I had no idea it was this simple. I am sooo excited. Now I can actually use my Elements program that has just been sitting there for a year. Horray! Thank you!
ReplyDeleteCan't wait on the curves, still trying to work on that. I am really liking the "you might also like" section you added.
ReplyDeleteSarah? Just get in the program and start playing! Use Rita's actions to get started, then start tweaking, and you can very easily teach yourself how to use PSE. How I learned! That, and reading Scott Kelby's book.
Oh, I forgot to ask. Do you think using the screen mode produces better results, say than using levels adjustment layer and masking out what didn't need to be brightened? Or just as effective, yet another way to lighten skin?
ReplyDeleteI have been loving levels lately, since I can't seem to get a handle on using curves. I have a plug in for PSE, but it just confuses me. Not hard to do, actually.
OMG! Thank you so much. This is EXACTLY what I have been looking for. You Rock! Off to play! Cannot wait to learn about curves!
ReplyDeleteThanks Rita......I love it when I get that "oooohhhhh that's how its done" moment after going through your tutorials! I appreciate all you do.
ReplyDeleteYou're amazing! Thanks for your generosity!
ReplyDeleteLove all the tips! REALLY interested in the s-curves tutorial.
ReplyDeleteThank you so much for taking the time to explain all of this.
ReplyDeleteYou are amazing, Rita! Thanks for the new rounded corners action! AND I've got to check out the Mozy discount! I've been wanting to sign up for that :)
ReplyDeletehey i love all your actions...i love the denim action and was wondering if could make an action like it but with say like red? ilove ur work thank you!
ReplyDeleteGreat work! Thanks!
ReplyDeleteI wonder if you could discuss sharpening (Unsharp Mask) in one of your future tutorials. I'm really interested in learning to make my subjects stand out from the background (especially if I used large aperture).
As far as what I would like to see... a cross processing technique/tutorial for PSE!
ReplyDeletewhat a great tutorial, you make everything sound so simple and easy and i love that! typically, i would think about more complicated editing to achieve the effect you've discussed in the article. thanks for sharing!!!
ReplyDeleteI also like the "you might also like" section you added. I would like something similar on my blog, just do not know how to do it so nicely.
This is so easy, (after you explained it) thank you so much, now I am off to play :)
ReplyDeleteThis is all so amazing. I'm watching closely for all your tutorials. Thank You! Thank You! Thank You!
ReplyDeleteThank you so much Rita. I would love to find a simple tutorial on fixing skin tones, and making skin less orange (i use nikon). Thanks.
ReplyDeleteWhat a great reminder on combining edits. It's so easy to try one technique and be done. I love how you showed the screen shot for all the layer edits. So easy to do also with your layer mask action. You've made me lazy! (that's a compliment)
ReplyDeleteI was just introduced to your site through a friend and I am in love. I have photoshop elements, and use it, but I never really knew how to do anything to make my pictures really pop. I didn't even know there were such things as actions!
ReplyDeleteFor future tutorials, I would love to learn how to make the background of a pic look blurry, while the subject of the picture is in focus. I love how most expensive cameras can do this right away, but unfortunately I can only afford a point and shoot, so I'd love to learn any tricks to making my photos look professional with the items I already have. Thank you so much!
OK, I thought of another tutorial I'd love to see. How about a tutorial showing us how to edit out blemishes from the skin, or that goldfish crumb on my daughter's face, or heaven forbid, that booger in the nose that ruins a perfectly good shot. Or how to edit out that car that drove into your shot right at you took it, etc. I know there are ways to do that, but I'm completely lost about it. Thanks!
ReplyDeleteThank you so much for this! It really simplified something that I was overcomplicating. I am all about the little tweaks that make all the difference.
ReplyDeleteLove your tutorials, you make it easy to learn! I would love to see sharpening tutorials...How to take a photo that's just a little bit soft and give it a sharpen (without oversharpening)...I like to you "perfect portrait" because of the sharpen action, but don't always need the extras...would love, love, love a quick sharpen action (where you can change your levels) or a tutorial! Thank you for all you do for elements users!!!
ReplyDeleteWow! Those instructions were awesome! Just used the first one now for an invitation and it worked like a charm. You rock!
ReplyDeleteJust popped in from MIchelle (Crafty Mama's) blog, she gave you props today. I am so happy to have found you, this must sound like a broken record (CD?) to you by now.
ReplyDeleteI'm just starting out but need to purchase editing software.. any tips about which one is great to START with? (Just in case you're searching for the next post topic.. ha!)
Again, thanks for putting this information out here for our photos to enjoy.. (: And us.
I love the "soft" black and white pics of newborns and babies. It's almost ethereal. How can I achieve that look in PSE?
ReplyDeleteThanks for giving me sooooo much help to take my photo's to the next level!
YOU'RE SO AMAZING! Thank you very much for being so generous with your knowledge and skills. I am totally self taught in PS and finding your tutorials has helped tremendously.
ReplyDeleteYou're fabulous:))
Ivy
Sounds great I can't wait to try it, I am still learning to use my camera and just learning photoshop. Thank you for your awesome website. ;)
ReplyDeleteYou are the best! I could kiss the ground you walk upon girl! Much appreciated.
ReplyDelete