In this case, I had an image of a bride (processed with CoffeeShop Attic Vintage Action ), and I wanted to fill the text with a pattern created from the yellow in her flowers. This is a sample from my header. To create the custom pattern, just select an area in your image using your marquee tool. Here I selected a yellow area of the rose that did not have much detail.
 Edit, then Define Pattern. Name your pattern and press OK. Ctrl-D to remove the selection ants.
 Now select the text you want to use (make sure it is big enough so you can see your texture!) and type it in.
 Now create a new layer on top. Photoshop Users: Please skip down until you see the Photoshop Only Tutorial...
 Edit, then Fill Layer, and select Pattern and find your pattern in the pull-down menu. Press OK.
  Now your image and text are covered by the pattern.
 Making sure the pattern layer is selected, type Ctrl-G. This will group the text with the pattern and you should see your text become filled with your pattern. At this point you can make any changes to the text (size, shape, etc.) and you can also move the pattern around (make sure that layer is selected) with the move tool to find the best placement on your text.
 Here is a sample with a pattern I created using the leaves of the image.
 Now you need to simplify the text (which means you will not be able to edit it as text anymore, but you can still Ctrl-T free transform it if you want). Right click on the Text layer and select "Simplify layer".
 Right click on the pattern layer and select "Merge Down".
 Now if you want to add a color stroke to your text, go to Edit, then Stroke Selection.
  Enter your stroke width, color, and location and press OK.
 Now click M to get your move tool, and move the text to its best location. Then flatten the image.
Hope you guys find this tutorial useful. The next tutorial will be a step-by-step tutorial on designing your own custom blog header. If you have any questions, please post the question at my CoffeeShop Flickr Group for a resident group of experts willing to help you out!
These Instructions are for Photoshop Users ONLY!
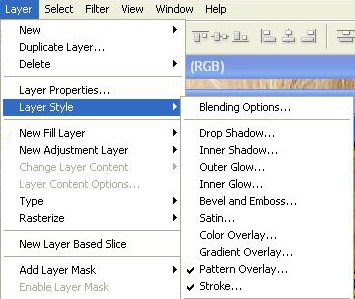
 With your text layer selected, go to Layer, Pattern Overlay,
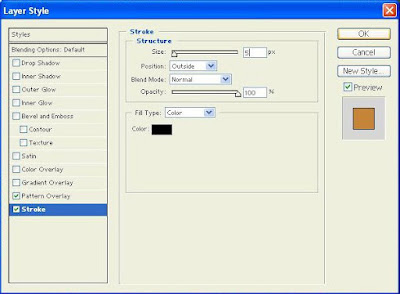
  Find your new pattern in the pull-down menu and press OK. Then go to Layer, Stroke.
  Enter the size, position, and color. Then make any adjustments to your text and flatten the image.


Wow! This is GREAT!
ReplyDeleteTif <><
Who knew it was so easy?! Thanks so much for sharing your great ideas with us!
ReplyDeleteThank you, thank you, thank you! I've been delaying a project because I couldn't figure this out. xoxo
ReplyDeleteWOO HOO I DID IT!
ReplyDeleteThanks!
Maybe you could write how to make a blinkie tutorial next :)
Help..when I use the marquee and select an area, "define pattern" is grayed out. What am I doing wrong so far in the beginning?
ReplyDeleteyou make it look so easy! =)
ReplyDeleteQuick question... on your texture tutorial... I downloaded the large scratch jpg, but it was too small for my image. I free transforms by holding down shift, but the jpg started to look pixalated. Any suggestions?
ReplyDeleteOK, when you are free transforming something it always looks pixelated until you press the check mark. Then it will look fine!
ReplyDeleteI tried this in PSE6 and it works but the "define pattern from selection" is grayed out in PSE7. Any ideas why this is happening?
ReplyDeleteThanks for the tutorial!!! I'm always learning something new from you!!!
ReplyDeleteRita,
ReplyDeleteThank you so much for your free actions and tutorials! I am fairly new to Photoshop (I have PSE 7), and I didn't think that I could use layer masks and actions (since I didn't have full version of Photoshop). I can't wait to figure them out and play with some photos!
Thanks again!
Amanda in Amarillo
Wow! This is so great - thank you SO much for sharing this! Who knew it was so easy?!? And thank you for all that you share...you are amazing!
ReplyDeleteThanks for the great tutorial!
ReplyDeleteI just wanted to say thank you and to let you know your posts aren't obsolete! I see you posted this awhile back, but I came across it tonight and it was a huge help! Thanks again! Without people like you, I'd never really know how much fun PSE7 really is! I'd never be able to take the time to figure it out! Keep up the great posts and tutorials!
ReplyDelete