


This is the CoffeeShop Template Making Tutorial. I will show you step-by-step how to make the template above, and how to insert images into it. I also included the template as a free download (see the bottom of this post) for those of you that would like to use it! This tutorial will work in Photoshop and Photoshop Elements.
 Decide on the size template you wish to create. Then File, New, enter the inches and pixels/inch. I always use 300 pixels/inch. Using this resolution will allow you to print your template bigger than the image size you entered. For example, you can make a 11x14 template, then "crop" it to 16x20 and print it with no real loss of resolution. The main thing is to make your template the proper width versus height.
 Decide what color/pattern/texture you want to use as your background. You can go crazy here and there are unlimited artistic options. If you want to add a solid color, just put that color into your foreground swatch, select your paint bucket tool, and click on the background. I have used a pattern in this case (from redheadstock at http://www.deviantart.com/, just go to Resources and do a search for patterns/brushes/textures, they have so many great free ones). Next week I will post a CoffeeShop Tutorial that shows you, step-by-step, how to make your own custom patterns! Load your pattern, select your paint bucket tool, change its setting from foreground to pattern, select your pattern swatch, and click on your background to apply it. You can change its color by a hue/saturation layer (put it in colorize for a easy change) or you can select parts of it with the magic wand and then change the color. If you put it on a new layer you can free transform it to a different size. You can also use brushes to add swirls and other neat touches, or drag in some textures and change your blending modes to get great artistic results. For great free textures be sure to check out Flickr. And you can find free patterns/brushes/textures all over the Web, just do a search.
I am keeping this one simple and I am just going to design a basic text box. I like to have everything lined up, so I go to View, Show Grid. You can change your grid markings at Edit, Preferences, Guides/Grides. Click on the New Layer icon on your layer pane. I use a new layer each time I add things to my template so that I can easily make changes, and then I just flatten it when I am finished. I first used the eyedropper tool and clicked on one of the flowers in this pattern to set my foreground swatch to green. Then I used the marquee tool to select a rectangle.
 Then I went to the top menu; Edit, Fill, Foreground color. Ctrl-D to deselect the area.
 I changed my foreground color to blue by clicking on a blue flower with the eyedropper, and then made another rectangle within the green rectangle, and filled it with the blue. Ctrl-D to deselect.
 Merge Down until all of your layers are flattened into your background. Only do this AFTER you are finished with your template design!
 Add a new blank layer, and click on your background layer name and change it to Template.
 Now drag your new named Template layer up above your blank Layer 1.
 Use your marquee tool to select the area you wish to cutout for the photo on the Template layer.
 Hit your delete key and now you have a photo cutout!
 If you want to add an inside border, then make your foreground swatch the border color of choice (in this case I am sticking with my blue from the flower), and then go to Edit, Stroke, select inside, and then put in your width (and make any changes to the color). Ctrl-D to deselect. Click on your Layer 1 layer. (I only do this so that when I drag in my photo image it will go automatically under the template layer).

Open the image you plan on inserting into your template. In this case it is a photo of my adorable niece.
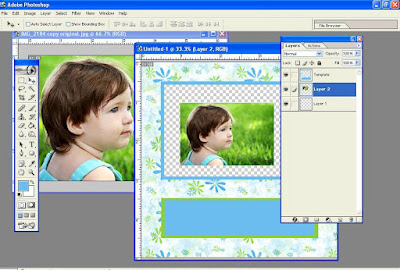 Use the Move tool (press M), and drag your image onto your template, making sure it is UNDER the Template layer.
  Ctrl-T to free transform your image, and then transform to fit. Press enter or click on the little check mark after you are finished adjusting it.
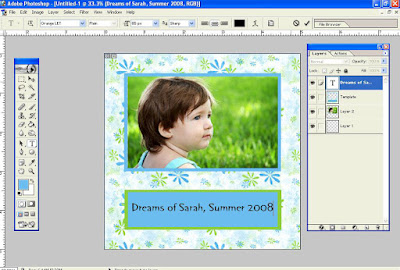 Now add text. Just click on to select the Template layer (this is to assure your text goes on top of your template), then select your Text tool, and click in the colorful text box you made and type in your text.
  When you are finished, flatten your image and save it as a .jpg.
The next CoffeeShop Tutorial will show you how to make custom digital paper for storyboards, cards, scrapbooking, etc. It will also show you how to design your own custom Christmas card from scratch!
Download the CoffeeShop Blue&Green Template HERE!Do you want to download my favorite CoffeeShop PSE/Photoshop Actions and Lightroom Presets or Design Elements in one convenient zipped file AND help support this blog? Just click here for my action pack or here for a download of some of my most popular design elements, storyboards, and textures.
For complete info on installing all of my actions, click here.


