

Here is a little about Claudia http://www.gnubee.wordpress.com/ blog, http://www.etsy.com/shop.php?user_id=5579967 Etsy Shop, in her own words:
Okay so, the most interesting thing about me is that I was born in Argentina! Yikes, here goes...
I've been taking photographs since I was 14. Always as a hobby, among all the others, photography has been and always will be my first love. Cliche I know, but I always seem to come back to it. I've never had any formal instruction in photography. I did work in the retail photo industry for 10 years, so I was able to see a lot of photographs, good and not so good.
Last year, I decided I needed to really start looking at photography like I never had before. I would harp on my kids that the only way to get better at something is to practice and yet I wasn't following my own advice. So I challenged myself to take more photos. I co-taught a class on photography/digital editing at our homeschool co-op and learned as much about editing as I was teaching about photographic principles. I still have a long way to go, I'm humbled when someone calls me talented.
I learned about editing by using the GIMP program first then broke down and spent money on Photoshop Elements 6. I am not a computer person - I'm artsy-fartsy - so after a lot of trial & error and observation of several different flickr groups I started successfully "playing" with my own shots. I've been hooked since then wanting to try different techniques or styles. I purchased an Argus 75 on ebay for $5 just to try my doing my own through the viewfinder (ttv) shots. There are so many great groups on flickr and so many people willing to help out a "newbie". Feel free to check my flickr profile for the few groups I joined for help.
When I found Rita of CoffeeShopPhotography I barely knew what an action was. I had no idea there were so few actions out there for Elements. Imagine my delight that she was willing to work some PS/computer magic and make her fabulous actions available for Elements users! Really she was just feeding my now new addiction! Some nights I wish I didn't need to sleep just so I could keep playing!! One night I decided to apply one of the CoffeeShop actions to my ttv shots and that opened up a whole new avenue of possibilities.
So, my flickr name - Cosi! It's the Italian word for "Like this!" or "This way!" I'm honored to be able to show you how to.
Here is the tutorial:
 1) Start by opening a photo, then open TTV [...] layer. I used http://www.flickr.com/photos/laurohunt/2568886271/in/set-72157604675769411/ in this sample. Minimize the TTV because you’ll need to drag it back onto the background first layer photo. *Note – sometimes before I minimize my TTV or texture layer I resize it under Image>Resize>Image Size, by plugging in the dimensions of my background photo. This is handy for getting the entire TTV or texture to “stretch” in the proper proportions. When you pull from the corner or sides you lose some of the image. You can also press Ctrl-T to free transform the texture to fit it on your photo, after it is on the top layer.
 2) In this case I did just pull from the corner to meet the bottom of the frame, and checked ok.
 3) Play around with the type of layering style you want and opacity amount. I’m still fairly new to PSE6 so I try a lot of options just to see what they’ll do. In this case, I chose multiply and I left the opacity at 100% or my black frame would have faded too much.
 4) It looks dark, sometimes that’s okay, sometimes not, you decide what you prefer but I left it like this, to play with a level layer and a hue/saturation layer.
 5) Flatten and crop.
 6) I added a level layer and lightened the shot. It seems kind of light but keep in mind I will be running the CoffeeShop Irish Breakfast Tea action before I’m done. And before that I’m going to add a hue/saturation level. Another thing to keep in mind – if you are planning to add a texture too, that may or may not darken the overall look.
 7) Add a Hue/Saturation layer. It seems like +20 is usually a good starting point, but again it’s up to personal taste.
 8) I also changed my hue/saturation layer to “soft light” and liked the effect better leaving it at 100% opacity. I spend too much time playing with all the buttons, but I like options!
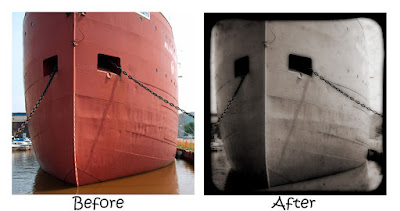
 9) Next, flatten. So here I am just before running the CoffeeShop Irish Breakfast Tea action http://coffeeteaphotography.blogspot.com/2008/08/download-my-huge-pspse-coffeehouse.html .
10) I chose to keep the Soften layer; I thought it look kind of “dreamy” and “old”. But thankfully Rita left us the option of adjusting, or leaving it out completely if we prefer. Flatten and save, and you have a fake TTV!
These same steps can be used to add a texture to your shots. There are several groups on flickr that offer textures for use, like Textures for Layers http://www.flickr.com/groups/textures4layers/ and Noise and Dust Through the Viewfinder http://www.flickr.com/groups/ttvdust/. Also check out http://www.flickr.com/photos/ghostbones/ , http://www.flickr.com/photos/nesster/ , http://www.flickr.com/photos/leschick/ , and http://www.flickr.com/photos/duncan_allan/ for some gorgeous free textures (and photos where they used these textures). Don’t be afraid to experiment with the layering styles when you add texture, the looks are as different as night and day sometimes!


