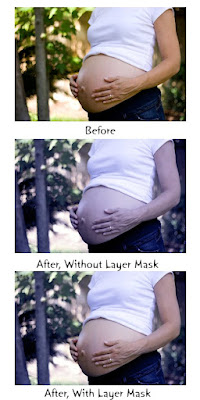
First, what is a layer mask? Imagine a beautiful stained-glass window, filled with light from the sun. Take a piece of white printer paper and tape it over part of that window. You will still be able to see the stained-glass colors and design through the paper. Take some black paint and paint the center of the paper black. Where you painted black you are not able to see through to the stained-glass window anymore. In photo-editing, the stained glass window is your image. The white piece of printer paper is your layer mask. The white layer mask will allow enhancements you do on that layer of your image to show through. The white is completely translucent in editing programs. If you paint over the white layer mask with black paint, it will make the mask opaque where it is black and the enhancements will not show through in those areas.
Now tape up a piece of thick black construction paper on that stained glass window. You don't see the stained glass colors and design. A layer mask filled with black completely blocks any of that layer's enhancements. However, if you paint over that black mask with a white brush, it "reveals" the enhancements on that layer.
It gets even more exciting than that. When you paint over layer masks you can adjust the opacity of your brushes. Say you have a layer with a white layer mask. If you set your black brush to 50% opacity, then 50% of that enhancement on that layer will be blocked. Paint over a black mask with a 10% white brush, and only 10% of that enhancement on that layer will come through.
If you go to your layers pane in PSE and you click on the icon "Create adjustment layer", those layers will have a built-in layer mask. However, if you add a new layer (say a solid color layer), a copy of your background, or even add a texture you will notice that there is no easy way to add a layer mask to those layers. Photoshop has an "add a layer mask" icon, so you just click on that and it automatically adds a white layer mask to the layer you have selected. PSE does not have this easy option, but you CAN do layer masks on these layers, in a slightly confusing way. You can also add an layer mask action or plug-in to your program, just Google for some great free ones or download my freebie: CoffeeShop Layer Mask Action for Photoshop Elements . However, the way I detailed below also works great, and it is the method I have used on some of my actions. You can use this method in Photoshop, but you don't have to as you can simply click on "add a layer mask".
The pictures you see below demonstrate the importance of a layer mask. The first photo is very warm with yellowish/reddish colors. I wanted to make it a bit more moody and cold with added blues, however I did not want my skin tones to be too blue. Yet the original skin tones would appear too orange compared to the colder background. The middle photo shows what my image would look like without a layer mask, the last photo shows that I masked out some of the blue from the model's skin to make it look more normal.


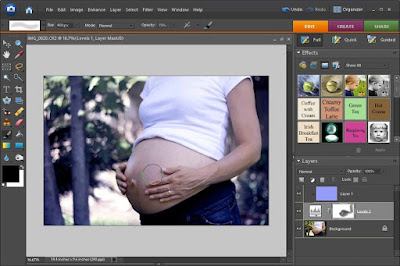
Now I was able to use the layer mask with the Levels adjustment layer as my layer mask for the colored layer. If you press D on your keyboard it sets the foreground color to black, the background color to white (bottom of menu to the left), and if you press X it switches the background and foreground colors. So I pressed D to make my foreground color black, B for my brush tool, selected a soft low opacity brush (19% in this case) and brushed over the skin.
If I used a 100% black brush then the skin would be too saturated and warm for this image. If you use a low opacity brush and keep on painting over the same area, it will continue to increase the brush intensity, in this case remove more of the blue color layer effects on the image.
OK, a few things to know. Say you have a white layer mask as in this case and you are masking out the bluish color from the skin with black and you go over the background by accident. Darn, the background now has a section that is too warm. Just press D to set your foreground/background color to the standard black/white, then X to make your foreground color white and brush over the area you accidentally covered in black. If you totally mess up, just click on your layer mask, and then go to the top menu and select Edit and the Fill Layer, Contents and then select white for a white mask or black for a black mask to bring your mask back to its original color and start painting again from scratch. Here is a sample of a black layer mask. This is the CoffeeShop PowderRoom action for skin softening. Notice the Step 1, Skin Softening layer is selected and that I am using a white brush at 35% opacity. I am brushing over the black layer mask. The action has already applied maximum skin softening to that layer, but because it has a black layer mask 100% of the skin softening is masked out (you can't see it). I must paint it back in. As I am using a white brush, the skin softening that was applied to that layer is showing through as I paint. I used a lower opacity brush because I did not want 100% of the softening, but rather a more subtle effect. In this case 35% of the softening layer is showing through where I paint.
Hope this makes sense! Give layer masks a try, they are easy and so incredibly useful.


