And check out these textures by Jerry! Jerry, I don't know how you do it, but you continue to amaze and delight me. :-)
As promised, today I am going to post something technical. :) I get so many emails asking me how I make slideshow headers.
Well, it is easy; if you follow this tutorial. I have done so much research trying to figure out the best way to do this without giving myself (or you, my reader) a headache.
NOTE: If your slideshow header is not centered correctly, please try this tip from one of my readers: "All you have to do is put this code in CSS: #HTML1 {margin-left:-40px} You may have to play with the number before" px" depending on the width of your blog but that should work."
By the way, I have a growing list of Blogger and blog tutorials. You can find them on the bottom of this page or click here to see all of my posts.
1. Make your "slides" the width of your blog header. I use Photoshop or Photoshop Elements. I have some free blank templates here. If you don't know how big you need to make your slideshow header, go to Page Elements, then click on "Edit" where you upload your header and look where it says "shrink to size" and copy that width. Or go to your template html and scroll down to Header Wrapper and copy that size. Them make your header that width and any height you choose. I usually go for 300 to 350px high but you can make them as large/small as you want. Make sure all of the slides are the exact same height and width or the slideshow won't work.
Here are the two lovely slides I made. They are 800px wide, 300px high. Remember, the more slides you add the slower your blog will load, so I usually try to stick with 2-5 slides.


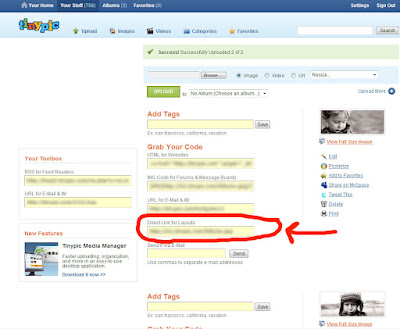
Upload your slides to your favorite image hosting site. I use free and wonderful TinyPic. Grab the direct link URL (circled here).
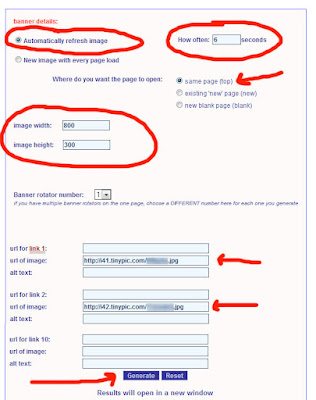
Now for the fun part! Go to HTML Basix. This is free and makes creating slides very simple. I was so excited when a few readers pointed this site out for me when I was on my quest to make a slideshow header. Click on Automatically refresh images and put in how often you want them to flash (every 6 seconds here). Click on same page (loop) and put in the slide's width and height in px. Then paste in the URL of each image where I put a little arrow. You can also put the URL of your blog in URL of link so if someone clicks on your slides they will be directed to your Home.
Click on Generate when you are done.
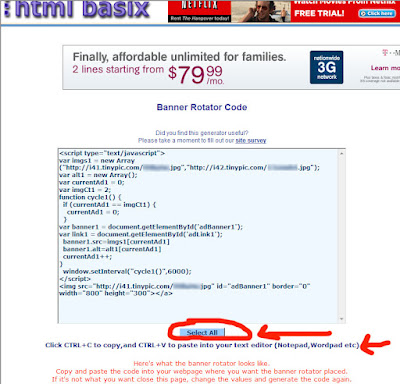
Now you will see your Banner Rotator Code. Simple click on Select All and copy that code. You will paste this in Blogger.
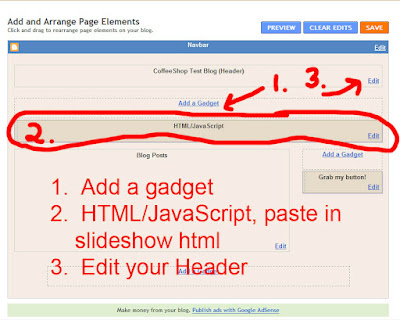
Once you copy the code, go to Blogger, Layout, Page Elements. Then go to the top and click on Add a Gadget (by your header gadget) and select "HTML/Javascript". Paste the code there and Save.
Once you do this you will see you have a nice little slideshow header!
However, you will still have your original static header. You can make a small static header on top or bottom of your slideshow header. Or you can remove your top header using the header gadget.
You will also want to remove the borders around your top header. Go to your template html (Layout, Edit Html), back up your template, and then page down to your header html and change the 2 borders seen in the image below to zero. Save your template.

Hope this made sense! I am so excited to finally post this tutorial. And I have many more Blogger UnWrapped tutorials coming, not to mention more free actions, editing and photography tutorials, and Coffee with Morgan!
If you have any questions, post them at the CoffeeShop Flickr Group!
I also wanted to thank all of you for visiting CoffeeShop. Thank you for reading my blog, posting great comments, sending your friends over here, and your generous donations! I am almost at 300 posts and I am still having a great time and still going strong. :-)


Okay, so one of downers to homeschooling is that when cool stuff like this comes up, you can't do anything about it until after you've schooled the kids :P
ReplyDeleteThanks Rita, can't wait to try it out, you always explain everything to well, I'm usually never confused unless I confuse myself :D
Thank you thank you! Off to give it a try!!
ReplyDeleteRita ~ Thanks so much for all your tutorials and free actions! I just love visiting your site and learning something new!
ReplyDeleteI just wanted to add that we are also a Texas family who homeschools, and we LOVE IT!! We are huge Phonics Pathways and The Well-Trained Mind fans, and my second son will start K at home in the fall, too.
Kudos to you ... From the comments you made on your other post, I think you'll enjoy it , too! ;)
Rita, you are simply amazing!! your website is so inspiring. it's my favorite :) thank you.
ReplyDeleteThank you! Just yesterday, I was trying to figure out how to do this.
ReplyDeleteHave totally been wanting to know how to do this!!
ReplyDeleteLove it! Thank you so much for this (and everything else!)
ReplyDeleteOh you are so awesome, I banged my head against the keyboard trying to figure this out on my own. Thank you, thank you, thank you!
ReplyDeleteThank you so much Rita for all of your fantastic tutorials and freebies. I truly appreciate your generosity and look forward to your every post!
ReplyDeleteYou are brilliant, Rita. Thanks so much for all of your time you put into these freebies for us. We really appreciate it! :)
ReplyDeleteThanks Rita!!! You are AWESOME!!
ReplyDeleteThanks it worked like a charm. Your directions were so clear and easy to follow.
ReplyDeleteI have been hoping you would do this post!! Thanks so much!!!
ReplyDeleteThank you! I've been working on this myself, and was having some trouble. This was perfect!
ReplyDeleteOne note - In order to remove the original header, I clicked on its Edit link on the Page Elements page, then clicked Remove. The Page Header is one of the gadgets that can be added from the Add A Gadget dialog if you need to put it back later.
Thanks for everything you do! You are such a blessing!
Thank you, thank you. You are wonderful. Love, love your blog. I've learned so much with you. Thanks again.
ReplyDeleteIf you want to make it one step simpler there is a blogger gadget that is a slide show, you upload pictures right to blogger and you could probably upload .jpeg files made with PSE you may not be able to change the size though.
ReplyDeleteBrilliant! I've been wondering for AGES how to do this! Will it work on Wordpress in a similar way, do you suppose? Thanks so much!
ReplyDeleteJust a quick note to let you know that a link to this post will be placed on CraftCrave.com in the Tutorials category today [17 Mar 12:53pm GMT]. Thanks, Maria
ReplyDeleteThanks Rita! I got the code, but when I go to my layout in Blogger, the Add a Gadget is at the bottom and it won't let me drag it to the top. And the rotating header (well, footer in this case :) is off center. Any ideas on how to fix it?
ReplyDeleteAh, never mind my question, I was using minima lefty, not minima. Got it, thanks so much, that was way easier than any other tutorials!
ReplyDeleteRita you are AMAZING. Thanks so much for all that you do. I cant wait to try this out.
ReplyDeleteThank you for this! I can't wait to learn it!
ReplyDeleteYOU ROCK! YOU ROCK! YOU ROCK!!!! did I tell you that you rock? Well you do!
ReplyDeleteRita - I love this tutorial! I'm wondering how to contact you to talk about writing a tutorial for you or doing giveaways on your site. Please let me know.
ReplyDeleteYou are Amazing!!
ReplyDeleteI've been wanting to do this for awhile, and before I decided to google how, I had a hunch to look over at Coffeeteaphotography.
Thanks for all of your hard work!
You are SO awesome for posting this information!! I'm so excited that I can make my Blogger page look so custome. I can't wait to try this!
ReplyDeleteMaybe i'm being greedy...but is there any way for the slides to transition in a more smooth manner, such as fading into one another?
ReplyDeleteOh My Gosh, I have wanted to do this forever. Thank you so much Rita!! You are amazing and so beautiful. :0)
ReplyDeleteI can't say Thanks enough Rita! I have been wanting to do this for more than a year... and I am a professional photographer.. I am supposed to know these things! (and your circle brushes are amazing!)
ReplyDeleteOn homeschooling- I was home schooled my sophomore year of to help with a family issue and it was ok- However, you have so many tools and options now that were not available to us then- not to mention there are networks too! If your schools are anything at all like ours you are MUCH better to home school- We hate the high schools here! There are no consequences- Teachers can't discipline, parents don't get involved- and the kids have more rights than any of us! So I would say you are very smart! Best of luck to you and as always I look forward to your blog quite often!
Rita built my blog and added a slideshow header to it and I receive soooo many comments on it! Everyone loves it~ Thanks for passing along your wonderment to everyone!
ReplyDeleteThank you I have been waiting for this.
ReplyDeleteI've been trying to figure out how to do this forever and had given up on ever accomplishing it! Thank you so much!!! Now all I have to do is find time to do it... Lol
ReplyDeleteThankyou so much for this ~ so easy :D!!
ReplyDeleteomg! I did it! I can't believe it. I've been wanting something like this for a long time!
ReplyDeleteThanks so much!
Thanks so much for this tutorial. I love the way my new header looks ... off to do the same to my other blog.
ReplyDeletehttp://themendisabals.blogspot.com
Thanks you for sharing this - it works perfectly
ReplyDeleteThanks Rita - i wracked my brains for 2hrs and came up with this one..
ReplyDeletewww.nectarinedreaming.blogspot.com
Just wanted to let you know you're my hero. I starred this in my RSS reader when you posted it and just got around to trying it and it was so simple! Thank you for all that you do to help guide us beginner bloggers!
ReplyDeleteFinally got around to trying this and gotta say it works great! (Please stop by and take a look when you have a minute!) Thanks for all you do! Love your site!
ReplyDeleteI am BEYOND impressed! This looks phenomenal - and is something I've always wondered how to do. Thank you so much.
ReplyDeleteYou were asking a while about tutorials... I have a very stupid question: I am still using Photoshop7 (saving like mad for CS5) and have downloaded brushes and actions that aren't compatible (even with some that said they were for are my version). Is there any quick way to delete them from my PS folders without having to write down the ones that don't work, then go in via Windows Explorer to delete them manually, one by one?
And any way to tell at a glance which will work, and which not, without installing them etc?
Thanks so much
Thanks Rita for your wonderful tutorials. This was SO very helpful and is exactly what I wanted to add to my website/blog. You are awesome and saved me lots of time. Thanks again.
ReplyDeleteThanks a BILLION!!!
ReplyDeleteRita, I'm trying oh so hard to do this and I've followed your instructions to a T. When I hit "generate" and it shows me a preview, one image will show up but the other two won't rotate, plus there's a bit of code text at the end. Any idea what might be happening?
ReplyDeleteSeriously this is amazing!!!! I have been looking all over and here you are!!!!! The tutorial is RIGHT ON the instructions are so easy to follow. Thank you so much.
ReplyDeleteHere is my link to my blog if you want to check it out to see how cool it works.
http://ttaaphotography.blogspot.com/
This was really helpful! Thanks for sharing, honestly!
ReplyDeleteLove the blog!
xo,
Ella
Thanks so much Rita, I just gave this a quick go to see if I could do it & it worked. Thanks for the wonderful well explained instructions.
ReplyDeleteMy blog is here
http://pareeericas.blogspot.com/
Feeling kind of sick. I decided to go to tinypic and i uploaded a picture header and now I cannot delete it. It seems it goes into a general pool and I can't access it from my photobucket account. Any ideas? I really want it deleted. I have tried everything.
ReplyDeleteThank you for this tutorial. I just found it and it was very easy you are very good at this.
ReplyDeleteHi Rita,
ReplyDeleteThank you so much for this wonderful tutorial. It was so easy to create the slideshow using your step by step guide. I have added the slideshow to my website under the header, however it is off center. Could you recommend a solution to align it in the middle please?
Hey Rita - this is such an easy tutorial to follow but when I get to the last step - at Basix - the script doesn't show me what it will look like - just a blue box in the middle with a "?". I've tried resizing my images and changing the values like it says, but I get the same tiny blue box with the ? on the header when I copy/paste script into blogger. Is it me ;D
ReplyDelete~Claudia
I've been banging my head against a wall and just about to give up, when I stumbled on you post! OH THANK YOU!!!!!! Thank you for dummying it down for me!
ReplyDeleteIs there ANYWAY to get a fade when the images transition? It's a little harsh/abrupt when it rotates images. A slight fade between images would really be the icing on the cake!
Nancy
Thank you very much for the information. Did wonders for me! :)
ReplyDeleteI know a few people asked about getting it centered. Did anyone figure it out? So close.....
ReplyDeleteThanks!
an easier way of centering is by putting < center > before the code and < / center > (take out spaces btwn!)
ReplyDeleteAnyone figure out the transition thing? The only thing holding me back!
I would also really like to know if there is a way to make the transition fade or something, it is a little choppy. Thanks so much for the tutorial, it made it easy! :)
ReplyDeleteTake a look here...
http://brooklynnphoto.blogspot.com/
Thank you for this!
ReplyDeleteThis is awesome! Thank you SO much!
ReplyDeleteHallelujah! You have no idea how long I was searching for how to do this! I'm so glad I found your site! I can't wait to go through all of your tutorials. It feels like Christmas.
ReplyDeleteIs it still working for people? I've got the code all installed and can see the widget, but the slideshow isn't playing.
ReplyDeleteI've used this before with no problems, but today, no luck!
I am a homeschooling mom of 6! My youngest two don't have to do school for a while, but as we school the others will (of course) automatically learn.
ReplyDeleteWe have been homeschooling now for 6 years and love it.
I feel Blessed and Privileged to do this since I am from a country where homeschooling is totally against the law!
Thank you for your tutorial on making a slide show header/banner.
I can't wait to give it a try!
I was so excited by this ... but for some reason it came up with bright grey stripes as a background. :-( I could see nothing in the code which might have caused this. But thank you for the tutorial!
ReplyDeleteMarvelous! Have been wanting to do this for so long and it was so EASY!! Thank you EVER so much!
ReplyDeleteHey Rita I just wanted to let you know I found a super easy quick way to get rid of the old header and the spacing. I just created an image in ps that was 1000 pix wide and 1 pic tall. I inserted that as my header pic and it worked like a charm.
ReplyDeletethis tutorial was SOOO helpful!!!
ReplyDeleteBut do you know if there's any way to make the images dissolve into another instead of just cutting to the next image?? Been trying to figure this out forever!
My slideshow is still off center. I've been working on this for the last 2 days. :( I tried using the code #HTML1 {margin-left:-40px} in CSS and nothing. I also tried the codes < center > before the code and < / center > (without spaces) and nothing. Do these go in the actual html code or the CSS? Either way I tried both locations adn nothing. It's off center by just a tad. Any help would be great!!! Thank you.
ReplyDeleteTHIS was exactly what i was looking for! thank you so much :)
ReplyDeletetheamazingworldofj.blogspot.com
it worket out just wonderful
any idea how to add a dissolve between images?
ReplyDeleteExactly what I have been trying to do for days. Thank you!!!! Just discovered your blog, and am now a fan!
ReplyDeleteThank you for the tutorial... It took a little work to get the slideshow centered and I figured out that my widget is actually HTML2 instead of HTML1. Once I changed to that my slide show is now centered. I figured it out by looking through the HTML code. This is what worked for me.
ReplyDelete#HTML2 {margin-left:-25px}
I also had to "unlock" the widget for the top portion to be able to add more. Standard setting is to only be able to have 2 widgets.
Anna, thank you so much for that info!!! Where did you change the html2 to html1? I need to post this in the post. Wonderful!
ReplyDeleteThis comment has been removed by the author.
ReplyDeletehow did you remove the header in the blogger?
ReplyDeleteThis comment has been removed by the author.
ReplyDeleteGosh... all your tutorials & your whole darn site is AWESOME! You have helped me out, more times than you'll ever know. Thank you!
ReplyDeleteWith that being said... Lol) any idea or a good tutorial on if it's possible to add a slideshow to an actual blogger page? I mainly would like to be able to click on the "seniors" part of my portfolio tab & have a slideshow of a few senior pics. Hope that made a little sense! THANK YOU!!
Oh thank you so much! This helped me out tremendously!! Any idea on how to slightly fade the photos in the slideshow? Thanks in advance.
ReplyDeleteThis is awesome!! Thank you so much for this tutorial!! Now I'm designing my slideshow :)
ReplyDeletehttp://queenlytan.blogspot.com/