Friday, July 31

CoffeeShop Box-It Storyboard Template!


What, another template? Yes! CoffeeShop Box-It is a psd file for Photoshop and Photoshop and has clipping masks (see my tutorial here if you don't know how to use them).

Download the free CoffeeShop Box-It Storyboard template HERE!

Do you want to download my favorite CoffeeShop PSE/Photoshop Actions and Lightroom Presets or Design Elements in one convenient zipped file AND help support this blog? Just click here for my action pack or here for a download of some of my most popular design elements, storyboards, and textures.

For complete info on installing all of my actions, click here.

Monday, July 27

CoffeeShop Polaroid Emulsion Transfer PS/PSE Enhancement Kit!


I am really excited about my newest action/tutorial, CoffeeShop Polaroid Emulsion Transfer PS/PSE Enhancement Kit! I have always loved the look of Polaroid Transfer, but lacked the actual ambition and time to do the real thing. So I decided to figure out how to replicate the look on my own.

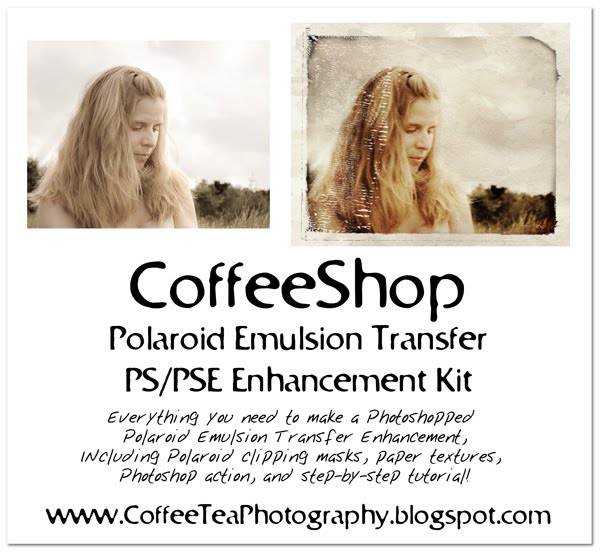
I have included everything you would need to make a fake Polaroid emulsion transfer effect . With this download you get quite a few polaroid emulsion clipping masks I created (if you don't know how to use clipping masks, please read my tutorial HERE) , some paper textures (I found some free ones on Flickr and Deviantart and tweaked them a bit and have included the links on each so you can see where I found them), a Photoshop and Photoshop Elements action AND a step-by-step tutorial (see below). I think you are going to have so much fun with this kit.

A few notes on the actions. If you use the PSE action you have to have one of the clipping masks open BEFORE starting the action and then follow the prompts. If you have Photoshop then just start the action and follow the prompts. The tutorial below will tell you how to tweak the final image, so be sure to read it even if you are using the action. And believe me, this is one time you will want to use the action!

This tutorial takes quite a few steps and can be a bit time-consuming the first time. However, if you use the action you will be able to have your new Polaroid transfer effect in just a minute or two.

CoffeeShop Polaroid Emulsion Transfer Tutorial (see image below of screenshot of layers):

1. Open the CoffeeShop Polaroid clipping mask of choice.

2. Open any paper texture (I have included a few free ones I found on the net, these are not my own and I included the links of where I downloaded them on the texture itself), drag it on top of your polaroid clipping mask, and adjust the size to taste by free transforming it to fit (Ctrl-T). If you can't see where to drag, then Ctrl-0 (that is a zero, not an Oh). Put that layer in Multiply mode. You can adjust the layer opacity later.

3. Click on the bottom layer (the clipping mask) and then open your image and drag it on top of the clipping mask and under the paper texture. Group it with the clipping mask (if you don't know how to use clipping masks, please read my tutorial HERE) and free transform to fit in the cutout.

4. Make a new layer, fill it with white and drag it to the bottom of the layers. This will be your white background. You can adjust the opacity of the paper texture layer so that you see less texture and more white background.

5. Click on the image to select that layer, and then add these adjustment layers: Hue/Saturation (raise or lower the saturation), Levels (I usually make the shadows and midtones darker, but you can adjust to taste), Brightness/Contrast (I add both brightness and contrast to make it a "pop" a bit more). Adjust all layers to taste. These layers should all be grouped with the image, and if they aren't please do it now. If you are using the action, you can change my preset settings by clicking on each layer and adjusting them, or you can lower the opacity of the layers to taste. Or use the layer masks and paint out what you don't want!

6. Now you want to make the image look more like an emulsion transfer and less like a super-sharp-taken-with-a -digital-camera print, so you need to go against everything you know about photo-editing and add blur and noise. :-) Click on the image layer and go to Filter, Blur, Motion blur and keep the angle at 0, but add a bit of distance (2-10) to make the image look like it was slightly diffused during transfer. If the image is too sharp it looks really fake. Then go to Filter, Noise, Add Noise and add a tiny bit of noise (Uniform, Monochromatic).

7. Click on the top-most grouped adjustment layer (the Paper texture should be on above your selection)and then add a new layer, fill it with black and Ctrl-J to copy it. Now you should have two black layers grouped with your image. Put the top one in Overlay blending mode (call it Color Burn) and the bottom one in Hard Light (call it Blacken Edges) and add a layer mask (if you have PSE, please download my layer mask action HERE)and fill that layer mask with black (to remove all effects). If you don't know how to use layer masks, please read this tutorial.

If your image is dark then I would suggest burning in the edges (or any part of the image) by using a soft white low opacity brush on the Color Burn layer mask layer. If your image is light, or you want black edges, then use a hard white brush on the layer mask of the Blacken Edges layer. Play around, and if you mess up just fill the layer mask back up with black or use a black brush with the layer mask selected to remove the darkened areas.

8. Flatten the image when finished and enjoy your hard work. And then ask yourself why you didn't just use the CoffeeShop action. ;-)

Here are a few more notes to help you get great results.

1. Don't add a paper texture and instead print your image on watercolor paper purchased from Walmart/Target or any art store. It doesn't have to be printer paper, any type of not-so-thick watercolor paper works great. You might want to saturate your image a bit more if you plan on printing it this way.

2. Don't be afraid to edit the clipping mask. If you find that you want to fill in some of the distressed bits (or add more), just click on the clipping mask layer and paint over those areas. For example, there might be too many little holes over the face in a portrait, so just fill those holes in on the clipping mask with any color paint.

3. Paper textures are great, but sometimes the texture is too strong over certain areas, like a coffeestain that falls right on your child's face. No problem! If you don't want to Ctrl-T the texture and move it around, just select the paper texture layer and use the cloning tool and find an area that is clean and clone it over the discolored area.

Download the CoffeeShop Polaroid Emulsion Transfer PS/PSE Enhancement kit HERE!

Do you want to download thousands of professional CoffeeShop PSE/Photoshop actions (including exclusive ones not found anywhere for free), textures/overlays, scrapbooking papers, clip art/design elements, photo storyboards and frames, and Lightroom presets from this site in one convenient zipped file AND help support this one-woman blog?

Just click here for my CoffeeShop Mega Download Pack!

Sunday, July 26

Preview of CoffeeShop Polaroid Emulsion Transfer!

boy&pear polaroid emulsion


I am going to pick the winner(s) of a custom CoffeeShop Watermarking action tomorrow, so until I do you can still enter by grabbing my blog button, posting it on your blog, and then leaving a comment in the last post. Tomorrow the winner(s) will be posted, so please come and check and see if it you!

I have been busy finishing up my new CoffeeShop endeavor. I am a bit obsessed with the Polaroid emulsion transfer effect . If you know me, I love a challenge and I decided that I would figure out a way to make fake ones in Photoshop. Not only did I develop a method, but I made a large selection of Polaroid clipping masks (to get that cool messy partly-transferred effect), found some nice paper textures, wrote an action that works in both Photoshop and Photoshop Elements AND am working on a full step-by-step tutorial. If you use my action, you can apply the technique in less than a minute and the best part is it is completely customizable.


This action/tutorial has been quite a challenge and I am really proud of it. The results, after playing with the layers, can be quite amazing. They won't fool a Polaroid emulsion transfer artist by any means, but after all, you are creating your own artistic version of a transfer. And if you don't use the paper texture layer and instead print these on watercolor paper (just go buy some at your local art store or Walmart/Target) your results will be quite realistic and beautiful.


The tutorial is holding me up, but I hope to have everything finished by tomorrow, so keep an eye out for it!


boys playing pe

Wednesday, July 22

Another contest! Free Custom Watermarking Action!

CLOSED! Winners announced above. Thank you so much for entering!!!
----------------------------------------------------------------


I had so much fun with my blog design contest I decided to have another one, this time with an action prize. Just paste my button below on your blog (or if you are not a fan of buttons, a post about my site counts!), comment here and link your blog, and in a day or two I will randomly select 1-2 comments and you will get a custom CoffeeShop Watermarking/Cropping action!

When I select the winner(s) I will post them here. Then I will design an action for Photoshop or Photoshop Elements that will crop your images to web-size, sharpen, and apply your watermark. I can even add an optional frame or rounded corner version! You just send me your watermark and tell me where you want it placed (it will be adjustable at the end) and soon you will be saving time posting on the web. I designed a watermark action for Julie (you can see it on her newest posted images) and I also was lucky enough to design her blog.

I might have to have another blog design contest soon. Blog design is so much fun and I am a bit addicted! Here is the last winner, Jen's blog. She was so sweet and I really enjoyed working with her. And her kids are so cute!

Make sure you link your site in your comment. And if you already have my button on your blog, that counts!!!


<a href="http://coffeeteaphotography.blogspot.com/"><img src="http://farm4.static.flickr.com/3647/3665953854_f271de3832_o.jpg"/>


Tuesday, July 21

CoffeeShop Baby Boy Announcements!


I promised I would be coming out with a boy version (check out the girly ones HERE) and here they are! There are 5 different patterns with an optional paper texture layer. These are .psd files which you open in Photoshop or Photoshop Elements and use my clipping mask tutorial to fit the images in the cutouts. Hope you enjoy them!

Download the free CoffeeShop Baby Boy templates HERE!

Do you want to download my favorite CoffeeShop PSE/Photoshop Actions and Lightroom Presets or Design Elements in one convenient zipped file AND help support this blog? Just click here for my action pack or here for a download of some of my most popular design elements, storyboards, and textures.

For complete info on installing all of my actions, click here.

Sunday, July 19

CoffeeShop Baby Girl Announcements!


I made some custom baby announcements and I wanted to share them with all of you! The zipped file contains a large .psd (for Photoshop and Photoshop Elements) many-layered 5x7, 300 dpi file. It has 6 different patterns and an optional paper texture layer. All text layers are adjustable and the images can be put in via clipping masks (check out my tutorial here if you haven't used them before). I have a boy version coming out next!

Hope you are having a great weekend!

Here is what the layers look like. Just turn on the eye icon of the pattern you want to use. Make sure to flatten the image before printing!

Download CoffeeShop Baby Girl Templates HERE!

Do you want to download my favorite CoffeeShop PSE/Photoshop Actions and Lightroom Presets or Design Elements in one convenient zipped file AND help support this blog? Just click here for my action pack or here for a download of some of my most popular design elements, storyboards, and textures. 

For complete info on installing all of my actions, click here.

Thursday, July 16

CoffeeShop Circle Rectangle Storyboard Template!


Another day, another storyboard! CoffeeShop Circle Rectangle (can you tell I am at the bottom of the naming bucket?) is a psd file for Photoshop and Photoshop and has clipping masks (see my tutorial here if you don't know how to use them). I also included a jpg template for those of you that don't use clipping masks. :-)

Download the free CoffeeShop Circle Rectangle Storyboard template HERE !

Do you want to download my favorite CoffeeShop PSE/Photoshop Actions and Lightroom Presets or Design Elements in one convenient zipped file AND help support this blog? Just click here for my action pack or here for a download of some of my most popular design elements, storyboards, and textures.

For complete info on installing all of my actions, click here.

Monday, July 13

CoffeeShop Splendor B&W PS/PSE Action and Tutorial!


I am always looking for different ways to do B&W, and I have seen this type of enhancement around Flickr and love it, so of course I had to figure out how to do it on my own. I really love how the skin glows and the dark areas have a hint of purple. This action has several layers which can all be adjusted (play around with blending modes and opacity). Sometimes the Contrast Boost layer will blow out highlights, so I added a layer mask to that layer. Just use a soft low opacity black brush (5-10%) and paint over blown out skin or other areas you want to slightly darken. Download the free action at the bottom of this post.

For those of you who like to take apart actions, here is the CoffeeShop Splendor UnMasked Tutorial!

1. Contrast Boost Layer: Add a levels adjustment layer and adjust the contrast. I usually bring up the highlight and midtones a bit and make the shadows a little darker. The action applies a slight S curve adjustment to a copied background layer, but PSE does not have the same type of curves so just use levels if you have that program.

2. Purple Tint Layer: Add a Hue/Saturation Adjustment layer. With it set to "Master" and colorize checked, set the Hue to 282 and the Saturation to 5.

3. Brownish Tint Layer: Add a Photo Filter adjustment layer. Click on "Color" and enter the hex# ac9133 on the bottom. Adjust "Density" to 50% and make sure "Preserve Luminosity" is checked. This will be a gross looking brown, but don't worry!

4. B&W Layer: Click on your Contrast Boost Layer just above your Background, and add a black to white Gradient Map Adjustment Layer. This adds additional contrast and pop (and if you did not have the other two color layers it would turn your image B&W).

5. Vignette Layer: (Check out the CoffeeShop Burn Action and Tutorial for more details!). Click on your Brownish Tint Layer. Add a Black to fade Gradient layer (not Gradient Map layer, make sure your foreground is set to Black and your background is set to white before adding this). Change the setting to Radial, the Scale to 150%, and click on Reverse. Then click on the gradient map and set the white slider on the gradient (on the right) to the middle where Location says 50 or less. The smaller you make the setting, the smaller the vignette. Press OK. You can set the vignette to multiply, overlay, soft light or vivid light blending mode and adjust the opacity to taste. Or turn it off if you would rather not have burned edges.

That is it! Hope you had fun learning how to make your own Splendor B&W image!

Download the free CoffeeShop Splendor B&W PS/PSE Action HERE!

Do you want to download thousands of professional CoffeeShop PSE/Photoshop actions (including exclusive ones not found anywhere for free), textures/overlays, scrapbooking papers, clip art/design elements, photo storyboards and frames, and Lightroom presets from this site in one convenient zipped file AND help support this one-woman blog?

Just click here for my CoffeeShop Mega Download Pack!

Friday, July 10

CoffeeShop Blog Design Winner!

OK, thanks to Random.org I have my winner, Jen of Our Daily Big Top !

I did pick an alternative winner. If Jen does not get back with me in a timely fashion OR Jen's blog goes really well and I finish it in a timely (love this word!) manner AND she likes it I will announce my alternative winner here in a few days. I want to do even more blogs but I have to remember I do have a day job and my two little bosses don't like their Mommy being on the computer instead of playing with them. :-) Not to mention I have to make sure I have stuff to post here.

Keep an eye out for more contests here at CoffeeShop. I will be giving away some custom-designed-for-you actions (including some watermarking/sizing for the web) and more blog design! And I have more actions and storyboards worked up that will be posted this month. Thanks for placing my blog button on your blogs, reading my posts, and donating so generously!

Mozy online backup is still on sale, but now Mom Mozy users can get 10% AND a free t-shirt, just click on this link, register to get your free t-shirt and enter JULY at checkout for a 10% discount. Or post about Mozy on your blog and register to get a free t-shirt! If you aren't a Mom register to get the free t-shirt and donate it to a friend.

If you are not a Mom, click on this link and enter JULY at checkout for a 10% discount on all of Mozy's backup plans! Or check out their free 2 GB backup, it is one of the best bargains out there. Make sure to back up all of your free CoffeeShop Stuff. :-)


Thursday, July 9

CoffeeShop Ovals Storyboard Template!


Another CoffeeShop free storyboard template! CoffeeShop Oval Storyboard is a psd file for Photoshop and Photoshop Elements and has clipping masks (see my tutorial here if you don't know how to use them). I also included a jpg for those of you who would rather use the template in other programs. This is not an action, and must be opened in Photoshop or Photoshop Elements like any other image file.


Download the free CoffeeShop Ovals Storyboard template HERE!

Do you want to download my favorite CoffeeShop PSE/Photoshop Actions and Lightroom Presets or Design Elements in one convenient zipped file AND help support this blog? Just click here for my action pack or here for a download of some of my most popular design elements, storyboards, and textures.

For complete info on installing all of my actions, click here.

Thursday, July 2

CoffeeShop Square Egg Storyboard Template!


I want to wish all of you a happy Independence Day weekend! My brother-in-law is from Iran, and after watching the Iranian people struggle for their own independence our family is reminded how fortunate we are to live here in the USA. I wish that everyone could experience our freedoms.

I have been on a storyboard kick lately and I am posting them as fast as I make them! This new one, CoffeeShop Square Egg, is a psd file for Photoshop and Photoshop Elements and has clipping masks (see my tutorial here if you don't know how to use them). I have plenty more sitting on my hard drive, so keep on visiting the CoffeeShop!

Download the free CoffeeShop Square Egg Storyboard template HERE!

Here is the preview of the next free CoffeeShop PS/PSE action coming out! I LOVE this B&W effect!

Do you want to download my favorite CoffeeShop PSE/Photoshop Actions and Lightroom Presets or Design Elements in one convenient zipped file AND help support this blog? Just click here for my action pack or here for a download of some of my most popular design elements, storyboards, and textures. 

For complete info on installing all of my actions, click here.