Yesterday I posted a beautiful set of 1880's fabric papers I created from an Old Pacific Print Works sample book. I have had several requests to put together a tutorial on how I do this, so here it is!
CoffeeShop Photography Photoshop/PSE Tutorial: From Vintage Scrap to Seamless Patterned Paper:
I love the rose with gray background fabric sample so I selected it using the Marquee tool and then cropped it out (Image<Crop).
This is the selection.
I pressed Ctrl-T to free-transform the fabric scrap and pulled out the selection on all corners to remove most of the rough edges.
Then I used both the spot healing and clone brush to fix the white edges.
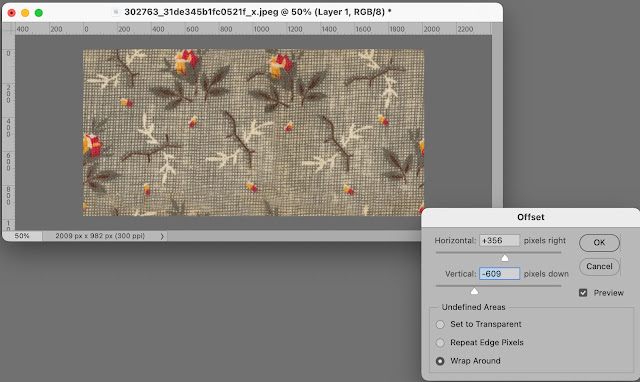
To make this into a seamless pattern I applied the Offset filter (Filter<Other<Offset).
Click Wrap Around and then adjust the Horizontal and Vertical sliders until you can see seams that were originally the edges of the image.
I have circled both the horizontal and vertical seams above. These will have to be blended in so they won't be obvious in this pattern.
I used the spot healing and clone brush to fix the pattern.
There was some reddish stain on part of the background so I cloned a clean gray background over it. I also remove some extra little flowers and added back leaves that had been cut off.
These isn't really any tricks to making a nice pattern in this case other than knowing how to clone and heal. It can take some time, but worth it to get a perfect seamless pattern.
After you finish, then run another Offset filter with new settings on it to make sure you don't see any seams. If you see anything that looks off, clone or heal it.
If you are using Photoshop Elements, make a pattern of this scrap (Edit<Define Pattern) and apply this pattern on a new blank paper (I made mine 12 by 12 inches). If you see any blank or weird looking areas, just clone some flowers or other design elements over the original pattern and save this new version and check it again. Continue to do this until you are satisfied with your pattern.
If you have Photoshop Elements you are done! If you have Photoshop then read on to learn a nifty trick to simplify pattern making.
Photoshop only: If you have a newer version of Photoshop, now they have this amazing feature called Pattern Preview (View<Pattern Preview). If you check this and zoom out you can see how your pattern will look once applied to a larger area.
The original pattern will have a blue box around it. You can spot heal or clone anywhere on the pattern and see live what is happening. Just make sure your changes are on a new layer on top so you can edit them.
I made a new layer and cloned a rose in the middle.
I free-transformed the rose to flip it and then used the erasure tool to remove any extra that was covering my original pattern.
Here is the finished seamless pattern paper. It looks great, you would never know I started with a dirty little fabric scrap.
If you have any questions please leave a comment below! And if you have any photo-editing or graphic designs tutorial suggestions, please let me know.
Just click here for my CoffeeShop Mega Download Pack!


