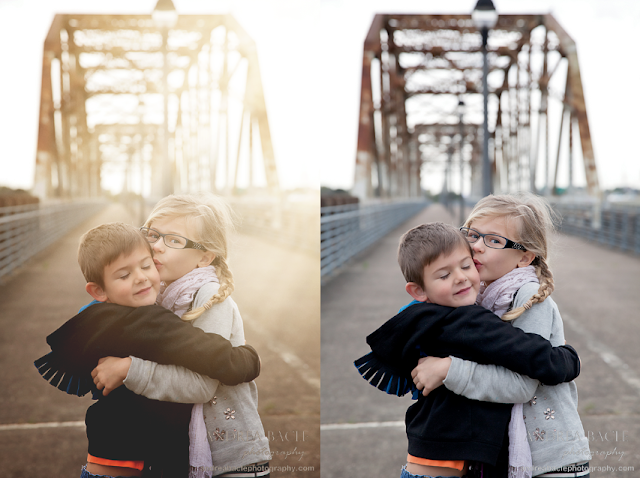
I have a fun week planned here on my blog. Today I have a step-by-step tutorial on one way to design your own custom sunray/sunburst overlays. I am also including a free downloadable set of three high-resolution ones you can use on your own images.
I also have a gorgeous sunray action coming out this week and another editing tutorial, so please come back and visit!
I wanted to design some new sunray overlays and found this amazing tutorial on creating them. I have used other methods but this was one of the easiest way I have ever seen to quickly design your own. I ended up modifying the tutorial for my own overlays and posted my method below.
Toward the bottom of this post you can grab three high-resolution sunray overlays I designed to share with you.
I used a fashion image by Tamara Bellis in my tutorial below and ad.
Original image from Flaunter .com

The beautiful image of the children on the bridge are from Andrea Bacle Photography. Andrea is not only an amazing photographer but a personal friend. I wanted her to introduce herself to you since I will be featuring some of her images on my blog. Thank you so much Andrea for helping me out!!!
Andrea is a travel photographer and a coach for women with photography businesses. She teaches boss babes how to get focused—fully booked and profitable—so they can focus on shooting with passion. Hop over to her Facebook community of fabulous small business owners and get your business jumpstarted!
CoffeeShop "Creating Custom Sunray/Sunburst Overlays" Tutorial:
This is one of many ways to create your own custom sunray overlays. I start off creating a new black document 6000x6000 pixels .
Grab the circle marquee tool and set "Feather" to 250 px. Hold shift and draw a small circle inside the black background. You don't want to make this too big because the sunrays might get cut off.
Create a new layer and make sure it is selected. Don't put your sunray directly on the background layer.
Make sure your foreground/background is black/white (as seen above) and then Filter
Click CMD-D to remove the marching ants selection.
Go to Filter
Set the amount to 100 and the Blur Method to "Zoom". Click on the example in the box where you want the light coming from. In this case I am creating sunbeams from the upper left corner. You can also make them from the top or right.
Repeat the Radial Blur one more time to smooth out the rays!
Now you can move the sunbeam layer if you want.
Duplicate the sunray layer (Ctrl-J) so that the rays are more defined. Merge these two layers before going on to the next step.
I like to pull out the bottom edges of the sunrays so I go to Edit
Pull the bars until you are satisfied with the rays.
I think these look pretty nice but I want to add more contrast.
I added a Levels adjustment layer and moved the highlight and midtone sliders to the left.
You can stop here and save your sunray, or add some custom color to the rays.
I added a beautiful golden tone to them by adding an orange Color Fill adjustment layer in Soft Light blending mode.
Now Merge Visible (Shift/alt.option/cmd/D) or flatten and save your new sunray overlay!
Now I will show you how to add it to your image.
Original image by Tamara Bellis
Drag the overlay on the image and Free Transform (Ctrl-T) it where you want the light.
It is best to cover your entire image with the overlay if possible so you won't notice any lines, especially if you have dark shadows. If you can't do this and notice a line where the overlay is not covering the image, then click on the overlay layer and use a black brush to paint on the transparent areas.
Put the overlay in Screen blending mode.
Duplicate the layer (Ctrl-J) to add more light and adjust the opacity of that layer to taste.
I usually like to add some golden color to the rest of the image.
Add a dark-orange Color Fill adjustment layer.
And put this new layer in Soft Light and adjust the opacity to taste.
I love how this looks! If you are working with a portrait you might want to use a soft low-opacity black brush on the sunray layer mask to paint off some of the haze.
I would love to see your own before/afters on my Facebook page!
Download the CoffeeShop "Sunray" Artistic Overlays.
Do you want to download thousands of professional CoffeeShop PSE/Photoshop actions (including exclusive ones not found anywhere for free), textures/overlays, scrapbooking papers, clip art/design elements, photo storyboards and frames, and Lightroom presets from this site in one convenient zipped file AND help support this one-woman blog?
Just click here for my CoffeeShop Mega Download Pack!


