This is Part One of a two-part tutorial on editing baby portraits. I have been wanting to update my Baby PowderRoom action for some time and I finally decided to put it on top of my list of things to do. This updated version has a automatic skin-softening feature with a twist, similar to Perfect Portrait 3. And I removed the redness remove layer and added a Levels adjustment layer. The original Baby PowderRoom will still be available for download because it is a great action, but I would love for you to try my updated version.
When I decided to update Baby PowderRoom I also wanted to write a step-by-step tutorial on editing a baby image. I don't have any babies to photograph right now (I am making a sad face right now), so I asked my Facebook fans if they had any SOOC (straight-out-of-camera) photos of adorable babies that had some redness/blotchy skin and needed some editing.
Today I will show you how I quickly remove red splotches from baby skin, and in the next post I will present the new CoffeeShop Baby PowderRoom 2 action and show you how I used it on this image. Finally I will add a texture to enhance the background.
Tutorial Part 1: Removing Red Blotchy Skin on Babies
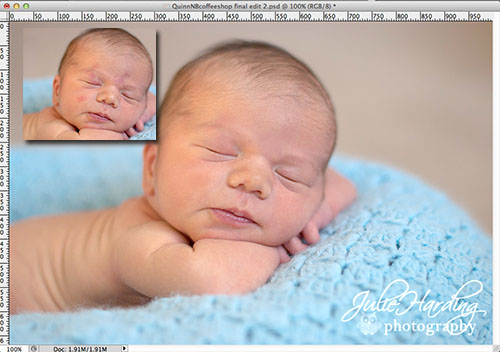
I had a great response to my Facebook baby photo search and it was difficult deciding on just one photo, but I finally decided on this one from Julie of Julie Harding Photography. It was the perfect image because it had a beautiful baby, perfectly focused and composed, but needed a bit of skin work. Thank you so much for sharing this image with me Julie!
1. I added a levels adjustment layer to brighten the image. I brought up the highlights and also the mid-tones. Then I flattened the image.
Thanks to Julie this image didn't have any really strange color casts, but if you have too much red, blue, or yellow in the skin-tones you can use the levels adjustment layer to fix them. Just click on the little drop-down menubar by the RGB in Levels and select Red to remove/add some red (I usually adjust the midtone slider) and Blue to add/remove yellow.
I usually do a final skin color adjustment after running Baby PowderRoom if it needs a tweak.
2. There are so many ways to remove red blotches, but I find the fastest way is to use the simple paintbrush. Remember, we are going to smooth the skin after removing the redness, so you don't have to be a perfectionist at this step.
Make sure your image is flattened or you are working on the background layer (or a duplicate layer). Zoom in on a red spot and then click "I" to select your eyedropper tool (make sure it is set to 3 by 3 Average) and click on a clean area of skin next to the red area.
3. Click "B" to select your brush tool. Make sure your brush is soft, the mode is Normal, and put the opacity around 25-50%.
4. Gently paint over the red area. You can click on "[" or "]" to make your brush bigger/smaller as you paint. If the skin is really red you might have to go over it a second time to completely cover it up. I had to go over this spot twice. You might notice that the cover-up is very obvious at this step, but don't worry! The skin-smoothing will fix that. But try not to paint over cute little baby wrinkles and dimples.

5. You can see my before and after in the screenshot above. It probably seems like it would take a lot of time, but if you get used to using keyboard shortcuts, it takes only a minute or two. Click on "I" and click on the clean skin to pick the color, then click on "B" and adjust the size of your brush with the "[" or "]" keys and paint.
On my next post I will show you how to use my new CoffeeShop Baby PowderRoom action to finish editing this adorable little baby.
Do you want to download my favorite CoffeeShop Actions or Design Elements in one convenient zipped file AND help support this blog? Just click here for my action pack or here for a download of some of my most popular design elements, storyboards, and textures.
For complete info on installing all of my actions, click here.


