

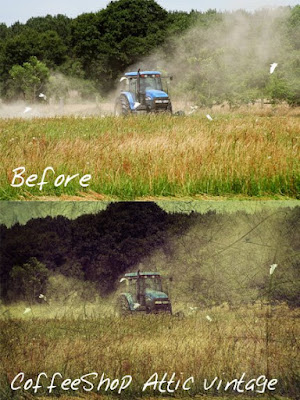
Here is the CoffeeShop Tutorial to create the CoffeeShop "Attic Vintage" look. This tutorial also teaches you how to use textures, so even if you don't care for this exact effect, read it just for the texture tutorial!
In a few days I will be posting an action for this treatment. However, you will be responsible for finding your own cool texture!

 Open your image. I thought this was cute as is, [...] but I really loved his knobby knees and turned-in frog boots. And the dried manure in the barn was pretty cool too. So I ended up cropping this one.
 Cropped and ready to go.
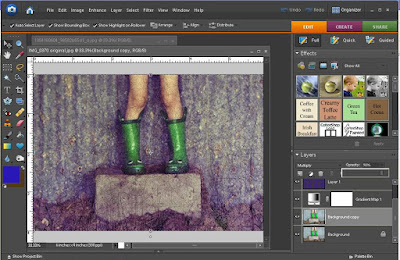
 Now I will apply a gradient map layer. I love using these for turning my images B&W and adding hues. In this case I wanted a yellowish/bluish vintage look, so I made my foreground swatch bright yellow and the background swatch dark purple *. Then I added a gradient map layer with these colors. Make sure you gradient looks goes from purple to yellow. If it is reversed your image will look more purple/blue than yellow. *NOTE: The swatch should have been purple (foreground) to yellow (background), but I did it backwards and had to click reverse on my gradient map pane as seen above!
 I put the gradient map layer in color blending mode and adjusted the opacity to 40%.
 I want to age this a bit more so I decided to add a cloud filter. Add a new blank layer on top. I made my foreground swatch color a bright dark blue and my background color a dark brown, then went to filter, render, clouds.
I put this layer into exclusion blending mode set to 25% opacity. Now I have a bit less contrast, a tiny amount of texture, and a nice tone.

Now I want to add my scratchy texture. I love this one from Paul Grand at Flickr: Cool Scratchy Texture . He has many other great free textures and also stunning photography work, so please check him out at Paul Grand at Flickr . For this type of photo enhancement you can use any type of texure you want, but I like the grungy/dirty ones. Check out Flickr for free textures ( I love Ghostbones and Cosi!'s but there are so many other great ones out there.) Also check out Deviantart under resources and textures for additional free textures. There are unlimited amazing ones out there.
Open your cool old scratchy/dirty texture. For this tutorial I used a B&W texture, so unless you want your colors to change I would make your colored texture B&W before using it. Colored textures are lovely too, but be aware it will change the color of your final image (which can be a good thing!).
 Using the move tool, drag the texture on top of your image and then Ctrl-T to free transform it to fit.
Play around with your blending mode and opacity. I loved Hard Light blending mode with this image and I adjusted the opacity to 40%. You can also use multiply, soft light, overlay, vivid light, etc.
You can also remove part of the texture from your image if you so wish. I didn't for this image, but if you do there are several methods. Use the erasure on the texture layer, set to a soft brush and low opacity, and "erase" the texture. You can also use a layer mask on that texture layer. Add your mask (in Elements just add a new levels layer without making any changes, drag it under your texture layer, then click on your texture layer and ctrl-G to group it with the levels layer, and use the level's layer mask) and use a soft black brush set to low opacity and paint over where you want to remove the texture. Finally, if you want to keep the texture's colors but not the actual texture, select around whatever you wish to remove the texture from (in the texture layer) with the lasso tool, feather it slightly, then Gaussian blur with the maximum setting.
I wanted to make this image a bit dark and moody, so I clicked on the background layer, ctrl-J to make a copy, put that new copied layer into multiply blending mode, and reduced the opacity to 90%.
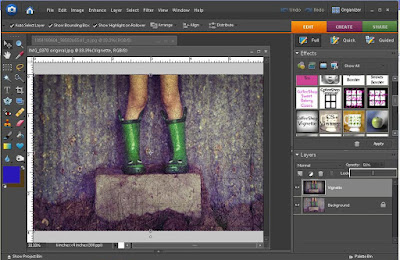 I flattened my image and then ran the CoffeeShop Vignette action on it. I put the opacity of the vignette layer to 50%. Once again I flattened, but this time I saved as a .jpg.
So that is it, the CoffeeShop "Attic Vintage" look. Don't be scared to try different colors in your layers, different blending modes, and different opacity settings. You can make this as unique as you want. I will be writing an adjustable action that does everything above but put in the texture (you will have to add that by hand) and I should have it up in a few days.
Hope you enjoy it! Rita


