


I released a new Lightroom Preset set this week called "Sapphire Lights". Today I wanted to show you how you can adjust the "Sapphire Lights" light effects on your own images.
Download the "Sapphire Lights" Lightroom preset set to follow along with this tutorial!

CoffeeShop Lightroom Tutorial: "Sapphire Lights" & Adding Light Via Gradient Filters

Open your image. This one is an image of my younger son, straight from the camera.

I ran the "CoffeeShop Sapphire - Upper Right Light" preset on the image and wanted to adjust the light effect coming from the upper right. This light effect is created using the Lightroom "Gradient Filter" tool.
I clicked on the "Gradient Filter" button on the Basic menu on the right of my screen. You can also type "M" to open the filter.
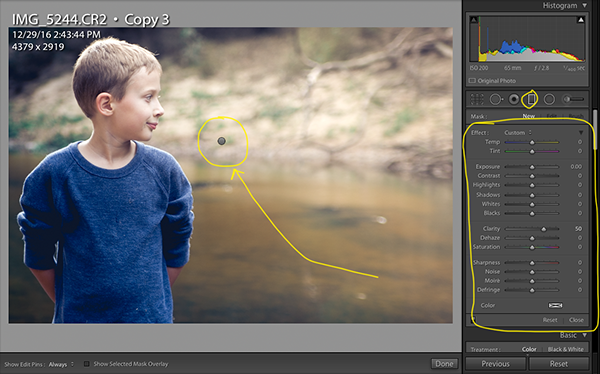
As you can see, there is a little black circle on my image which is the center of the "Gradient Filter" light effect the action applied to the image.
You will also notice that a new menu opened up, it is the "Gradient Filter" adjustment menu. But it is not showing the settings of the filter applied by the preset, you have to click on the black circle to see those settings.

If you hold your mouse over the black circle you will see red where the effect is added. Click on the black circle to make adjustments to the settings.

Now you can see the settings for the light effect and also where the gradient is applied. I want to drag this light effect farther to the left so that there is more light falling on his face.


Then I made adjustments to the settings. I added more yellow to the Temp, and also adjusted the Exposure and contrast settings (adding more light) and fine-tuned the Dehaze.
Once you are finished adjusting the light's position, color, contrast, and haze; click Close and the changes are saved.

Now I have my finished image and I love it! You can go back at any time and make more adjustments, just type "M" and click on that black circle to see the settings.
I hope you enjoyed this little Lightroom tutorial.
Do you want to download my favorite CoffeeShop PSE/Photoshop Actions and Lightroom Presets or Design Elements in one convenient zipped file AND help support this blog? Just click here for my action pack or here for a download of some of my most popular design elements, storyboards, and textures.
For complete info on installing all of my actions, click here.
Facebook | Instagram | Pinterest | Twitter


No comments:
Post a Comment
Thank you for taking the time to leave a message, I love reading them! All comments are personally moderated by me and I will post and answer them them as soon as possible.
Rita