


Thursday, September 24
Sunday, September 20
CoffeeShop Blogger UnWrapped: Adding Image Backgrounds
My goal in these Blogger UnWrapped Tutorials is to teach you how to take a plain Blogger Minima template and make it your own. I realize there are tons of free templates and backgrounds out there, but I think it is more fun to do it on your own (without knowing Html or CSS) and I want to teach you some of the tricks I have learned over the last months. Note: I made a special vintage blog background just for my readers, you can find the download at the end of this post!
Today I am going to show you how to add a pretty image background to your Blogger blog using a Html gadget.
Today I am going to show you how to add a pretty image background to your Blogger blog using a Html gadget.
Tuesday, September 15
CoffeeShop Web Storyboard 1 PS/PSE Action and Template!

Here is my newest web storyboard action and template, CoffeeShop Web Storyboard 1! The download includes both a Photoshop and Photoshop Elements action, a .psd template for those of you who don't like actions, and full instructions. You can use this storyboard on your blog/website or print it out.
Download the free CoffeeShop Web Storyboard 1 PS/PSE Action and Template HERE!
Do you want to download thousands of professional CoffeeShop PSE/Photoshop actions (including exclusive ones not found anywhere for free), textures/overlays, scrapbooking papers, clip art/design elements, photo storyboards and frames, and Lightroom presets from this site in one convenient zipped file AND help support this one-woman blog?
Just click here for my CoffeeShop Mega Download Pack!
Friday, September 11
CoffeeShop Editing 101 - Layer Masks
I know that many of my readers recently found my site and are complete beginners in photo-editing. And many people don't really understand layer masks, or why they would ever need to use them. For one thing, you can't add layer masks to many different types of layers in Photoshop Elements PSE5, 6, 7 or 8 (PSE 9 has the layer mask option built in). To solve this problem I have written a free action that allows you to add layer masks to any layer in that program, just like you can in Photoshop CS4. You can download it HERE.
I hope to explain why you should love layer masks in this post. Your main lesson today: Black conceals (fat) and white reveals (fat). The "fat" part was added by me. ;-) My screenshots are from Photoshop Elements, but the same tutorial applies in Photoshop, except you don't need an action but rather can add layer masks by clicking on the little icon on the bottom of your layer pane. Edited to add that PSE9 does have a layer mask button FINALLY so you don't have to use my layer mask action!
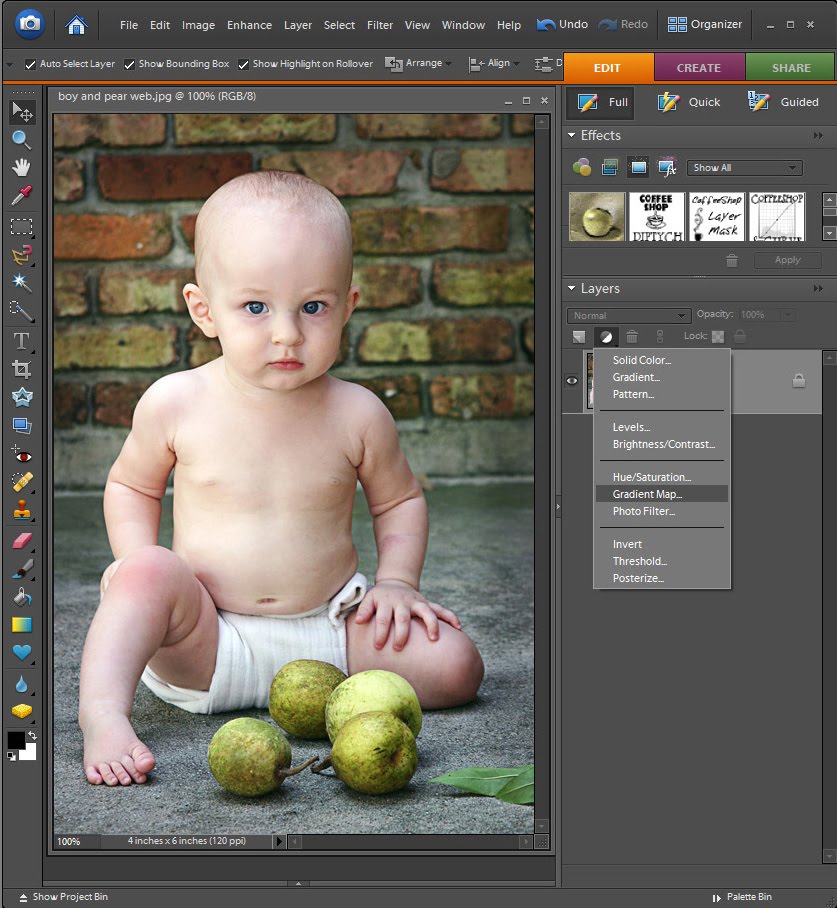
If you add an adjustment layer to your image it automatically has a layer mask built in with the layer. You can see the PSE adjustment layer pop-down menu above.
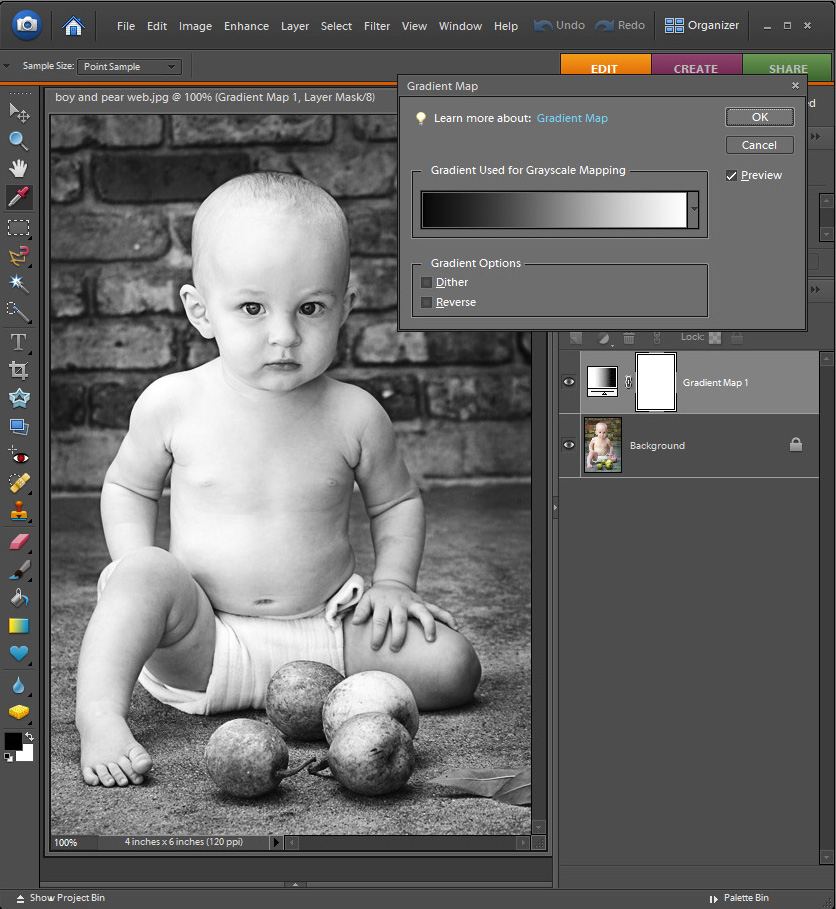
In this case I am adding a black to white Gradient Map adjustment layer. This is a great quick way to turn your image B&W. Make sure that your foreground color is black and your background color is white to get this effect. Notice the white box next to the gradient layer thumbnail in your layer pane. This is your layer mask.
Now I will show you how to use a white layer mask. If the layer mask is white, that means that the effect on that layer is not "masked", or covered up. In other words, the image is B&W because the gradient mask layer is not painted in black. White Reveals, Black Conceals; remember? I want to "paint" back in the pear's colors.
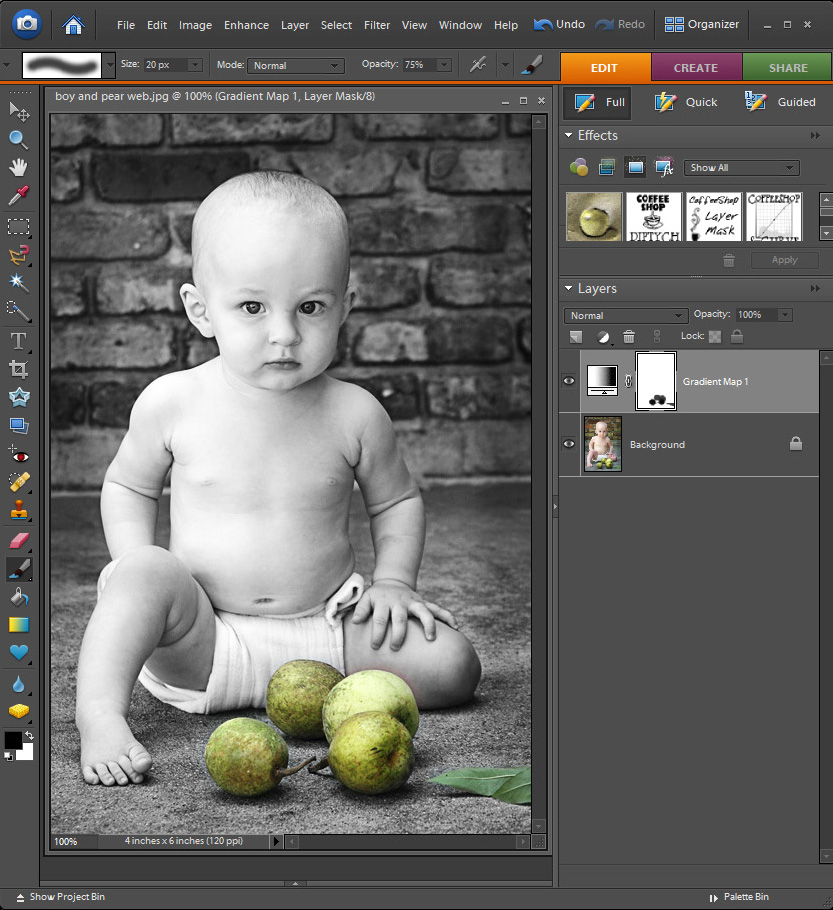
So I then 1. Select the brush tool (B to select), make the brush black (D) 2. Go to the top menu and make my brush soft. 3. Adjust the brush size. 4. Make sure the brush blending mode is set to Normal, and 5. Adjust the brush opacity to taste. In this case I used an opacity of 75% because I did not want my pears to be too bright and colorful. If I used 100% then the original color of the pears will show. You can also use a low opacity brush and rebrush over areas to add more "color".
After selecting my brush tool I clicked on the layer mask to select it and then painted over the pears in my image. If you don't click to select the layer mask you will paint black over your image. You can adjust the size of your brush on the fly by using the [ and ] keys. A soft brush allows your lines to be feathered, but you can switch to a hard brush if you don't want any feathering. If you make a mistake you can switch to a white brush (just change your foreground color to white, press X) and brush over the area you wish to remove color from the image. Notice in the layer mask that you can see black where I painted over the pears. The black "masks" or "conceals" the black to white gradient mask, so wherever I paint black you can't see the effect of that layer. And my pears are now colorful!
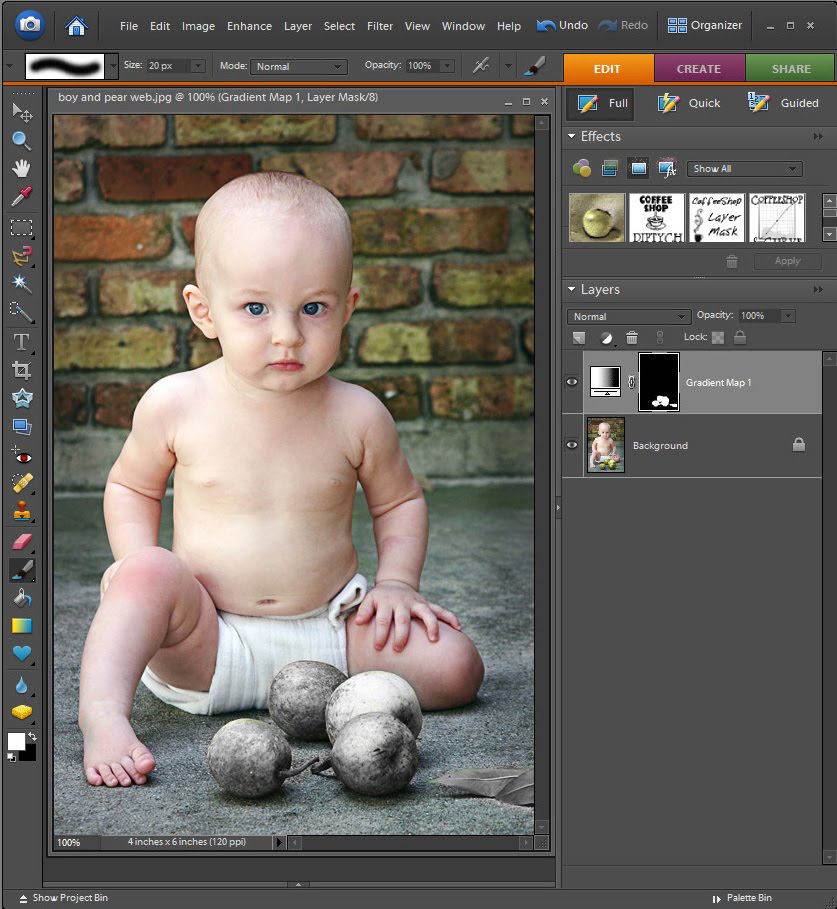
Maybe you want your entire image color and just your pears B&W (well, maybe not, but let me show you anyway!). In this case you want to mask everything but the pears. So click on your layer mask, then Edit, Fill with black and use a soft white brush to paint over the pears. The white "paint" on the black mask reveals that layer's effects on the image. Don't forget to select the mask BEFORE painting over the image!
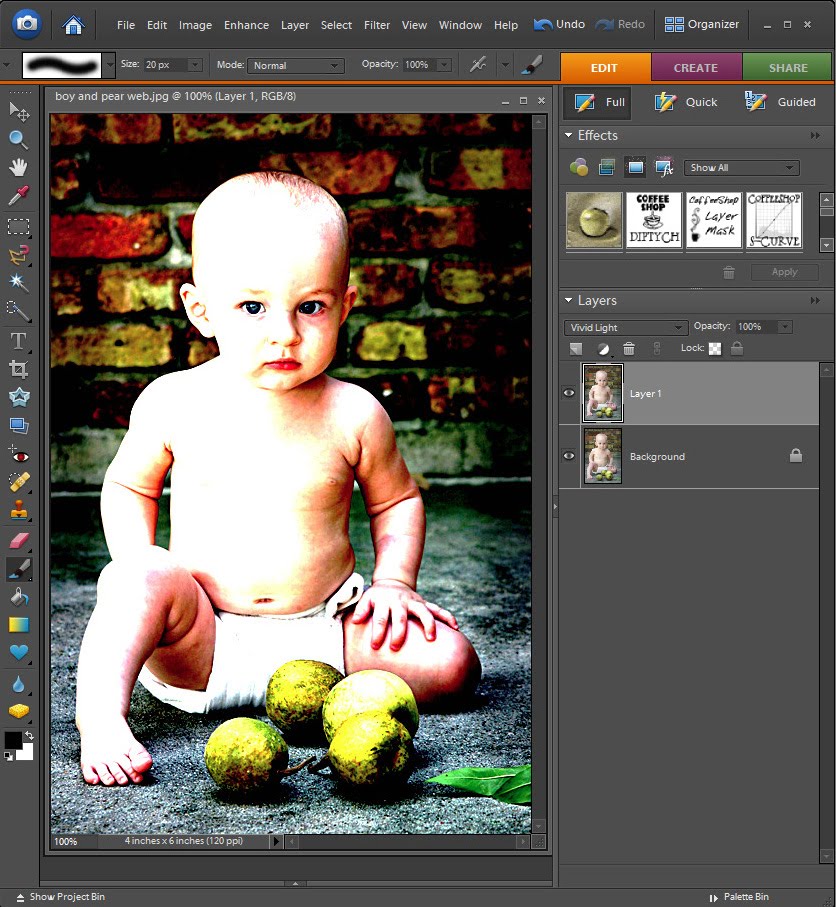
Here is another mask example. I wanted to make the background of this image really contrasty and gritty. I Ctrl-J (made a duplicate) of the background, and put this layer into Vivid Light Blending mode. Yuck, the skin tones of the baby (little Duke years ago) are really horrible. No problem! I will mask out his skin.
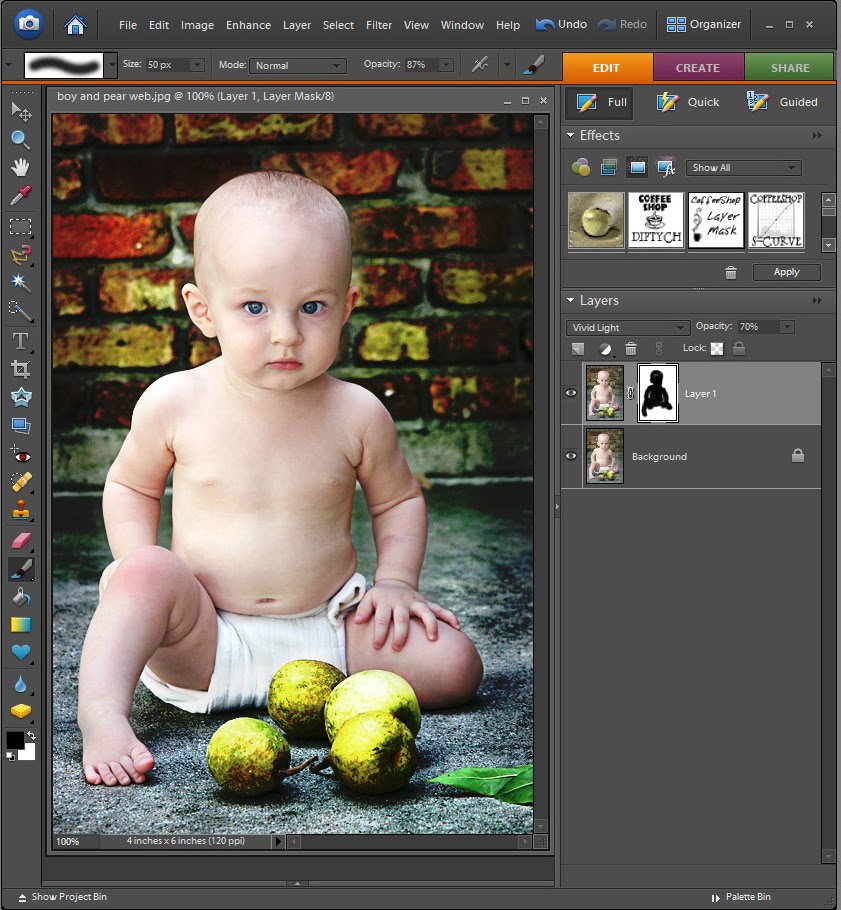
As you can tell Photoshop Elements and Photoshop do not automatically add a layer mask to copied layers. In Photoshop just click on the little layer mask icon on the bottom of the layer pane. If you have Photoshop Elements, download my layer mask action and click on the thumbnail to add a layer mask to that layer (PSE9 does have a layer mask button). Then select your brush, make it black and soft, adjust the brush opacity to taste (I used 87% here), and click to select your layer mask. Then paint over the baby to remove the Vivid Color pop off his skin. Look at my layer mask, see the black baby outline? Black concealed the vivid color pop on his skin.
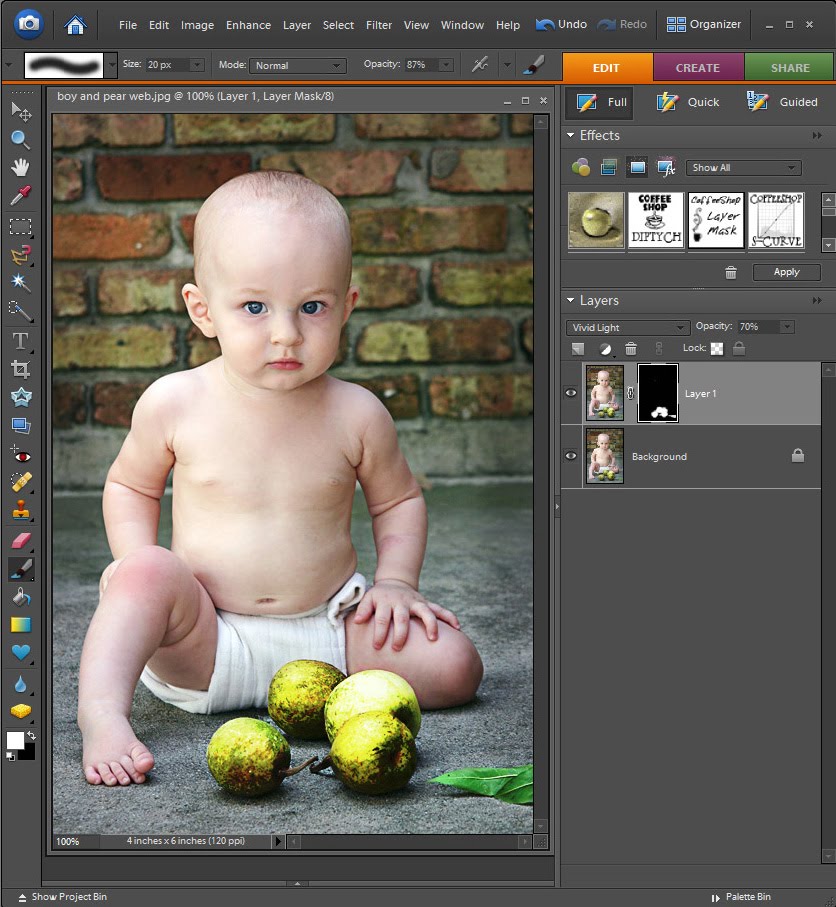
Maybe you just want the Vivid Light pop on the pears. Click on your layer mask, Edit, Fill with black, and use a soft white brush to just paint over the pears in the image. Now the Vivid Light blending mode layer is completely masked by black, except the pears. Notice the white pear outlines in my layer mask. The white paint reveals that layer effect.
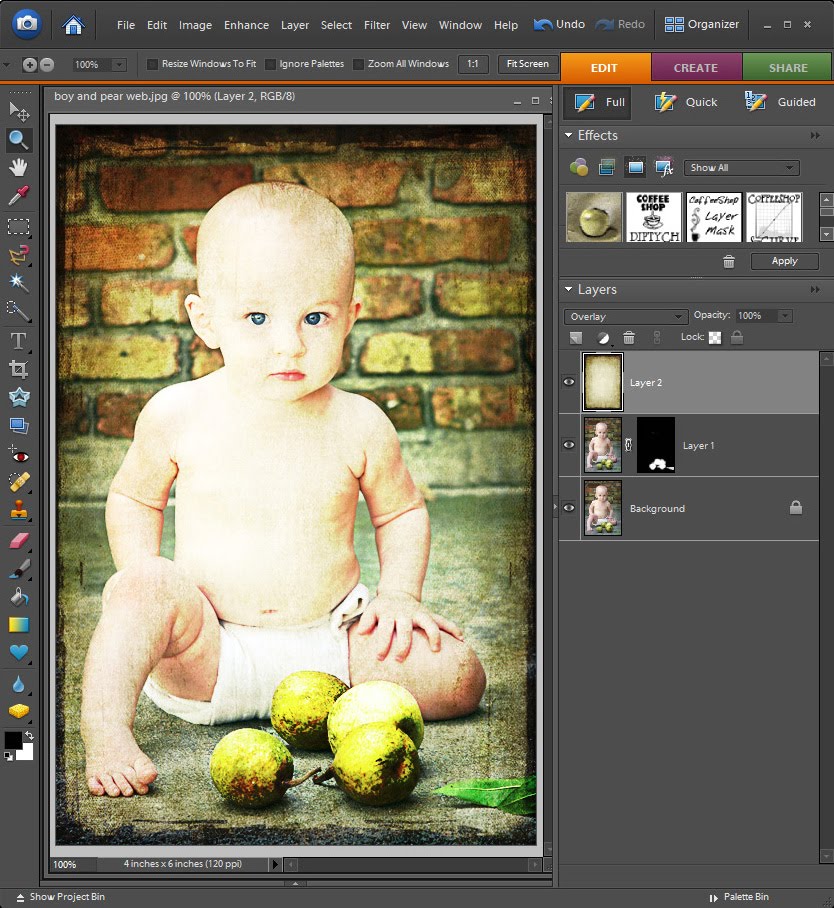
One of the biggest reasons you will use layer masks is for adding textures. I added this lovely Florabella texture to my image, above the Vivid Light blending mode layer and put the texture layer in Overlay blending mode. Now Duke's skin is completely blown! I could lower the opacity of that layer, but then I loose the texture effect over the rest of the image. Time to apply a layer mask!
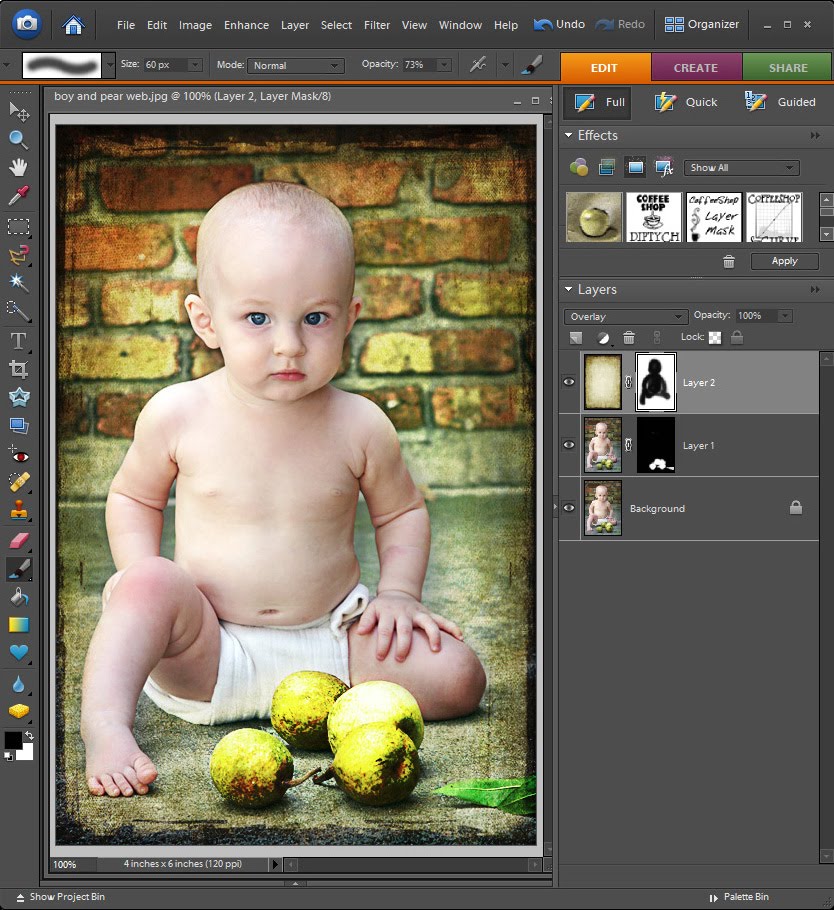
As you can see I added my layer mask, clicked to select it, and then painted over the baby with a soft black 73% opacity brush. Now Duke's skin looks so much better. Look at the two layer masks above. The top texture layer one has the baby painted in black (I removed the texture from the baby by hiding it with black paint) and the bottom Vivid Light layer one has the pears painted in white (to give them a color pop). You can use layer masks on every layer if you want!
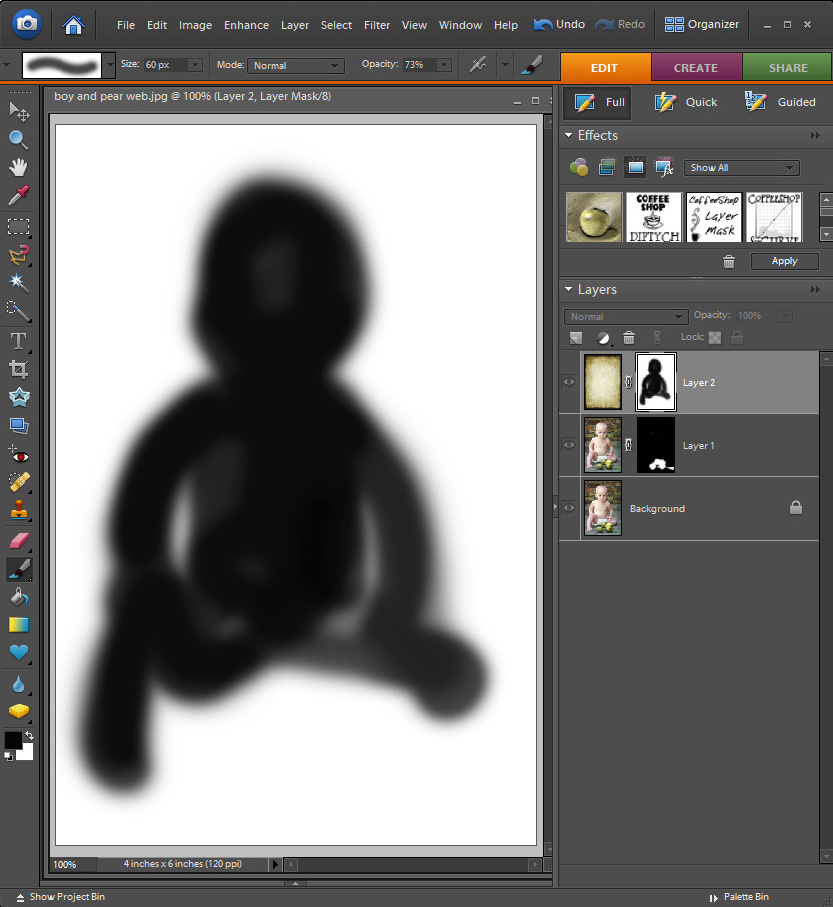
Here is a nifty trick. Atl-Click on the top layer mask with the baby outline and you will see how well I painted in the baby. Atl-Click on the layer mask to return the image to normal. You can also use the keystroke \ to turn this red mask off and on.
Maybe you want to see how well you are masking your image as you paint. Just Shift-Alt (Option)-Click on the layer mask and wherever you paint black on your layer mask will show up red on your image. To remove this red just Shift-Alt-Click back on the layer mask. This is a great method that allows you to touch-up your layer mask. To erase the layer mask where you ran off the image, just switch to a white brush and brush over the areas you wish to remove from the mask.
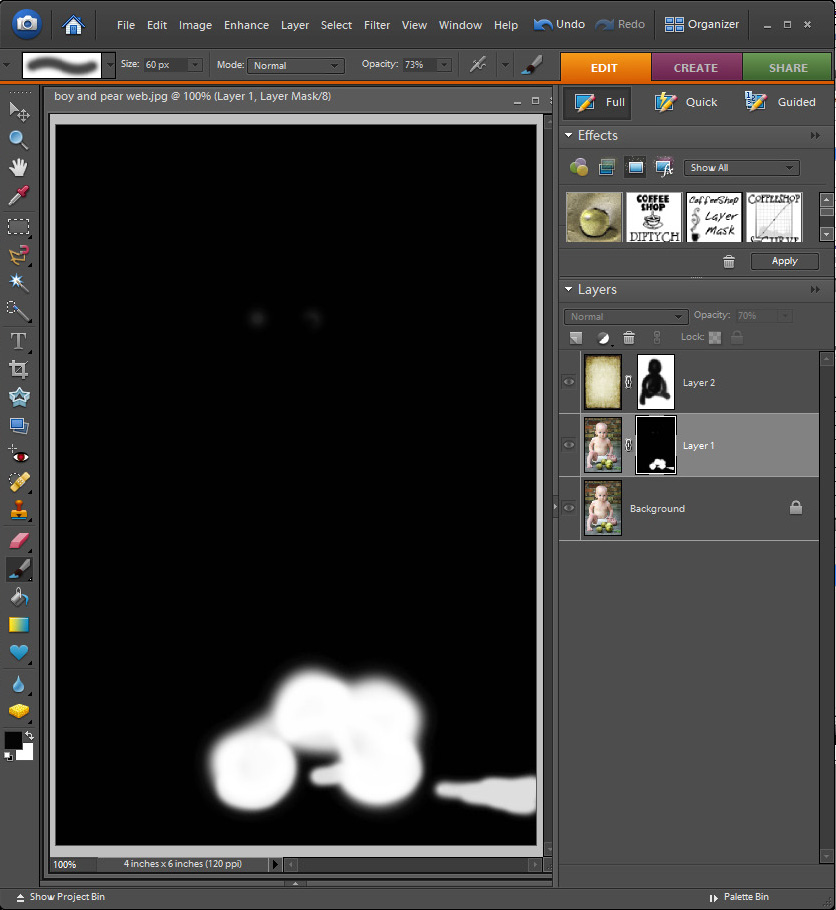
Now click on the lower layer mask with the pears in white. Alt-Click on the layer mask and you can see your pear mask.

Now Shift-Alt-Click on the layer mask and the black part of your mask turns red and the white part over the pears is not red. Now I can touch up my pears masking if I want.
I hope this little tutorial made layer masks a bit more understandable. Once you figure out how to use them you will find yourself playing with them all of the time!
Do you want to download my favorite CoffeeShop PSE/Photoshop Actions and Lightroom Presets or Design Elements in one convenient zipped file AND help support this blog? Just click here for my action pack or here for a download of some of my most popular design elements, storyboards, and textures.
I hope to explain why you should love layer masks in this post. Your main lesson today: Black conceals (fat) and white reveals (fat). The "fat" part was added by me. ;-) My screenshots are from Photoshop Elements, but the same tutorial applies in Photoshop, except you don't need an action but rather can add layer masks by clicking on the little icon on the bottom of your layer pane. Edited to add that PSE9 does have a layer mask button FINALLY so you don't have to use my layer mask action!

If you add an adjustment layer to your image it automatically has a layer mask built in with the layer. You can see the PSE adjustment layer pop-down menu above.

In this case I am adding a black to white Gradient Map adjustment layer. This is a great quick way to turn your image B&W. Make sure that your foreground color is black and your background color is white to get this effect. Notice the white box next to the gradient layer thumbnail in your layer pane. This is your layer mask.

Now I will show you how to use a white layer mask. If the layer mask is white, that means that the effect on that layer is not "masked", or covered up. In other words, the image is B&W because the gradient mask layer is not painted in black. White Reveals, Black Conceals; remember? I want to "paint" back in the pear's colors.
So I then 1. Select the brush tool (B to select), make the brush black (D) 2. Go to the top menu and make my brush soft. 3. Adjust the brush size. 4. Make sure the brush blending mode is set to Normal, and 5. Adjust the brush opacity to taste. In this case I used an opacity of 75% because I did not want my pears to be too bright and colorful. If I used 100% then the original color of the pears will show. You can also use a low opacity brush and rebrush over areas to add more "color".
After selecting my brush tool I clicked on the layer mask to select it and then painted over the pears in my image. If you don't click to select the layer mask you will paint black over your image. You can adjust the size of your brush on the fly by using the [ and ] keys. A soft brush allows your lines to be feathered, but you can switch to a hard brush if you don't want any feathering. If you make a mistake you can switch to a white brush (just change your foreground color to white, press X) and brush over the area you wish to remove color from the image. Notice in the layer mask that you can see black where I painted over the pears. The black "masks" or "conceals" the black to white gradient mask, so wherever I paint black you can't see the effect of that layer. And my pears are now colorful!

Maybe you want your entire image color and just your pears B&W (well, maybe not, but let me show you anyway!). In this case you want to mask everything but the pears. So click on your layer mask, then Edit, Fill with black and use a soft white brush to paint over the pears. The white "paint" on the black mask reveals that layer's effects on the image. Don't forget to select the mask BEFORE painting over the image!

Here is another mask example. I wanted to make the background of this image really contrasty and gritty. I Ctrl-J (made a duplicate) of the background, and put this layer into Vivid Light Blending mode. Yuck, the skin tones of the baby (little Duke years ago) are really horrible. No problem! I will mask out his skin.

As you can tell Photoshop Elements and Photoshop do not automatically add a layer mask to copied layers. In Photoshop just click on the little layer mask icon on the bottom of the layer pane. If you have Photoshop Elements, download my layer mask action and click on the thumbnail to add a layer mask to that layer (PSE9 does have a layer mask button). Then select your brush, make it black and soft, adjust the brush opacity to taste (I used 87% here), and click to select your layer mask. Then paint over the baby to remove the Vivid Color pop off his skin. Look at my layer mask, see the black baby outline? Black concealed the vivid color pop on his skin.

Maybe you just want the Vivid Light pop on the pears. Click on your layer mask, Edit, Fill with black, and use a soft white brush to just paint over the pears in the image. Now the Vivid Light blending mode layer is completely masked by black, except the pears. Notice the white pear outlines in my layer mask. The white paint reveals that layer effect.

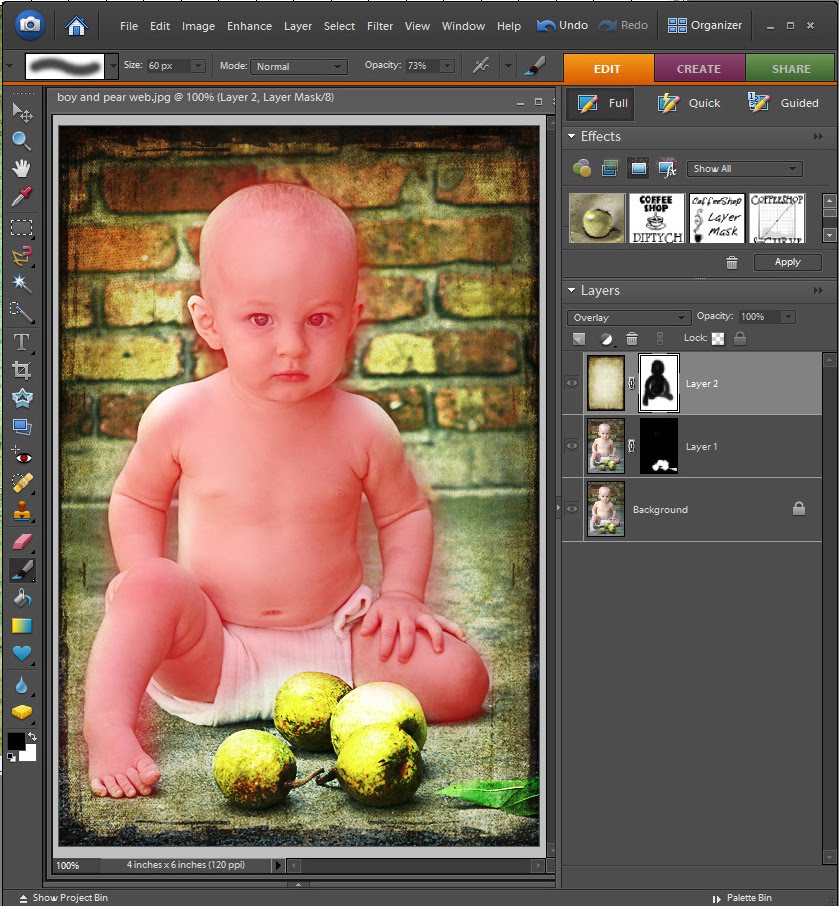
One of the biggest reasons you will use layer masks is for adding textures. I added this lovely Florabella texture to my image, above the Vivid Light blending mode layer and put the texture layer in Overlay blending mode. Now Duke's skin is completely blown! I could lower the opacity of that layer, but then I loose the texture effect over the rest of the image. Time to apply a layer mask!

As you can see I added my layer mask, clicked to select it, and then painted over the baby with a soft black 73% opacity brush. Now Duke's skin looks so much better. Look at the two layer masks above. The top texture layer one has the baby painted in black (I removed the texture from the baby by hiding it with black paint) and the bottom Vivid Light layer one has the pears painted in white (to give them a color pop). You can use layer masks on every layer if you want!

Here is a nifty trick. Atl-Click on the top layer mask with the baby outline and you will see how well I painted in the baby. Atl-Click on the layer mask to return the image to normal. You can also use the keystroke \ to turn this red mask off and on.

Maybe you want to see how well you are masking your image as you paint. Just Shift-Alt (Option)-Click on the layer mask and wherever you paint black on your layer mask will show up red on your image. To remove this red just Shift-Alt-Click back on the layer mask. This is a great method that allows you to touch-up your layer mask. To erase the layer mask where you ran off the image, just switch to a white brush and brush over the areas you wish to remove from the mask.

Now click on the lower layer mask with the pears in white. Alt-Click on the layer mask and you can see your pear mask.

Now Shift-Alt-Click on the layer mask and the black part of your mask turns red and the white part over the pears is not red. Now I can touch up my pears masking if I want.
I hope this little tutorial made layer masks a bit more understandable. Once you figure out how to use them you will find yourself playing with them all of the time!
Do you want to download my favorite CoffeeShop PSE/Photoshop Actions and Lightroom Presets or Design Elements in one convenient zipped file AND help support this blog? Just click here for my action pack or here for a download of some of my most popular design elements, storyboards, and textures.
Thursday, September 10
Win a CoffeeShop Blog Design!
This giveaway is closed!
 Time for another free CoffeeShop Blog Design giveaway, CoffeeShop Pink Dots! This is a premade blog in a shabby-chic style. You will get the background and page dividers, a photoblog template, horizontal menubar, a layered header that you can customize to taste, and full instructions on setting up everything and making future changes! I will change the color of the background if you aren't a "pink" person. :-)
To win this giveaway (note, this design only works on Blogger blogs), just place my button somewhere on your blog or post about CoffeeShop. If you already have my button on your blog just let me know in the comment, that counts! If you don't have a blog yet (so you can't use my button or blog about me) but want to start blogging and love this CoffeeShop Pink Dots design, then please tell me why you want a blog or post about CoffeeShop on your favorite message board (and leave an email or name or link!).
Make sure you link your site and/or email in your comment. And if you already have my button on your blog, that counts!!!
<center> <a href="http://coffeeteaphotography.blogspot.com/"><img src="http://farm4.static.flickr.com/3533/3863947860_4d4fbb4481_o.gif"/> </a> </center>
Wednesday, September 9
Labor Day Weekend In Pictures

Imp enjoying some time at our family waterpark.

NOTE: My husband says this photo makes him look like a naked caged man... He is not naked (he has on shorts) and he is not caged (well, maybe for a few minutes when he was in the cage making adjustments). Just thought I would set the record straight for those of you who had similar thoughts. :-)
My dear husband building a rat/snake proof cage for my broody chicken. You might remember I posted about my little black hen, Blackie, sitting on 11 eggs, due just before my birthday? Well, a few mornings ago I went to the coop to let my little chickens out (they are true free-range chickens) and my little hen was sitting on a different nest, on two golf balls, trembling in fear. Egg shells and dead little baby chicks littered the floor and her old nest box. I suspected a snake and that was confirmed, I thought, the next day when I went to the pen and almost stepped on another 4 foot chicken snake. However, I happened to have found an egg that was covered with poop (not very tasty), so I put that in her old nest the next night to see what would happen. The next day the eggshell was there, with little bite marks in the center and completely drained dry.
So my chick murderer(s) was not a snake, but rats! Oh, I can't imagine how Blackie must have felt being pushed out of her nest box by a crowd of big hungry rats. Now I am thinking I love that chicken snake, because chicken snakes love (to eat) rats. Come on snake, do your job!
So after this disappointment, I tried to keep Blackie off her nest to give her a break, but she was going to hatch something, even if it was a golf ball. My dear husband spent half of a day turning a dog kennel into a snake/rat free zone (that is not easy) and now she is happily living there with 15 (yes, I forgot to mark them for a few days, they are not all her's obviously) eggs. So hopefully Sept. 26th or so we will have some new little babies, unless the snakes/mice/rats/dogs/cats/aliens eat them... :-)

While EyeGuy (my husband) was cutting his delicate hands up building a broody hen cage, Duke and I made homemade soft Auntie Anne's KnockOff Cinnamon Sugar pretzels. Oh, they were the best, you can find the recipe here. I did make a few changes. I used my bread machine on dough cycle to make/raise the dough (I am lazy), replaced 2 cups of the white bread flour with 100% wheat flour, and made pretzel sticks rather than pretzel pretzels. Duke and I found sticks easier.
OMGosh, they were delicious! My husband, who usually hates when I sneak in wheat flour in my baking, told me these were better than the mall ones (that is a compliment, believe me) and Duke confirmed it. I know Duke is honest because the other day we had Middle Eastern food and he told me that my homemade hummus was not very good, but this restaurant's hummus was the best he had ever eaten!
Little Imp especially loved these and I left to go clean up inside and he took a break from his waterpark fun and ate 4 of them. I asked EyeGuy why he didn't say anything to stop the little guy, and he mumbled that he was too busy building my cage to notice. Can't argue with that.
Did I mention he spent the rest of Monday building an Ikea bunk bed for the boys and they are both sleeping on it tonight. I usually hate to shop at Ikea (the crowds, the long winding 10 mile trail to get a wine glass, the huge lines to check out), but this bunk bed is the absolute best. Duke has a double bed and Imp has been sleeping on a twin mattress on the floor since he was one. This bed is for smaller kids and the bottom bunk is just a mattress on the floor, so the perfect little cave for little boys. They had a pile of books in there today, reading. I love my kids... I have banned TV in our house (for the kids only of course) unless they are really sick or it is horrible weather outside. It is so hard to stick to that ban, but they are so much nicer if they don't watch TV, even Nogin. TV makes them grouchy(ier). How Max and Ruby or Little Bear can give you a bad attitude, I haven't a clue, but it does my boys.
It is a story of a chicken and the little girl who always has a million unfinished projects going on and neglects it. My husband read it and told me I am just like the girl Mae (except I don't neglect my chickens, they are a bit spoiled). I always start these new projects, almost finish them, and then move on to something new that interests me. Like painting the laundry room, doing embroidery, editing my family pics, etc., you get the picture. :-)
I have another CoffeeShop 101 tutorial coming out in a day or two and a few more actions and other fun things so keep on visiting! Thanks again for making blogging fun. :-)
Monday, September 7
CoffeeShop Web Diptych 2 PS/PSE Action and Template!

Here is another Diptych web storyboard action for you Photoshop CS and Photoshop Elements users! This download also includes the .psd template if you would rather not use an action, and full instructions. If you don't want to use this storyboard on the web, you can also print it.
CoffeeShop Web Diptych 2 PS/PSE Action Instructions
Note: I have also included a .psd template with clipping masks for those of you who don't want to use an action. Just open this like any other image, and follow my clipping mask tutorial.
1. Load action (.atn file) and thumbnails (.psd for PSE5, .png for PSE6 and PSE10) if you have PSE. If you have PSE, make sure you have a random image open before starting the action (it won't work otherwise). The action will close the random image and start building the storyboard. If you have Photoshop, start the action without any images open.
2. The action will build the storyboard and prompt you to load the left-side image. Then it will prompt you to free-transform the image to fit in the cutout. If you can't see the free-transform bars, click on Ctrl-0 (that is zero) to expand the view so you can easily adjust the image to fit. Hold down the shift key (in Photoshop) or make sure "Constrain Proportions" is checked (in PSE) so your image does not warp.
3. The second image will load on the right; follow the direction in step 2 to make it fit.
4. Finally, the action will prompt you to enter the final desired image width in pixels. Enter the width only, the height will automatically adjust. For example, I crop my storyboards 600px wide so they fit the middle column of the CoffeeShop blog. Keep the image size as is if you wish to print this storyboard.
5. After the action is finished you can move around and transform the images to make final adjustments. Then flatten and upload to your favorite website/blog.
6. The Photoshop action will close all of the images you loaded into the storyboard. The PSE action does not (it crashes the program).
Download the free CoffeeShop Web Diptych 2 PS/PSE Action and Template HERE!
Do you want to download thousands of professional CoffeeShop PSE/Photoshop actions (including exclusive ones not found anywhere for free), textures/overlays, scrapbooking papers, clip art/design elements, photo storyboards and frames, and Lightroom presets from this site in one convenient zipped file AND help support this one-woman blog?
Just click here for my CoffeeShop Mega Download Pack!
Friday, September 4
CoffeeShop Editing 101: S-Curve Pop PS/PSE Action and UnWrapped Tutorial!

As you know I love Photoshop Elements. Most photographers don't need to invest in its big expensive sister Photoshop CS4 unless they have extra money burning a hole in their pocket or have to process a large amount of images professionally. But PSE unfortunately does have a few things missing that I love to use, such as Layer Masks (download my free PSE layer mask action HERE) and the original Photoshop Curves. However, you can still use PSE curves to get a nice "pop" in your images.
For example, you might have heard people talk about applying a small S-Curve adjustment layer to their image to give it a slight "pop", or contrast enhancement. You can see in the image below the settings for a slight S-Curve.

If you want a nice subtle contrast boost, this is a great setting. Photoshop users, add a Curves adjustment layer and make your RGB look similar to the one above. And even though PSE users can't access the real Photoshop Curves, you can use your version. Go to Enhance, Adjust color, Adjust color curves and make your curve look similar to the image above.
I have written an action that applies it on a copy of your image (Photoshop users can also use this) if you want to save some time. Just run the action and adjust the opacity of the S-Curve Pop layer to taste and flatten your image. I even added a layer mask on the S-Curve Pop layer (great for PSE users as you can't mask out your PSE curves because it is not an adjustment layer, unless you download my free layer mask action and make a duplicate of your image) so you can mask out the effect where needed (skin?) by using a soft low opacity black brush in the mask.
I love subtle ways to pop my color and B&W images, and using a simple S-Curve is one of the best I know.
Download the CoffeeShop S-Curve Pop PS/PSE Action HERE!
Do you want to download thousands of professional CoffeeShop PSE/Photoshop actions (including exclusive ones not found anywhere for free), textures/overlays, scrapbooking papers, clip art/design elements, photo storyboards and frames, and Lightroom presets from this site in one convenient zipped file AND help support this one-woman blog?
Just click here for my CoffeeShop Mega Download Pack!
Tuesday, September 1
CoffeeShop Vintage Honey PS/PSE Action and Action UnWrapped!

This month I will be celebrating my birthday (it's one of those landmark ones), and I decided that this birthday would be celebrated from Sept. 1st to Sept. 30th. That means extra chocolate and coffee, going out to eat a few more times than normal, extra back rubs from my dear old husband, and a bit more slacking off than normal. So happy birthday to me!!!
Now I know all of you want to get me a gift, so I have made my short list: Canon EOS Rebel T1i 15.1 MP CMOS Digital SLR Camera with 3-Inch LCD (Body Only)
Now, on to my actual post. I was playing around trying to get a honeyed vintage effect and I hit upon one I really like. After running this action play around with the opacity of any of the layers for different effects. If you want to download the action click on the link at the bottom of this post. For those of you who want a step-by-step tutorial so you can do this on your own, please read the CoffeeShop Vintage Honey UnWrapped tutorial below.
CoffeeShop Vintage Honey UnWrapped!
1. Color Fade Layer: Add a gradient map adjustment layer, black to white. This turns your image B&W. Adjust the opacity to fade the color but not completely remove it. For the image above it was set to 40%.
2. Purple Color Fill Layer: Add a color fill adjustment layer and put #4d1c5d in the bottom space. Put this layer in Screen blending mode and adjust opacity to taste (I used 100%).
3. Yellow Color Fill Layer: Add a color fill adjustment layer and put #faec0a in the bottom space. Put this layer in Color blending mode and adjust opacity to taste (I used 15%).
4. Ivory Color Fill Layer: Add a color fill adjustment layer and put #fdfceb in the bottom space. Put this layer in Normal blending mode and adjust opacity to taste (I used 10%).
5. Bright Blue Color Fill Layer: Add a color fill adjustment layer and put #0f1977 in the bottom space. Put this layer in Exclusion blending mode and adjust opacity to taste (I used 25%).
Download CoffeeShop Vintage Honey PS/PSE Action HERE!
Do you want to download thousands of professional CoffeeShop PSE/Photoshop actions (including exclusive ones not found anywhere for free), textures/overlays, scrapbooking papers, clip art/design elements, photo storyboards and frames, and Lightroom presets from this site in one convenient zipped file AND help support this one-woman blog?
Just click here for my CoffeeShop Mega Download Pack!
Subscribe to:
Posts (Atom)


