


My poor little 6-year-old has the flu and I really feel sorry for him. He has been sleeping with us so I can keep an eye on his temperature, and last night around 2 am it spiked up to 104.4! I have never seen such a high temperature in my boys. Thank goodness with the help of some tylenol and a cool washcloth wipe-down we got it down to a more manageable level in about 20 minutes.
Today my husband and I feel bad (and we are watching Duke), so whether we are coming down with the flu or it is psychosomatic, I don't know yet. My husband is playing Monopoly with the boys (the never-ending game!) so I had some time to finish my newest action, CoffeeShop Luminous. I have also posted a step-by-step tutorial if you want to learn some editing tricks.
CoffeeShop Luminous Action Tutorial:
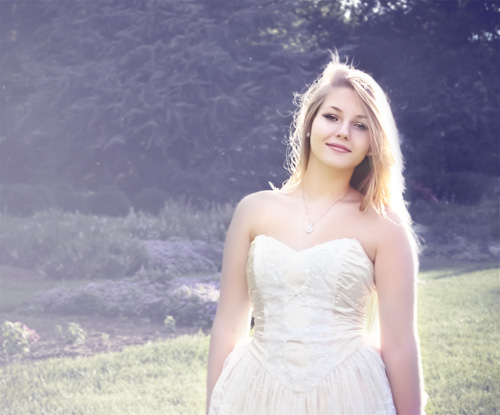
I am using a beautiful image from Photography by Ziza & Lara for this action tutorial.

1. Open your image and run the action. Adjust the surface blur to taste to soften the background and the high pass filter to add definition. In this edit I made no adjustments and kept the surface blur/high pass filter settings as they were entered in the action.

2. After the action runs your image will look frightening and you will have to paint on layer masks and adjust opacities of layers to make it pretty. I will start with the Soften Background layer and work my way up.

3. Soften Background: Use a soft black 100% opacity brush and paint over the areas in your image you don't want softened. I painted over the girl and left the background alone.

4. Define: To add definition to eyes, hair, and clothing use a soft white 100% opacity brush and paint over the face, hair, and dress.

5. Mute Color: Use a soft black brush at low to middle opacity to add back color to the portrait where needed (skin, hair, dress, etc).

6. Dreamy Hazy: You can add a new black-to-white gradient mask to the Dreamy Hazy layer if needed (see tutorial for guide). I used a soft black brush at low opacity to remove some of the haze from her face.

7. Matte: Adjust this layer's opacity to taste. I kept it at 100%.
Tint: I used a soft low opacity black brush (around 30%) and removed some of the bluish-tint from her skin.

8. Skin Contrast Pop: As a final step, I used a 100% soft white brush to add contrast to her skin and hair and a 50% soft white brush to add some contrast to her dress. This really makes your image pop.
Like most of my more advanced artistic actions, you will have to play with the layers for your own images. And as you can see, the results can be stunning. Have fun playing!
Mouse over to see the before.
Download the free CoffeeShop Luminous Photoshop/PSE action! You can also download it here.
Do you want to download my favorite CoffeeShop PSE/Photoshop Actions (including this one) and Lightroom Presets or Design Elements in one convenient zipped file AND help support this blog? Just click here for my action pack or here for a download of some of my most popular design elements, storyboards, and textures. A special perk for Photoshop and PSE11-12 users, the actions also come in one simple action group which makes loading them super fast and easy. :-)
For complete info on installing all of my actions, click here.


Thank you Rita and hope your son gets better soon. Oh also hope you guys don't get sick either.
ReplyDeleteThank you so much. Can't wait to try it out.
ReplyDelete