

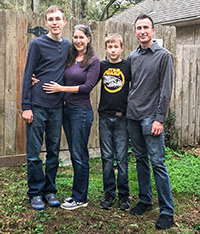
So today it is hot and the boys are painting their masterpieces and I decided to post a new free action and tutorial. I hope you enjoy this one!


Tutorial
1. Open your image in Photoshop or Photoshop Elements.
2. Soft Haze layer: Add a solid color adjustment layer in ivory (hex#fcfbe5), normal blending mode, opacity 15%.
3. Lighten layer: Add a levels adjustment layer and move the gamma (middle) slider from 1.0 to 1.2.
4. Add a gradient map adjustment layer with forground color pink (hex#a6215a) to background color light blue (hex#b2d8f2). Put this layer in soft light blending mode.
5. Color Mute layer: Add a black to white gradient map adjustment layer in normal mode and adjust the opacity to taste (start with 10% or so).
6. Vintage layer: Add a dark blue (hex#021276) solid color adjustment layer and put it in exclusion blending mode, 40% opacity.
7. Add texture for additional enhancement! For my sample in my "ad" I added this free texture from ShadowHouse Creations just above the background layer (I desaturated it first so it wouldn't change any of my colors) in linear light blending mode, 40% opacity.
8. Adjust all layers to taste!
You can also download the free CoffeeShop Simply Vintage action here!
Want all of my favorite CoffeeShop Actions or Design Elements in one simple download AND help support this blog? Just click here for my action pack or here for a download of some of my most popular design elements, storyboards, and textures. For complete info on installing all of my actions, click here.


Lovely! Thank you!
ReplyDeleteLove it... Your actions are the BEST! They are so much appreciated!
ReplyDeletethank you so much for deconstructing these actions for those of us (me) who are actionally challenged.
ReplyDeletecindy
Thank you Rita....for both the action and the tutorial.
ReplyDeletethanks so much!
ReplyDeleteLove this! Played around with a few photos. Here's my favorite:
ReplyDeletehttp://www.flickr.com/photos/momof3txvakids/4662283808/sizes/l/
Leigh, that looks great! And thanks everyone, glad you like it. :-) Rita
ReplyDeleteJust a quick note to let you know that a link to this post will be placed on CraftCrave today [02 Jun 02:00pm GMT]. Thanks, Maria
ReplyDeleteLovely,lovely, I love how you make things easier for us "DUH" folks.
ReplyDeleteO' come on people, I'm not the only one, so no hate mail. LOL!
I'm still not sure if you're Wonder Woman or Super Girl, maybe a little of both.
Hugs
Very nice!!! Thank you!!!
ReplyDeleteFantastic! I think this is my new favorite action! Thank you BUNCHES AND BUNCHES!
ReplyDeleteHi Rita, just wanted to tell you how much I (too) appreciate your freebies! You are soooo generous! So thanks, thanks, thanks!
ReplyDeleteUsed your simply vintage tutorial here: http://www.flickr.com/photos/jinterwas/4666326850/
Looking forward to every new post :) !!
Kind regards!
I'm excited to try this! Thank you! This is probably a "duh" question, but how do you desaturate a photo, like you did the texture in the example? Is it something different than converting it to black and white?
ReplyDeleteThis looks awesome! I can't wait to try it out!
ReplyDeleteBeautiful! Thanks for sharing!
ReplyDeleteGosh! I did everything it says to do for a mac and cannot get it to work. When I go into elelments there is no status box saying anything. :( Any ideas?
ReplyDeleteThanks for taking the time to share PS. For years I've been wanting to take a class to learn more. Your postings are helping me grow and learn each day. I'm enjoying this as a hobby and I look forward to your future postings. Keep up the good work. Thanks for making a difference.
ReplyDeleteI love your hard work! How do I download the texture you used from . Shadowhouse creations? I went to the site and flickr and am so lost. Can you tell I am new at this? Thank you
ReplyDeleteLisa, the textures are just image files, so simply click on the download links on Jerry's site and follow the direction to download the textures.
ReplyDeleteIn Flickr, click on the textures then click on Actions, show all sizes then download the size you want. :-)
Rita
Thanks for sharing your actions Rita! I've learnt so much about them just from reading your instructions. Used this one here:
ReplyDeletehttp://photographybyshahanara.tumblr.com/post/790623306/model-mike-wardrobe-styling-mike-and-me
I absolutely love all of your stuff but i cant seem to download any of your actions, I think that I may be download-ably challenged! HELP! You can send me an email if you would like: mandafrances13@gmail.com. I have followed all the steps and still cant get them to come up. I have PSE 8! Thanks!
ReplyDeleteCan anyone explain to be how I get the texture from the site to my PSE? I clicked download on it but it just takes to the picture and I can't figure out what to do from there.
ReplyDeleteWhat is the texture called?
ReplyDeleteThank you for your generosity in sharing your action and information!
ReplyDeleteI Can't get this download to work. :( Any advice on how to get it?
ReplyDeleteI used the same settings on my video it looks amazing thank you very much
ReplyDeleteYou are so welcome Conrad!
DeleteThanks for another great action and tutorial Rita and also the link to the texture you used. I love Jerry's work--in fact I think I originally found him through you.
ReplyDeleteLisa D.