


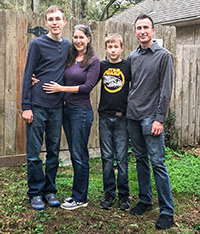
You might remember this "before" photo. I ran the CoffeeShop Butterscotch Vintage action on it. But I think it needs a bit more. Make sure you flatten your image after you run the action! So I went and grabbed the free Old Film TTV texture from Shadowhouse Creations.

Just open the texture. Select your move tool (V) and ... click on the texture and drag it on top of your image.
Now you need to free transform (Ctrl-T) it to fit. You probably won't want to hold down shift (in Photoshop) or have Constrain Proportions checked (Photoshop Elements) because you will want to fit the texture to taste.

I put the texture layer in Multiply blending mode, 30% opacity. These percentages and blending modes are only examples, you need to play to find the best settings for your image.

I Ctrl-J (made a duplicate of the texture layer) and put it in Overlay blending mode (this a great method to add "pop"), 75% opacity, to add some more contrast.

I found the image a bit too dark for my taste, so I clicked on the background layer, Ctrl-J to duplicate it, put it in Screen blending mode (great setting to increase the midtones), 50% opacity. You can see my before/after below!

It is a subtle difference, but you don't always want people to look at your images and see TEXTURE and then the subject of your photo.
If you have any questions, please post them them in my CoffeeShop Flickr Group! And for complete info on installing all of my actions, click here!


Thank you! Your blog post will be advertised on the DigiFree Tutorials search engine today (look for timestamp: 10 Dec [LA 04:24pm, NY 07:24pm] - 11 Dec [UK 12:24am, OZ 11:24am] ).
ReplyDeleteRita, what lense did you use for this picture?
ReplyDeleteWhere do I save my "Textures" files to? I understand downloading the "actions" files and resetting the metadata file... but i'm not sure where to save/load the texture files?!?!!
ReplyDeleteDid the "Household Diva 6" find an answer other question? I would like to know the answer too. Thanks!
ReplyDeleteOpen the textures like a photo. :-)
ReplyDeleteThank you for this tutorial, Rita! I do some graphic design for a nonprofit (Community for Youth in Seattle) and just used this tutorial to give an auction catalog a more vintage feel.
ReplyDelete